Recently in Photography

  Page 159 of 382 in Photography  

eye-fi-mobi-receiver.jpg

The Eye-Fi Mobi is already one of my favorite WiFi-enabled memory cards. With the recent addition of Desktop Receiver, it's become even more interesting.

Versions of the beta software are available for both Mac and Windows platforms. When enabled, you computer goes into "listening mode," on the lookout for images available from the Mobi card. If you take a picture, the file is transferred to a folder.

In my tests with the Fujifilm X20 compact, which doesn't have built-in WiFi, the process worked smoothly. I shot Raw+Jpeg. The Jpegs were copied to my Mac and the Raws remained intact in the camera.

One thing to keep in mind about the beta software: if you also use the Mobi card to send images to your mobile device, be sure to exit the software on your computer first. My experience was that the iPad couldn't recognize the Mobi when Desktop Receiver was active.

You can download the beta software for free from the Eye-Fi Labs site. There's also a handy FAQ there that handles the most common questions.

For me, this capability will be handy for blogging. I can shoot a subject and have it appear immediately on my computer for posting. What about you? If you have an Eye-Fi Mobi, give this software a spin and see where it takes you.


Join me on my Instagram site as I explore the world of mobile photography. And now Instagram features 15-second movies too.

Want to Comment on this Post?

You can share your thoughts at the TDS Facebook page, where I'll post this story for discussion.

fujifilm-x20-bw-mode.jpg

I carry the Fujifilm X-20 compact in my camera bag, set to RAW+Jpeg with the Film Simulation mode on B&W with yellow filter. Why?

By doing so, I'm always set to shoot B&W. The monochrome images look great on the LCD when I frame the shot, and while reviewing the images too. I use the X-20 for this because Fujifilm really has film simulation down to a science.

As a safety net, I'm capturing Raw too. When I import the images into Aperture, I enable Raw+Jpeg Pairs (in the import dialog box), then select: "Both (Separate Originals)." By doing so, I get all of those wonderful monochrome Jpegs plus the master Raw files. I tend to separate them into their respective albums.

I typically use the B&Ws going forward. But if I need those Raw files, it's good to have 'em.

Aperture Tips and Techniques

To learn more about Aperture, check out my Aperture 3.3 Essential Training (2012) on lynda.com. Also, take a look at our Aperture 3 Learning Center. Tons of free content about how to get the most out of Aperture.


The Digital Story on Facebook -- discussion, outstanding images from the TDS community, and inside information. Join our celebration of great photography!


olympus-14-42-pancake-zoom.jpg

Very few lenses give us everything we want. And the clever Olympus 14-42mm f3.5-5.6 EZ zoom ($349) is no exception.

On the plus side you get a very compact, handsome power zoom that's quiet with auto-on and an accessory auto lens cap. The optic focuses quickly and accurately. It's the perfect choice for quick-draw candids. What you give up is some edge sharpness with a dash of color fringing on contrasty lines.

My definitive test for this zoom was photographing a landscape under ideal conditions, with favorable camera settings. The image below was recorded mid-morning after a storm. I used the "Low ISO" setting on the Olympus OM-D E-M10 and captured in both RAW and Jpeg Fine. (You can download the full size version on Flickr and study the image yourself.)

Petaluma Countryside

I used a mid-range focal length (21mm) on the 14-42mm zoom at f/5.6, 1/640th of a second. I processed the RAW file in Olympus Viewer 3 and the Jpeg in Aperture 3.5. (This version is from the RAW file.)

During RAW processing I removed the slight color fringing on the white fence (had to magnify to even see it) in Olympus Viewer. I also made a few tonal adjustments.

processing-raw-olympus-viewer3.jpg

I then made a 13" x 19" print on Red River Paper UltraPro Gloss 2.0 with the Epson R2000. I like to make prints when evaluating lenses. To me, it feels like the "real world" test.

The image looked good through all phases of production on the computer. I had to magnify to see the flaws, notably the color fringing on the white fence. I did detect the sharpness falloff on the edges when viewing the image on my MacBook Pro Retina Display. But it was easier for me to draw my final conclusions by studying the 13" x 19" print.

The Bottom Line

The Olympus 14-42mm f3.5-5.6 EZ zoom is the standard lens that I keep mounted on the Olympus OM-D E-M10. It reacts quickly when I power up the camera, so it's well-suited for grabbing a quick shot. The quiet power zoom is easy to use and helpful for video recording.

But when it's time for more serious landscape work or architecture, I recommend switching to one of the excellent primes by Olympus or Panasonic. Even at f/5.6 on the 14-42mm, the edges are not as sharp as the center. And the color fringing, which can be removed in post, still appears on hard edges in bright areas.

The Olympus 14-42mm EZ zoom is a marvel of engineering: compact, quiet, with lots of features. It will help you capture images that you may have otherwise missed with a more traditional optic. But when it's time for the best edge-to-edge sharpness, switch to a prime.


Nimble Photographer Logo

The 14-42mm has a high Nimbleosity Rating. What does that mean? You can learn about Nimbleosity and more by visiting TheNimblePhotographer.com.

Want to Comment on this Post?

You can share your thoughts at the TDS Facebook page, where I'll post this story for discussion.

For the Feb. 2014 Photo Assignment, TDS shooters used the camera that's "always with you." See for yourself in our gallery, Smartphone. And which one will be the SizzlPix Photo Assignment Pick of the Month?

david-blanchard-feb14-pa.jpg

TDS photographer David Blanchard captured this image of "the big hand" in Santa Rosa while waiting to meet other members of the Fine Art Workshop for dinner. David used HDR Pro on his iPhone. See all of the great images from this month's assignment by visiting the Smartphone.


Participate in This Month's Assignment

The April 2014 assignment is "Flower Power." Details can be found on the Member Participation page. Deadline is April 30, 2014. No limit on image size submitted.

Please follow the instructions carefully for labeling the subject line of the email for your submission. It's easy to lose these in the pile of mail if not labeled correctly. For example, the subject line for this month's assignment should be: "Photo Assignment: April 2014." Also, if you can, please don't strip out the metadata. And feel free to add any IPTC data you wish (These fields in particular: Caption, Credit, Copyright, Byline), I use that for the caption info.

Gallery posting is one month behind the deadline. So I'm posting Feb. 2014 at the end of March, the March. gallery will be posted at the end of April, and on and on.

Good luck with your April assignment, and congratulations to all of the fine contributors for February.


Want to Comment on this Post?

You can share your thoughts at the TDS Facebook page, where I'll post this story for discussion.


iPad for Digital Photographers

If you love mobile photography like I do, then you'll enjoy iPad for Digital Photographers-- now available in print, Kindle, and iBooks versions.

This week on The Digital Story photography podcast: How Memory Cards Work; FrankenPod: the Joby Ballhead X on the MeFOTO DayTrip Tripod; and the 10000 dpi film scanner - All of this and more on today's show with Derrick Story.

Story #1 - The Weekly Update: Canon Reveals Plans for a Full Frame Sensor Smartphone. You thought Sony did the impossible with a large sensor compact camera. Well Canon has revealed that they are jumping on the mobile device bandwagon in a big way with a full frame sensor smartphone. Source: April Fools!

In other news, Olympus brings PEN style and 5-axis IS to Stylus SH-1 travel zoom. It looks like a PEN, but it's really a $399 compact camera. (DP Review).

And finally, Reflecta's New 35mm Scanner Promises Unprecedented Resolution. German manufacturer Reflecta has a new 35mm film scanner with a nominal resolution of up to 10.000 dpi, which is higher than anything you'll find on other consumer film scanners. In addition, the ProScan 10T promises a very high dynamic range of 3.9 DMax, which should be sufficient even for scanning such dense slide films as Velvia 50. Est. cost $650 US. (The Phoblographer).

Story #2 - How Memory Cards Work - We use them everyday, but do you know how your card manages its files? I'll cover erasing and formatting in this second segment.

mefoto-daytrip-joby-ballhead-x.jpg

Story #3 - The Nimbleosity Report - The MeFOTO DayTrip Tripod ($119) with the Joby Ballhead X. This super compact tripod weighs only 1.8 pounds and folds to 9.4". Combined with Ballhead X and the SideKick360, you have a versatile tripod solution for both cameras and smartphones. Does it belong in your Nimble Photographer bag? I'll tell you what I think in the third story.

Virtual Camera Club News

Workshop News: The Sonoma Coast Photography Workshop is scheduled for August 22-24, 2014. And the dates are set for the Fall Color with Safari West Workshop, October 24-26, 2014. You can learn about them both, plus request a reservation form by visiting the TDS Workshops Page and using the "Send Me Info" box.

Photo Assignment for April 2014 is "Flower Power".

If you haven't done so already, please post a review for The Digital Story Podcast in iTunes.

BTW: If you're ordering through B&H or Amazon, please click on the respective ad tile under the Products header in the box half way down the 2nd column on thedigitalstory.com. That helps support the site.

Listen to the Podcast

In addition to subscribing in iTunes, you can also download the podcast file here (32 minutes). You can support this podcast by purchasing the TDS iPhone App for only $2.99 from the Apple App Store.

More Ways to Participate

Want to share photos and talk with other members in our virtual camera club? Check out our Flickr Public Group. And from those images, I choose the TDS Member Photo of the Day.

Podcast Sponsors

Red River Paper -- Keep up with the world of inkjet printing, and win free paper, by liking Red River Paper on Facebook.

SizzlPix! - High resolution output for your photography. You've never seen your imagery look so good. SizzlPix.com. SizzlPix! now is qualified for PayPal "Bill Me Later," No payments, No interest for up to 6 months, which means, have your SizzlPix! now, and pay nothing until August!

Want to Comment on this Post?

You can share your thoughts at the TDS Facebook page, where I'll post this story for discussion.

Handy Photo for iPad Image Editing

handy-photo-tools.jpg

One of the apps that generated chatter at the recent Macworld/iWorld event was Handy Photo for iOS ($1.99). And for good reason. This image editor is chock-full of powerful tools, is easy to use, and sports an attractive user interface.

When you first launch the app, you're greeted with a friendly welcome screen that asks you what you want to do: take a picture or open one from your gallery. I selected a shot from my Photo Stream that I had captured this morning with the iPhone. The image appears onscreen waiting for you to tap the hand in the upper right corner to select your next action.

I typically start with cropping, so I picked the Magic Crop tool. By doing so, options for that tool are available in the lower left corner. Pick the particular action you want, and apply it with your finger tip. Image editing categories to choose from include: Tone & Color, Retouch, Clone Stamp, Move Me, Filters, Textures, Magic Crop, and Frames.

They're all relatively easy to figure out, but if you need help, return to Handy Photo Home, and tap on the Tutorials button. They've posted YouTube videos for their tools that show you how to proceed. Once you've learned a new technique, you can return to the app and apply it.

Depending on the device and the processing power that you have on it, Handy Photo has some pretty robust file handling features. For example, they list: 100% size image editing, up to 36 MP image handling, RAW format support. Here's the breakdown listed device by device:

  • 5 MP - iPod touch 4th Generation / iPad
  • 10 MP - iPhone 4 / iPhone 4s / iPod touch 5th Generation
  • 15 MP - iPad 2 / iPad mini
  • 36 MP - iPhone 5 / iPhone 5s / iPhone 5c / iPad 3 / iPad 4 / iPad Air

The images of the resolution higher than maximum allowed will be automatically resized.

The Bottom Line

Handy Photo is an excellent value for $1.99. The image editing tools are powerful, and there's quite a variety of them. The application itself is easy to use. And you can save the pictures back to your camera roll or upload them to Twitter or Facebook. All in all, I really enjoyed the app and I'm going to keep it on my iPad.


Nimble Photographer Logo

This product has a high Nimbleosity Rating. What does that mean? You can learn about Nimbleosity and more by visiting TheNimblePhotographer.com.

Want to Comment on this Post?

You can share your thoughts at the TDS Facebook page, where I'll post this story for discussion.

Take Your Camera to Dinner

Part of life on the road is eating alone. One of the ways I make the best of this situation is to take my camera to dinner.

I travel light in these situations, packing my mirrorless in the Walking Man Shoulder Bag or a pouch such as the Lowepro Dashpoint 30, as shown below.

Late afternoon exploration

Having my camera with me doesn't help during the meal itself. But when I'm alone, I discover that I'm more attuned to my surroundings before, during, and after eating. Suddenly I see shots, and am willing to work them, that I might have missed before. Here's a shot I captured while having my after-meal coffee.

So yes, it might be a bit lonely during the entree. But by taking my camera to dinner, I've discovered that desserts can be fantastic.

You might also enjoy Table for One on The Nimble Photographer.


Nimble Photographer Logo

The Walking Man Shoulder Bag and Lowepro Dashpoint 30 have a high Nimbleosity Rating. What does that mean? You can learn about Nimbleosity and more by visiting TheNimblePhotographer.com.

Want to Comment on this Post?

You can share your thoughts at the TDS Facebook page, where I'll post this story for discussion.

mefoto-daytrip-tripod-top-view.jpg

Figuring out how to carry a professional quality tripod in my Lowepro Urban Reporter camera bag wasn't an easy trick. That is, until I discovered the MeFoto DayTrip tripod ($119).

This sturdy set of sticks folds down to 9.4" and weighs only 1.8 pounds. Yet it can handle up to 8.8 pounds and extend to 24" high. I can work with it on the ground for macro photography and landscape, or set it on a table, chair, newspaper stand, or any other available surface for more height.

The DayTrip's variable-angle adjustable legs allow for work on uneven surfaces. The included ball head with mini Arca Swiss quick release provides quick adjustments with oversized knobs for easy gripping.

The MeFOTO DayTrip is beautifully crafted. The aluminum components are nicely finished with attractive color accents in red, black, orange, titanium, blue, green, white, chocolate, yellow, purple, gold, or hot pink. I personally love the red model.

mefoto-daytrip-length.jpg

All of the adjustment points are precise and easy to use. The ballhead is removable, so you can add a full size Arca Swiss head, such as the Joby Ballhead X. And if you need a super low angle, the center column is reversible.

mefoto-sidekick360.jpg

iPhone and Android photographers may want to add the SideKick360 Smartphone Adapter ($49) to their MeFOTO kit.

The SideKick360 has an Arca-Swiss Style Base (full size), three 1/4"-20 mounts, and one 3/8"-16 mount. The bullhead adjuster allows for a variety of positions. The SideKick360 can stand on its own, or be mounted on any tripod. It is constructed of the same high quality aluminum with oversized knobs and the DayTrip tripod.

The MeFOTO tripod fits nicely inside the Urban Reporter 150. I replaced the original full size camera box insert with another that was only about two-thirds as wide. This opened up a nice space inside the bag so I could pace the MeFOTO tripod upright.

mefoto-in-bag.jpg

If you need a bigger tripod, MeFOTO also makes the GlobeTrotter ($209, 64" high) and the RoadTrip ($189, 61" high).

But for me with my mirrorless kit in the Urban Reporter, it's the MeFOTO DayTrip. It's light, compact, and quite beautiful.


Nimble Photographer Logo

The MeFOTO DayTrip has a high Nimbleosity Rating. What does that mean? You can learn about Nimbleosity and more by visiting TheNimblePhotographer.com.

Want to Comment on this Post?

You can share your thoughts at the TDS Facebook page, where I'll post this story for discussion.

Love Leica? Shoot Micro Four Thirds

leica-25mm-front.jpg

If you love Leica glass, then consider shooting with a micro four thirds camera. Why?

By doing so, you can enjoy the brand and quality without tanking your credit card. Here are a few examples:

The just-announced Panasonic/Leica 15mm f/1.7 sells for $599. That is not cheap by any means. But the Leica 35mm f/2.5 Summarit-M sells for $1,950.

I own a Panasonic Leica DG Summilux 25mm f/1.4 ASPH prime that currently costs $529. I love this lens and use it often on my OM-D cameras. The Leica Normal 50mm f/1.4 Summilux M Aspherical prime will currently set you back $4,250.

leica-42pt5mm-prime.jpg

A lens that I'm lusting after, the Panasonic Leica DG Nocticron 42.5mm f/1.2 ASPH (with image stabilization) is listed for $1,598. That's why I don't have it (yet). But for perspective, the Leica Telephoto 90mm f/2.0 APO Summicron M Aspherical will hit your credit card at $3,995.

By comparing the different mounts, you can clearly see there are differences between the micro four thirds models and the optics built for Leica cameras. That being said, the image quality I get with my 25mm Leica on an OM-D E-M1 is wonderful.

For years I wanted to own and shoot with a Leica lens. But the investment was cost-prohibitive for my photojournalist salary. But thanks to micro four thirds photography, I have a great camera and beautiful optics that I can afford, including a Leica or two.


Nimble Photographer Logo

These Leica lenses have a high Nimbleosity Rating. What does that mean? You can learn about Nimbleosity and more by visiting TheNimblePhotographer.com.

Want to Comment on this Post?

You can share your thoughts at the TDS Facebook page, where I'll post this story for discussion.

This week on The Digital Story photography podcast: The Olympus OM-D E-M10 Camera Review, new Leica 15mm f/1.7 lens for Micro Four Thirds, and Big B&W - All of this and more on today's show with Derrick Story.

Story #1 - The Weekly Update: Samsung NX mini is announced. They write, "If nothing else, the NX mini is another option in a growing category of super-small interchangeable lens cameras. The Pentax Q7 and Panasonic GM1 appear to be the enthusiasts' best options in the field, while the mini joins the Nikon 1 J3 in targeting beginners." (DP Review)
In other news, Kodak is back in the news with the Pixpro S1 micro four thirds camera. (ePHOTOzine).
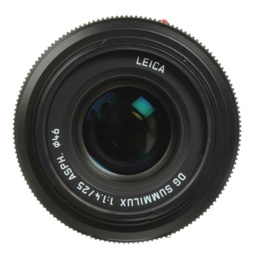
And finally, We have a tempting new Leica DG Summilux 15mm f/1.7 ASPH to resist. This micro 4/3 optic is equivalent to a 30mm lens on a 35mm camera, and features 9 elements in 7 groups, including 3 aspherical elements. Panasonic's Nano Surface Coating technology is adopted to minimize reflections. Should sell for about $550. (Photography Blog).

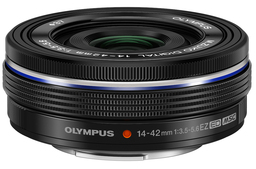
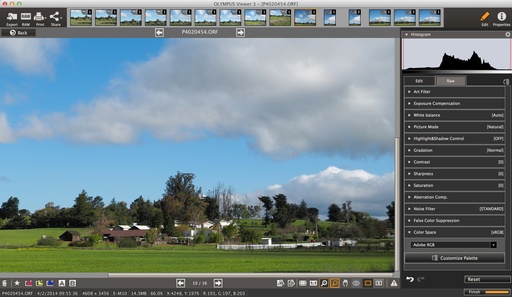
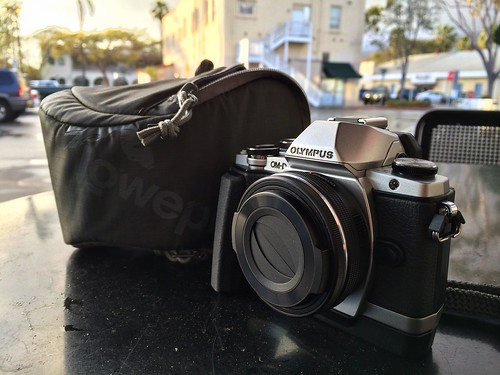
Story #2 - The Olympus Olympus OM-D E-M10 Hands On Review ($699 for body only)

I'm testing this little gem with the new Olympus 14-42mm f3.5-5.6 EZ zoom ($349) and the Olympus Lens Cap Auto Open ($39). Highlight features include:

  • 16MP Sensor, TruePic VII Processor
  • Built-in Wi-Fi, Popup flash
  • 3-Axis IS (with auto selection)
  • 81 point Fast-AF, 8 FPS
  • No anti-aliasing filter
  • No weather proofing
  • Uses same battery as the PENs, no the other OM-Ds
  • No Accessory port
  • Optional ECG-1 External Camera Grip available
  • Live Composite, 2 HDR modes and HDR Bracketing, Color Creator, 999-shot Intervalometer, Time-Lapse Movie, Photo Story, Hand- Held Starlight Mode, Art Filters

I discuss what how this camera fits into the OM-D family and my shooting experiences with it.

Story #3 - From the Screening Room - Joseph Linaschke: Artist in Action: Joseph Linaschke's Large Scale Black-and-White Photograph. You might know this week's featured artist through his Aperture Expert website and work. But Joseph is also a fan of B&W printing. He combines these passions in this week's Screening Room.

You can watch Joseph take his images from Aperture to the wall by visiting the TDS Screening Room at lynda.com/thedigitalstory. While you're there, you can start your 7 day free trial to watch other photography titles, plus every other topic in the library.

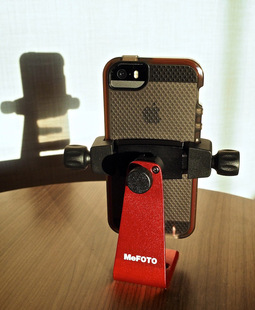
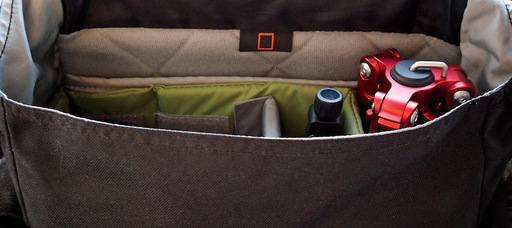
Story #4 - The Nimbleosity Report - My 3-day event coverage with the Urban Reporter 150 and mirrorless cameras.

Virtual Camera Club News

Workshop News: The Sonoma Coast Photography Workshop is scheduled for August 22-24, 2014. And the dates are set for the Fall Color with Safari West Workshop, October 24-26, 2014. You can learn about them both, plus request a reservation form by visiting the TDS Workshops Page and using the "Send Me Info" box.

Lowepro Pro Roller x-200 Giveaway: Follow Derrick_Story on Twitter, TheDigitalStory on Facebook, or DerrickStory on Instagram, then by March 31, 2014, send an email to: derrick@thedigitalstory.com with the Subject line: Roller Giveaway and your name and social network addition in the body of the email. Please include your shipping address.

Photo Assignment for March 2014 is HDR.

If you haven't done so already, please post a review for The Digital Story Podcast in iTunes.

BTW: If you're ordering through B&H or Amazon, please click on the respective ad tile under the Products header in the box half way down the 2nd column on thedigitalstory.com. That helps support the site.

Listen to the Podcast

In addition to subscribing in iTunes, you can also download the podcast file here (32 minutes). You can support this podcast by purchasing the TDS iPhone App for only $2.99 from the Apple App Store.

More Ways to Participate

Want to share photos and talk with other members in our virtual camera club? Check out our Flickr Public Group. And from those images, I choose the TDS Member Photo of the Day.

Podcast Sponsors

lynda.com - Learn lighting, portraiture, Photoshop skills, and more from expert-taught videos at lynda.com/thedigitalstory.

Red River Paper -- Keep up with the world of inkjet printing, and win free paper, by liking Red River Paper on Facebook.

SizzlPix! - High resolution output for your photography. You've never seen your imagery look so good. SizzlPix.com. SizzlPix! now is qualified for PayPal "Bill Me Later," No payments, No interest for up to 6 months, which means, have your SizzlPix! now, and pay nothing until August!

Want to Comment on this Post?

You can share your thoughts at the TDS Facebook page, where I'll post this story for discussion.