Top shelf mirrorless cameras are tempting enthusiasts to set down their DSLRs and take notice. We've heard a lot about the Olympus OM-D E-M1, Panasonic GH3, and Sony NEX-7. Great cameras indeed, but pricy too. The E-M1 lists for $1,399 without lens, the GH3 is selling for $1,298 sans glass, and the NEX-7 is available for $1,098, body only.
If those numbers are a bit rich for your budget, here are three CSCs that have plenty of star power, but without the big price tags. They offer excellent performance and options, and cost hundreds less than the flagship models.
Panasonic Lumix DMC-GX7
Panasonic pulled out all of the stops with the DMC-GX7, featuring a 16 MP Digital Live MOS sensor that sells for $898.
Highlight features include a 3" 1,040k-dot tilting touchscreen LCD and a 90 degree tilting 2,764k-dot EVF, all within a sleek body. Unlike most of the other G-series cameras, the GX7 includes in-body image stabilization instead of relying solely on optical IS. And we love that it has both built-in wireless and NFC connectivity. Its handsome good looks add the finishing touch to a very complete package.
Based on its design and specs, I think it's one of the most tempting Panasonics to date.
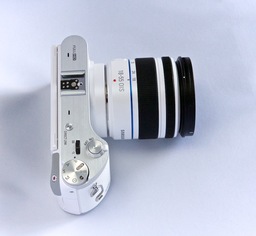
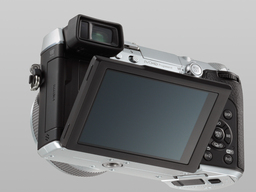
Samsung NX300
The Samsung NX300 gets you a lot of resolution (and functionality) for the money. The 20.3 MP APS-C sensor delivers the goods in practically any lighting condition. The kit, which includes a 18-55mm f/3.5-5.6 OIS lens, is selling for $799. For that reasonable price, you get more pixels than the Micro Four Thirds bodies from Olympus and Panasonic. plus a sharp, stabilized zoom lens.
I was very impressed with the image quality of the NX300. The tilting LCD adds flexibility while composing the shots. The downside is that there isn't an electronic viewfinder as with the GX7. The WiFi is easy to use and allows for both remote camera control and file transfer. But the real kicker with the NX300 is its Smart Mode that provides options similar to traditional scene modes, but on steriods. Be sure to try Beauty Face and Light Trace.
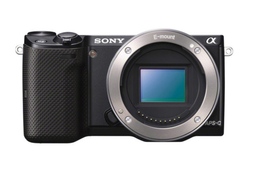
Sony Alpha NEX-5T
Sony makes two basic flavors of their Alpha line of Compact System Cameras. A handsome lower priced model is the Alpha NEX-5T that houses a 16.1MP APS-C Exmor APS HD CMOS sensor and sells for $548.
The NEX-5T includes lots of goodies such as built-in Wi-Fi and NFC connectivity, continuous shooting rate of 10 fps, tilting 3" 921.6k-dot LCD, plus fast autofocusing and high ISO performance. And if you've never experienced Sony's sweep panorama, you're in for a treat.
As with the Samsung NX300, there's no electronic viewfinder. But unlike the NX300, Sony managed to squeeze a pop-up flash into this very compact body.
Bottom Line
Among these three, I find the Panasonic GX7 the most tempting of the bunch, and it's also the most expensive (but still less than flagship counterparts). I like the tilting LCD and EVF, plus with built-in image stabilization, there's a huge catalog of lenses from Panasonic, Olympus, and independents that will perform well on this camera body.
But if you want a slightly larger sensor and save even more money, both the Samsung and the Sony are excellent options. You'll have to compose solely on the LCD, but these cameras are feature rich and provide outstanding image quality.
Want to Comment on this Post?
You can share your thoughts at the TDS Facebook page, where I'll post this story for discussion.
Aperture Workshop Coming on Nov. 16 and 17, 2013
Want to learn Aperture in a hands on environment? My next Aperture workshop will be Nov. 16 and 17 in Santa Rosa, CA. We'll review all of the basics, plus work on portraiture (including a live model shoot), product photography, and more. Write me at derrick@thedigitalstory.com for more information and a reservation form.