Recently in Photography

  Page 191 of 382 in Photography  

You can control which application opens when you double-click a shared Aperture/iPhoto library. (All current Aperture and iPhoto libraries are "shared" by default.) This is a handy trick because many photographers open libraries from the Finder instead of from within the application. Here's how to control whether iPhoto or Aperture opens when you double-click on the shared library icon.

Specifying which application opens the library by default

More Aperture/iPhoto Tips and Techniques

To learn more about using Aperture and iPhoto together, visit my Using iPhoto and Aperture Together on lynda.com. Also, take a look at our Aperture 3 Learning Center. Tons of free content about how to get the most out of Aperture.

Want to Comment on this Post?

You can share your thoughts at the TDS Facebook page, where I'll post this story for discussion.

LED Flashlight DIY Lightwand Ice Light

On a tip from our friends at Imaging Resource, we learned about Simon Ellingworth's DIY Ice Light project.

In about 20 minutes, you can build your own light wand that's handy for portraiture and general photo projects. Simon uses a compact, but powerful LED flashlight and a length of white PVC pipe as the basic components for his homemade Ice Light.

It's a clever, easy to assemble project that could prove to be very useful in the home studio. Take a look.

Want to Comment on this Post?

You can share your thoughts at the TDS Facebook page, where I'll post this story for discussion.

We'll be covering the Sonoma County Hot Air Balloon Classic as our project for the Movie Making for Photographers workshop on June 15 and 16, 2013.

Final Cut Pro X Balloon Festival

Joined by two professional filmmakers, Louis Ekrem of Laughing Cat Films and Eric Michael Perez of Clicker Video, you will learn how to tap the movie making functionality of your DSLR. This workshop is for photographers who want to learn how to use their existing gear to create short, impactful video for publishing.

The focus of our class project will be the beautiful Sonoma County Hot Air Balloon Classic. We'll be on site capturing footage, then learning how to maximize its impact using Final Cut X and iMovie applications.

Class size will be limited to six participants. Tuition is $495, that includes two full workshop days, breakfasts and lunches, comfortable working environment, and swag. Registration is open now. Use the "Send Me Info" form located on the TDS Workshops page. I will get you complete details about the event, including the registration form.

This is going to be an immersive, exciting weekend where you can focus solely on your photography.

About the Instructors

Louis Ekrem is the founder of Laughing Cat Films, based in Santa Rosa, California. His full service video production company provides high quality media services for business professionals, non-profit organizations, corporations, professional athletes and performing artists. Some of Northern California's finest businesses have put their faith in LCF to bring their timely and important messages to the world. Past LCF clients include: Bar Association of San Francisco, Center For Innovation and Resources, Creator's Art Productions, Ultramarathon Runner Dean Karnazes, FuzeMeeting.com, Kaiser Permanente, Leukemia & Lymphoma Society and Sonoma County Thunder to name a few.

Eric Michael Perez has been filming and creating still photos starting in the early 1970's when him and his friend would create skateboarding films shot on his dads 8mm movie camera. He was an early adopter using water housings to film water sports in the 1990's as both a top competitor and shooter of wake boarding, both for ESPN and his own productions. More recently Eric has been creating marketing pieces for wineries and small product manufacturers. Eric has been using DSLR cameras for his video productions since 2008. He currently uses a Canon 7D and a Lumix GH17

Derrick Story is a professional photographer, writer, teacher, and photography evangelist for Lowepro. He's authored several digital media books, including The Digital Photography Companion (O'Reilly Media) and iPad for Digital Photographers (Wiley & Sons). Derrick is a Senior Contributor for Macworld magazine where he writes a digital photography column, and he's a regular presenter on the popular training site, lynda.com featuring video titles on Aperture, iPhoto, Flickr, and photo technique.

Want to Comment on this Post?

You can share your thoughts at the TDS Facebook page, where I'll post this story for discussion.

This week on The Digital Story: DIY home portrait studio, model releases, lens hood as an LCD shade, all of this... and more!

Story #1 - DIY Home Portrait Studio. We'll cover this over the course of a few installments. Today, I'm going to to discuss the space itself. Most enthusiast photographers don't have the luxury of setting up a dedicated room for a portrait studio. There might be multi-use space available. So quick set up and breakdown become important.

Attributes to look for include: natural lighting, at least 10' x 12' floor space, minimum 8' ceilings (higher is better), temperature control, closet space to store equipment when not in use, and nearby bathroom to serve as changing room.

Story #2 - Model Releases. For every set-up portrait you arrange, you want to secure a model release. This document includes text granting permission by the subject for you to use the photo in a variety of ways. I get model releases for hired subjects, friends, and even family.

Story #3 - Lens Hood as LCD Shade Trick - Reviewing your photos on the camera's LCD screen in bright sunlight can be very discouraging. You can help minimize glare by placing a lens hood over the LCD and looking through that.

Listen to the Podcast

You can also download the podcast here (29 minutes). Or better yet, subscribe to the podcast in iTunes. You can support this podcast by purchasing the TDS iPhone App for only $2.99 from the Apple App Store.

Monthly Photo Assignment

The April 2013 photo assignment is Architecture.

More Ways to Participate

Want to share photos and talk with other members in our virtual camera club? Check out our Flickr Public Group. And from those images, I choose the TDS Member Photo of the Day.

Podcast Sponsors

Red River Paper -- Keep up with the world of inkjet printing, and win free paper, by liking Red River Paper on Facebook.

Make Your Photos Sizzle with Color! -- SizzlPix is like High Definition TV for your photography. Take the SizzlPix Challenge - See how your photo will Sizzl by getting a free 5x7 section of an uploaded image. Just put TDS or The Digital Story in the comments to get your free SizzlPix section.

Need a New Photo Bag? Check out the Lowepro Specialty Store on The Digital Story and use discount code LP20 to save 20% at check out.

Want to Comment on this Post?

You can share your thoughts at the TDS Facebook page, where I'll post this story for discussion.

It's tough to view photos on camera LCD screens in bright outdoor conditions. You can help improve this situation by using an accessory that you probably already have in your camera bag: a lens hood.

Lens Hood LCD Shade Olympus OM-D Digital Camera photography

I carry a couple collapsable rubber lens hoods because their depth when mounted on the front of the lens helps prevent flare in contrasty conditions. They occupy about the same amount of space as a filter, yet can serve double duty. When not on the front of the lens, hoods are helpful on the back of the camera, improving the contrast of the LCD screen.

Another favorite of mine is the deep plastic lens hood that came with my Leica 25mm f/1.4 prime lens that I use on the OM-D. Its rectangular shape is a nice match for the LCD screen on the back of the camera.

I bet if you dig around a bit, you can find a double-duty lens hood that could justify its space in your camera bag. In bright sun, every little bit helps.

Want to Comment on this Post?

You can share your thoughts at the TDS Facebook page, where I'll post this story for discussion.


Join me on my Instagram site as I explore the world of mobile photography.

Happy Easter

Take the day off to spend with family, a friend, your dog, or just you and nature...

Happy Easter Eggs!

Want to Comment on this Post?

You can share your thoughts at the TDS Facebook page, where I'll post this story for discussion.

Photographers Guide to Copyright Law

I've just finished looking over the Photographer's Guide to Copyright Law, and there is a ton of useful information in this free download. The guide, created by PhotoShelter and the American Society of Media Photographers (ASMP), covers these topics:

  • Discover your 6 exclusive rights under copyright law.
  • Learn how to secure your photos and avoid infringement.
  • Get tips to register your work through the U.S. Copyright Office.
  • Understand steps to take if you are infringed.

Definitely something you want to add to your reference library.

Want to Comment on this Post?

You can share your thoughts at the TDS Facebook page, where I'll post this story for discussion.


Join me on my Instagram site as I explore the world of mobile photography.

Photographer Gavin Seim did many things right when creating his ColorFlow presets for Aperture 3. I like them, not only because they help you produce better images, but also because they help you improve your editing skills in Aperture.

ColorFlow, Aperture 3, Image Editing, Model, Sexy, Portrait 
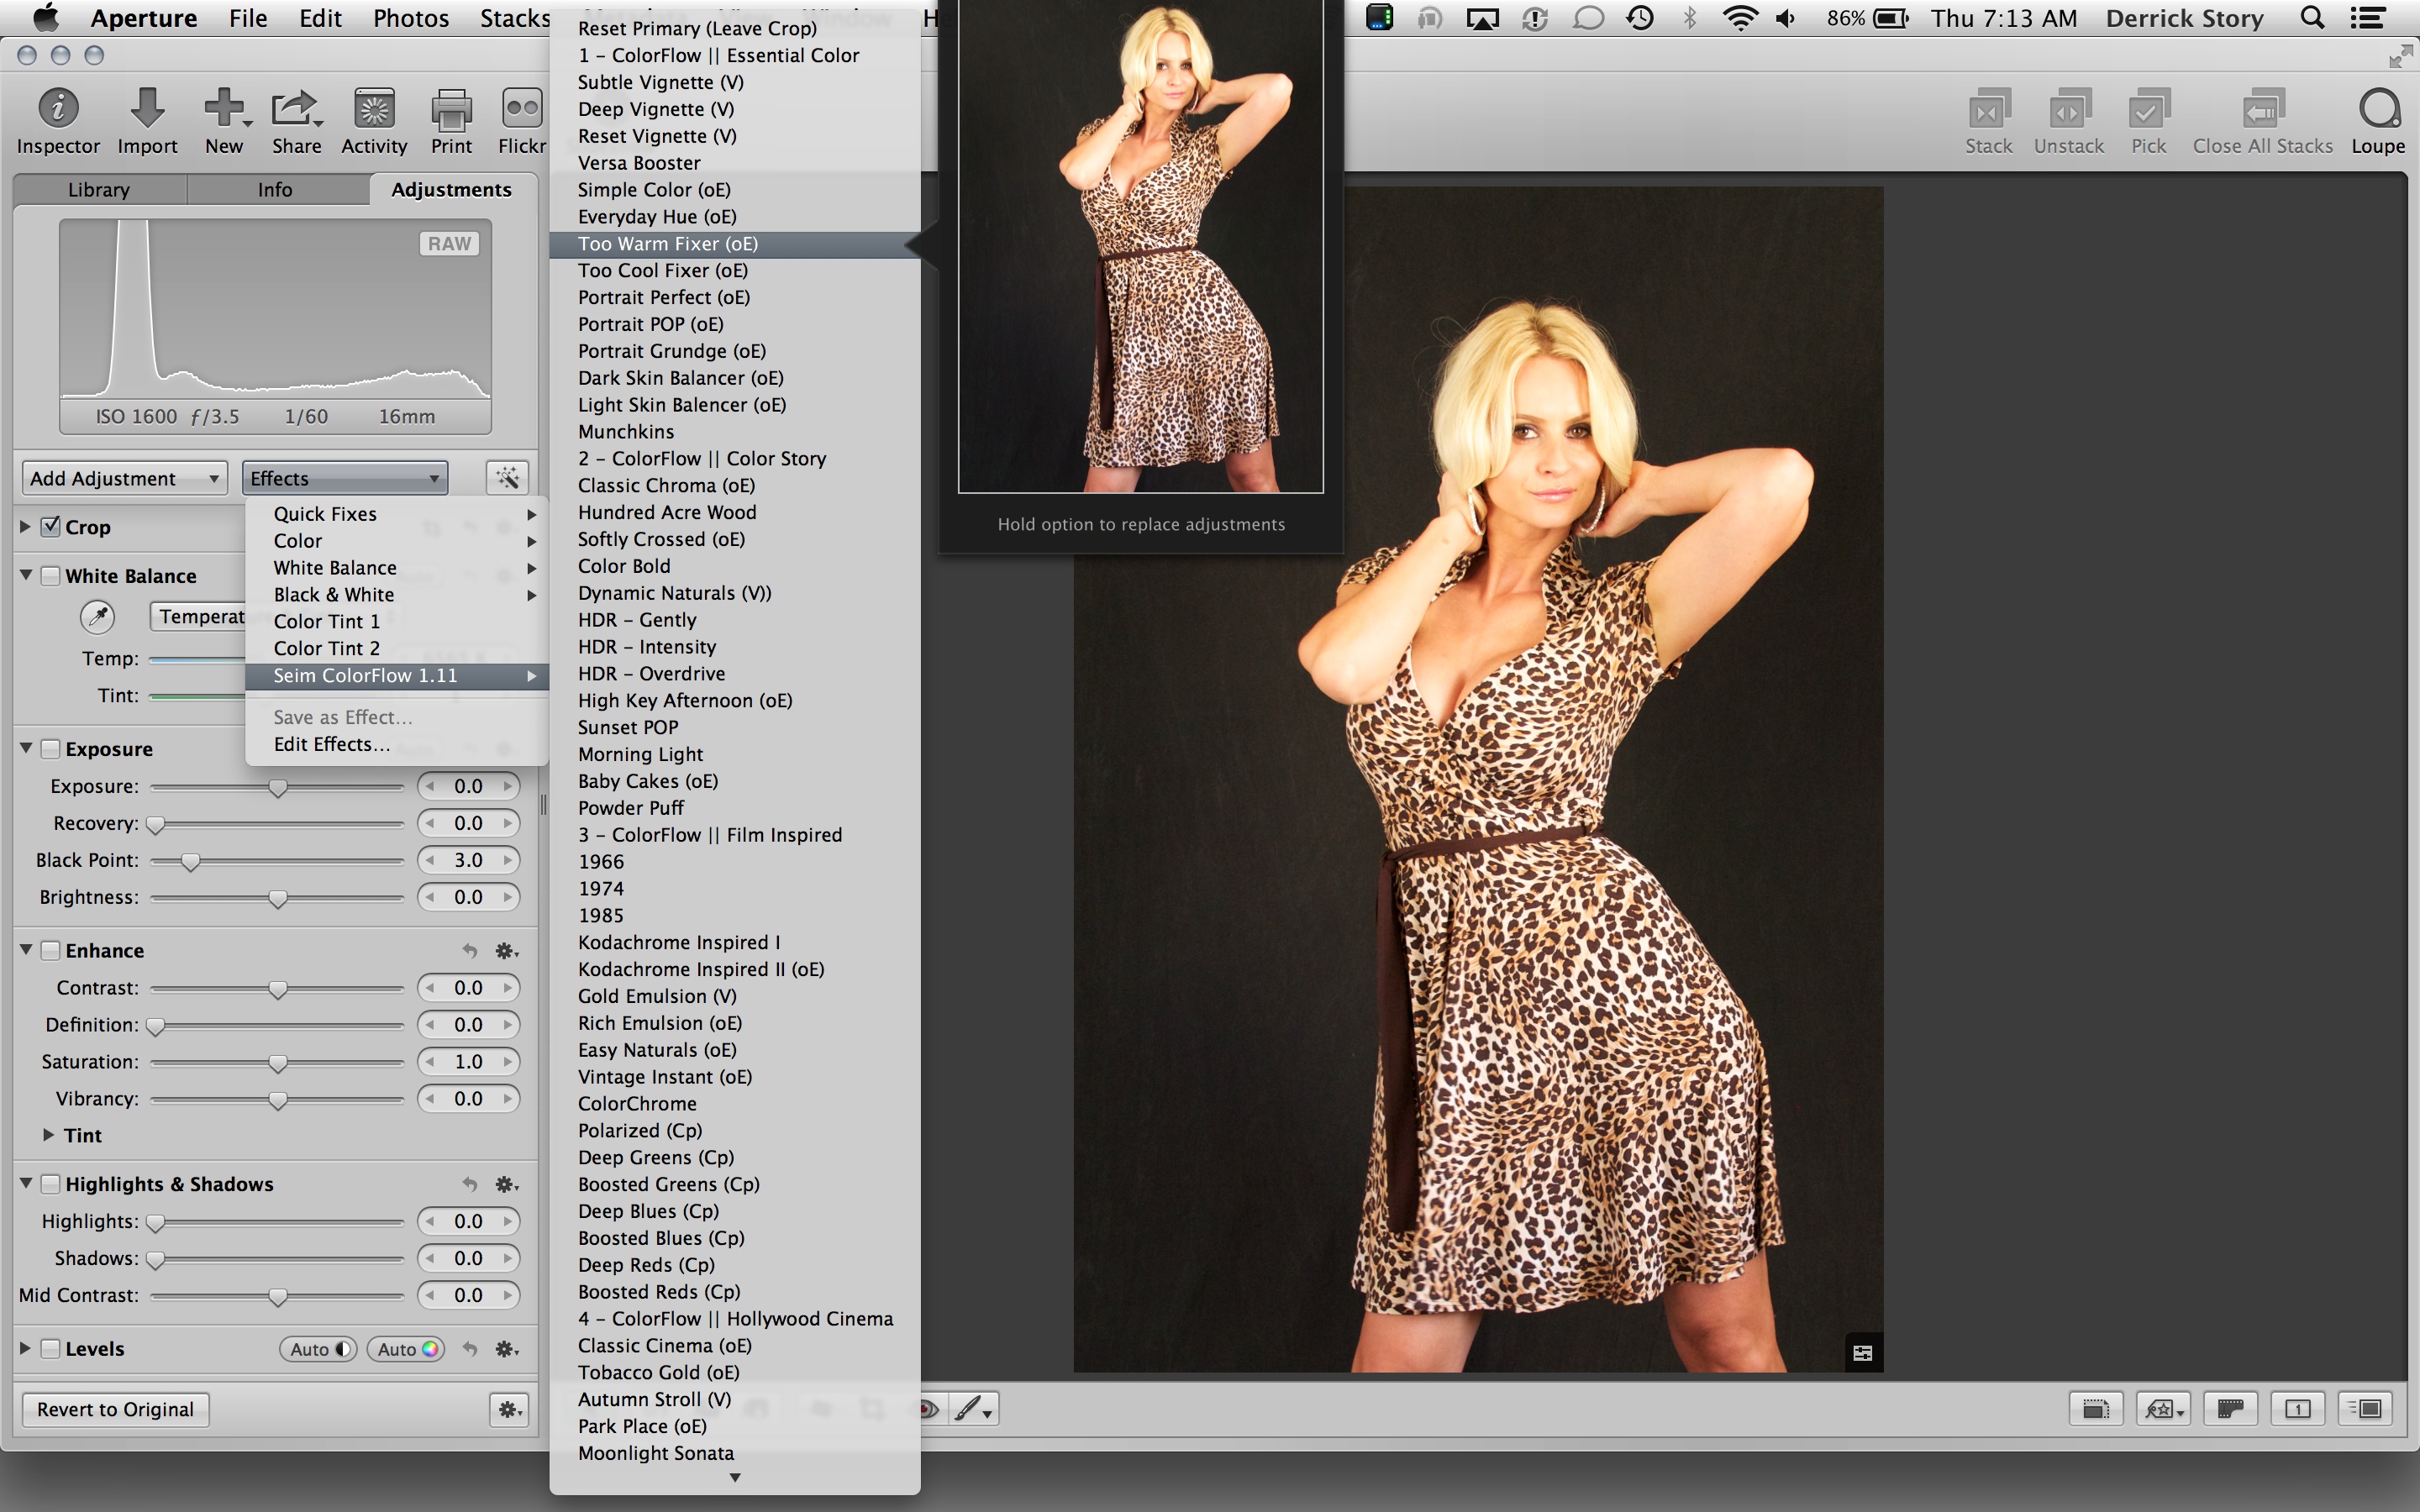
Applying the "Too Warm Fixer" preset to this portrait of Ewelina.

You can purchase the entire set, more than 60 presets in 5 categories, from Gavin's site for $39. It's a download, so within minutes you're using them in the app. (In the Adjustment tab, click on the Effects popup, choose Edit Effects, click on the gear menu and choose Import. Navigate to ColorFlow that you just downloaded. Aperture adds the presets to the app.)

The aspect of ColorFlow that I really like is that you stay in the Aperture environment the entire time you're working. There's no roundtripping to a separate window that adds big TIFF files to your library. You're working with your RAWs just like you would any other image.

The difference is, Gavin is giving you a head start on the editing. When I chose the "Too Warm Fixer" preset for the portrait of Ewelina, ColorFlow left my crop alone, but made changes to the White Balance and Enhance bricks. I can see exactly what it did. And if I want, tweak further using the sliders that I'm already familiar with.

Then, if I want, I might add a Hollywood Cinema effect, such as American Western, and ColorFlow makes adjustments to both Curves, and the Highlights & Shadows bricks. if the effect isn't exactly what I want, I can play from there.

There's nothing over the top here. Many of the effects are subtle, helping you craft your image rather than be hit over the head with it. And if you want more intensity, you can add it yourself.

I think ColorFlow is an excellent investment for your Aperture workflow. Because they are presets, they have low impact on the application itself. It's more like a guided tour for image editing. And I think using ColorFlow will inspire you to fine tune your pictures.

Watch the video that Gavin has embedded on the ColorFlow page, you'll learn a lot about these presets, and gain insights on his approach to photography.

Aperture Tips and Techniques

To learn more about Aperture, check out my Aperture 3.3 Essential Training (2012) on lynda.com. Also, take a look at our Aperture 3 Learning Center. Tons of free content about how to get the most out of Aperture.

Want to Comment on this Post?

You can share your thoughts at the TDS Facebook page, where I'll post this story for discussion.

iPhone as Your Third Camera Option

You have a DSLR around your neck, and another body in your camera bag. You should be able to cover just about anything, right?

Yes, indeed. Especially since you have a formidable third option in your pocket. An iPhone.

Artisan Cheese Festival Marketplace, iPhone, Derrick Story Wide angle shot captured with an iPhone 4S in panorama mode.

I love standing in the thick of things and pulling out my iPhone to record panoramas. Those images look much different than anything I shoot with my other cameras. I often hold the iPhone overhead and sweep across the scene to capture an entirely new perspective.

Panorama mode is built into the Camera app. Tap the Options button to reveal the Panorama control. Once enabled, you can sweep from left to right, or right to left. Just tap on the side that you want to begin recording.

If you have Photo Stream enabled, the images can go directly into your Aperture or iPhoto library. Since I'm an Aperture user, I've set up iPhoto to house my Photo Stream images. Then I use what I need and archive the rest.

When on location, you never know which perspective you're going to like the best. But you can't choose among them if you don't record 'em in the first place. So don't forget about that third option in your pocket.

Want to Comment on this Post?

You can share your thoughts at the TDS Facebook page, where I'll post this story for discussion.

Using Aperture and iPhoto Together

To learn more about using Aperture and iPhoto together, visit my Using iPhoto and Aperture Together on lynda.com. Also, take a look at our Aperture 3 Learning Center. Tons of free content about how to get the most out of Aperture.

This week on The Digital Story: Is the new Canon EOS SL1 a mirrorless killer? Supercharge your photo management workflow by using Aperture and iPhoto together. And I share some insights from the recent 3-Day Artisan Cheese Festival event coverage and advanced TDS workshop.

Story #1 - Canon EOS SL1: Instead of Mirrorless? Canon wants you to have your optical viewfinder and compact size too. With the announcement of the EOS SL1 (100D), you can tote a mere 407 grams with a body that measures only 117 x 91 x 69 mm. Compare that to the Olympus OM-D that weighs in at 425 grams and 122 x 89 x 43 mm. What are the pros and cons for buying compact SLR vs a mirror less body? (You can see the Canon EOS Rebel SL1 DSLR with 18-55mm EF-S IS STM lenshere.)

  • Bigger image sensor on the SL1 - APS-C (18MP) vs Micro Four Thirds (16MP)
  • Can use existing EF-S and EF lenses on SL-1
  • Lens are lighter and smaller, however, with OM-D
  • More professional features with OM-D such as 9 fps vs 4 fps, tilting LCD, built-in image stabilization, etc.
  • Price is interesting: Canon is $799 with 18-55 STM vs 1049 for OM-D with 12-42mm.

Story #2 - Using iPhoto and Aperture Together - I love using Aperture and iPhoto together, and now I have a training on lynda.com that shows you how to get the most out of this tandem. This was really made possible by the Unified Library that lets you use either application interchangeable with your image library. From there, you can decide which app is best for any given task, then use the right tool for the job. My goal is to help fully understand your options so you can create a killer workflow for all of your photography work (and play).

Story #3 - Clarification on the Canon CPS story. You need to be a working photographer to qualify. This is not a program for hobbyists.

Story #4 - Artisan Cheese Festival Event Coverage and Advanced Workshop. Three TDS members joined me for the 3-day festival: Scott McDaniel, Jeremy White, and Jeff Dickerson. And they shot lights out all weekend.

Listen to the Podcast

You can also download the podcast here (32 minutes). Or better yet, subscribe to the podcast in iTunes. You can support this podcast by purchasing the TDS iPhone App for only $2.99 from the Apple App Store.

Monthly Photo Assignment

The March 2013 photo assignment is Black & White.

More Ways to Participate

Want to share photos and talk with other members in our virtual camera club? Check out our Flickr Public Group. And from those images, I choose the TDS Member Photo of the Day.

Podcast Sponsors

Red River Paper -- Keep up with the world of inkjet printing, and win free paper, by liking Red River Paper on Facebook.

Make Your Photos Sizzle with Color! -- SizzlPix is like High Definition TV for your photography. Take the SizzlPix Challenge - See how your photo will Sizzl by getting a free 5x7 section of an uploaded image. Just put TDS or The Digital Story in the comments to get your free SizzlPix section.

Need a New Photo Bag? Check out the Lowepro Specialty Store on The Digital Story and use discount code LP20 to save 20% at check out.

Want to Comment on this Post?

You can share your thoughts at the TDS Facebook page, where I'll post this story for discussion.