Recently in Photography

  Page 209 of 382 in Photography  

Professional photographer Daniel Forster invited me to accompany him while shooting the Rolex Big Boats Series in San Francisco. I learned much about this type of photography during the day, and thought you might enjoy a behind the sails look.

Daniel Forster Capturing Action 
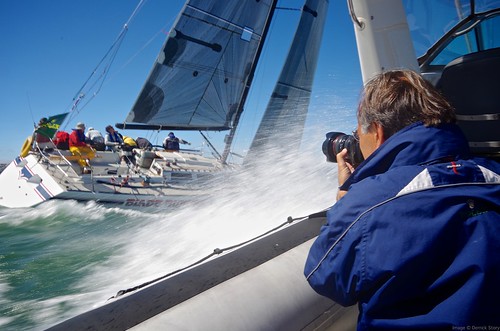
Daniel Forster at work during the Rolex Big Boat Series. We were so close at this point that he had to put down his 70-200mm and go with a wider lens.

Daniel Forester works for Rolex, shoots with Canon gear, and uses Lowepro to protect it. He is an experienced sailor as well as a season professional photographer. He knows both the craft of making great images and maneuvering on the sea.

His "go to" cameras and lenses are the Canon 5D Mark II and 5D Mark III. The Mark II has his 70-200mm f/2.8 L zoom and the Mark III is mounted with the Canon 400mm f/4. Even though he carries additional lenses, bodies, and accessories, he accomplished the bulk of his shooting with those two rigs. Daniel relies on a Lowepro Pro Runner x450 AWto protect his cameras on the sea and in the airport.

Daniel Forster Preparation Daniel preparing his gear on board our boat just before the race began.

I was introduced to the Rolex team, of which Daniel is a member. In order to publish on a daily basis during events, there's another photographer who focuses on image processing, copy writer, and an editor. Together they report on the people and activities of the day, including an inside look at race results.

We left the marina on an outboard Protector navigated by a pilot. The interaction during the race between Daniel and Peter Scott (the pilot) was vital to the success of the shoot. Both are seasoned sailors who understand the actions of the racers and know how to approach them without interfering with the event.

Forster with Pilot
The interaction between pilot and photographer during the race is crucial to the success of the shoot.

Daniel and I returned to the media center at the San Francisco Yacht Club to turn in the memory cards so the rest of the Rolex team could start working with the content. After a cup of tea and a short break, Daniel, Peter, and I headed back to the outboard for a second round of shooting.

The outboard is extremely fast and can navigate around the sailing boats. Daniel and the pilot would discuss positioning, then Daniel would shoot, then we'd be off again for another angle. We followed the racers for hours in order to capture a variety of shots of each of the contestants. After all, you had to make sure you had images of the winners at the end of the day.

Rolex Big Boat Series, SF, CA Being in the right position had everything to do with creating an interesting image.

I really appreciate Daniel and the entire Rolex team inviting me on this shoot. The Rolex Big Boats Series is a thrilling event. Having the opportunity to work in the middle of it was exhilarating.

You can see more of Daniel Forster's work at www.danielforster.com.


twitter.jpg Follow me on Twitter


One post production technique for delighting the viewer's eye is to first convert the image to B&W, then restore bits of color. The element of surprise is often stimulating.

Unexpected Nasturtium

For this shot of a "formerly yellow nasturtium," I applied the Black & White adjustment in Aperture 3.3. Then, in the Black & White Adjustment Brick, I clicked on the gear menu, and selected, "Brush Black & White away." I used an adjustment brush to restore color to the nasturtium leaves. I like the pattern they form around the flower.

The first pass took only a few minutes of image editing. If, after time, I decided that I liked the photo, I would go back and spend another 20 minutes or so touching up the details. Typically, I "live with a photo" for a day or two before deciding whether or not to put more work in to it.

This technique works well for greeting cards and personal messages. It shows that you put a little extra effort into the image that you're sharing.


You can find more photo tips and "photography how tos" on my Pinterest page.


Unwanted Metadata

Unwanted Metadata

I love the metadata that cameras write to our digital files... most of the time. But every now and then a camera includes information that I don't want, and have a hard time getting rid of. Case in point: the "Image Description" field automatically populated by Olympus digital cameras.

For reasons unknown to me, the Olympus OM-D insists on writing (in upper case no less): OLYMPUS DIGITAL CAMERA in the "Image Description" field of the EXIF data. And it just so happens that this is the field that Google+ reads for the caption information.

To make matters worse, Aperture 3 views this information as EXIF data and won't let me edit it away (as illustrated in the screenshot). So if I go straight from Aperture to Google+, I get that ugly all caps description for my photo.

Fortunately, there are workarounds. I can:

  • Edit the information out in Google+ by clicking on the picture, then clicking on the Edit hyperlink next to the description.
  • Open the image in Photoshop, go to File Info, and edit the metadata.
  • Shoot with a different camera.

Why Photoshop lets me edit the "Image Description" field and Aperture does not is a mystery to me. And while we're at it, why Olympus puts that data there in the first place is even more annoying.

My hope is that Apple allows me to edit that field in a future version of Aperture, or Olympus stops adding it. In the meantime, thank goodness for Photoshop. It's an extra step, but at least I can edit the metadata before sending the image out into the world.


You can find more photo tips and "photography how tos" on my Pinterest page.


News from the World of Filters

Even in the digital age filters have an important role. Here are a few updates that might be of interest to you.

Hoya UV and IR Cut Filter

hoya_uv_ir_filter.jpg

Think of this like a supercharged UV filter. When working outdoors, UV and IR rays just outside the visible spectrum can "pollute" our images. This Hoya filter allows only visible spectrum light rays to enter the camera.

You can leave it mounted all of the time, letting it serve as protection glass. But its filtering effects will be most noticeable outside for landscape photography. Available sizes range for 49mm to 82mm. They're not cheap though. The 58mm UV and IR Cut Filter will run you $107 at B&H. It might be worth it for serious landscape shooters, however.

Filter Kit for Your Micro Four Thirds

Just because the lenses are smaller, that doesn't mean that they still don't need protection or could use the occasional polarizer or ND filter. Here's a nifty collection called the Hoya 37mm Digital Filter Kit that includes a multi-coated UV, and single coated polarizer and 3-stop ND filter.

hoya_37mm_filters.jpg

The three filters are housed in a handy filter pouch that fits just about anywhere in your camera bag. I bought one of these to share for my Olympus 14-42mm, 17mm, and 45mm lenses. At $59 it won't break the bank, but it might save the front of your lens.

An Affordable Variable ND Filter

polaroid_nd_filter.jpgHave you wanted a variable ND filter to shoot at wide apertures in bright light, but didn't want to spend $200 or more? Take a look at the Polaroid 58mm Neutral Density Fader Filter for $35 (58mm). It provides variable exposure from 1.3 to 8.6 stops, and it's multicoated too.

Now you can shoot those waterfalls in bright light, soft focus background portraits at the beach, or dramatic video footage just about anywhere. Polaroid makes 12 different sizes, and all of them run less than $50.


Take a look at the Olympus Micro Four Thirds Gear Guide for an overview of cameras, lenses, and accessories.

I've been waiting for a professional zoom lens to complement the Olympus OM-D, and thanks to Panasonic's new 12-35mm f/2.8, I have one. At 2.9" long and less than 11 ounces in weight, this 14-element zoom allows me to tackle the most demanding of assignments. I share my initial impressions of the 12-35mm in the first segment of this week's show.

In the second story I share how AT&T kindly unlocked my iPhone 3GS so I could take it to Germany and use a local SIM card there. Will make life much easier on the road. And finally, I cover the iPad Smart Case. It protects the entire unit, not just the front. All of this and more in this week's podcast.

Listen to the Podcast

You can also download the podcast here (31 minutes). Or better yet, subscribe to the podcast in iTunes. You can support this podcast by purchasing the TDS iPhone App for only $2.99 from the Apple App Store.

Monthly Photo Assignment

Bokeh is the Sept. 2012 Photo Assignment. You can read more about how to submit on our Member Participation page. Deadline for entry is Sept. 30, 2012.

More Ways to Participate

Want to share photos and talk with other members in our virtual camera club? Check out our Flickr Public Group. And from those images, I choose the TDS Member Photo of the Day.

Podcast Sponsors

Red River Paper -- The $7.99 Sample Kit is back! And with free shipping.

Make Your Photos Sizzle with Color! -- SizzlPix is like High Definition TV for your photography.

Need a New Photo Bag? Check out the Lowepro Specialty Store on The Digital Story and use discount code LP20 to saven 20% at check out.


Technorati Tags:
, , , , ,


lumix_12-35mm_omd.jpg

The Panasonic 12-35mm lens for micro four thirds cameras is the equivalent of a 24-70mm f/2.8 zooms for DSLRs (keeping in mind that you double the focal length listed on the lens in the M 4/3 system.) When mounted on a top-tier body, such as the Olympus OM-D E-M5, you have a professional caliber rig that is far more compact than its DSLR counterpart.

I've been testing the 12-35mm Panasonic in the studio and field with great success. Here are a few highlights.

Handling

The lens is 2.9" long (74mm) and weights 10.8 ounces (305 grams). Its non-rotating front element accepts 58mm threaded filters. Both the manual focus and zoom rings are well dampened and rotate smoothly.

One of the things I like about this lens is I can use manual focus easily. I programmed the Fn1 button on the OM-D to toggle back and forth between manual and autofocus. That way I can quickly switch between the two modes. Manual focusing with this lens is a pleasure, especially when mounted on the OM-D.

The zoom ring also rotates smoothly and stays put at the selected focal length. There isn't any creep, even when you angle the camera up or down.

The Power O.I.S. switch on the side of the lens activates the optical image stabilization system. When mounted on Olympus bodies (that have sensor based IS), the switch can be in the off position. On Panasonic bodies, turn it on. Having the switch makes this zoom compatible for any body you mount it on.

Magnum 650 AW Inside 12-35mm on OM-D: Good sharpness at f/3.5, 1/15th sec using natural light in the studio.

Autofocusing

I was curious about the autofocusing ability of a Panasonic lens on the Olympus body. But I guess this is one of the advantages of developing a "standard" that both companies follow closely. The 12-35mm zoom autofocuses quickly and quietly - as fast, or faster, as any of my DSLRs. The linear stepper motor provides top notch performance.

Ewelina Studio

Image Quality

Center sharpness is outstanding at all apertures, including f/2.8. Corner sharpness is also excellent, with only a bit of softness at the extreme corners when wide open. Color and contrast is beautiful. Fantastic images on the OM-D.

Bottom Line

The only drawback to the Panasonic 12-35mm lens is its $1,299 US price tag. But this is a professional lens that should yield outstanding performance for years to come. Canon just released an update to their 24-70mm f/2.8 zoom for $2,300, nearly twice the price of the Panasonic.


12-35mm on OM-D: In the studio with strobes I shot at f/5.6 at 1/125th for this high key fashion look.

For my photography, this lens makes it easier to bring the OM-D on any shoot, knowing that I have the glass to handle most any assignment. Highly recommended.


Take a look at the Olympus Micro Four Thirds Gear Guide for an overview of cameras, lenses, and accessories.

You can save even more time in Aperture by apply basic image adjustments during the import process. This automation became particularly attractive in version 3.3 with the introduction of Auto Enhance, which never harms a photo, but does a great job of applying subtle adjustments to improve it.

Here's how to set up your import to apply Auto Enhance, or any other effect.

import_settings_aperture.jpg

First, make sure that "Effect Presets" is selected from the "Import Settings" popup menu in the Import dialog box. If there's a checkmark next to the name, it's selected and should appear on the right side of the interface.

apply_effect_import_web.jpg

Next, go to the Effects Preset brick in the Import dialog box and choose Quick Fixes > Auto Enhance.

Now, when you import your images, Auto Enhance will be applied to each shot. You can fine tune the settings for your favorite shots in the Adjustments tab.

Aperture Tips and Techniques

To learn more about Aperture 3, check out my Aperture 3 Essential Training on Lynda.com. Also, take a look at our Aperture 3 Learning Center. Tons of free content about how to get the most out of Aperture.

My next open Aperture Workshop is scheduled for Nov. 16 & 17 2012, in Santa Rosa, CA. You can get on the pre-registration list, plus learn about all the other photography workshops offered this season by visiting the TDS Workshops page.


The Digital Story on Facebook -- discussion, outstanding images from the TDS community, and inside information. Join our celebration of great photography!


For the July 2012 Photo Assignment, TDS shooters tried to stay cool while capturing heat in their images. See for yourself in our gallery, Hot. And which one will be the SizzlPix Pick of the Month?

gerry_legere_hot_web.jpg

Photo by Gerry Legere. "Heat is important in the making of bread, so I thought I would try to show the bread and heating elements together, to convey the the cooking process," Gerry wrote. To see all of the other terrific shots from July, visit the Hot gallery page.


Participate in This Month's Assignment

The September 2012 assignment is "Bokeh." Details can be found on the Member Participation page. Deadline is Sept. 30, 2012.

Please follow the instructions carefully for labeling the subject line of the email for your submission. It's easy to lose these in the pile of mail if not labeled correctly. For example, the subject line for this month's assignment should be: "Photo Assignment: Sept 2012." Also, if you can, please don't strip out the metadata. And feel free to add any IPTC data you wish (These fields in particular: Caption, Credit, Copyright, Byline), I use that for the caption info.

Good luck with your Sept. assignment, and congratulations to all of the fine contributors for July.


twitter.jpg Follow me on Twitter

-


Now Available! The Digital Photography Companion. The official guide for The Digital Story Virtual Camera Club.

  • 25 handy and informative tables for quick reference.
  • Metadata listings for every photo in the book
  • Dedicated chapter on making printing easy.
  • Photo management software guide.
  • Many, many inside tips gleaned from years of experience.
  • Comprehensive (214 pages), yet fits easily in camera bag.

Technorati Tags: , ,

adobe_apps_dock.jpg

Good news out of San Jose. PetaPixel published an article pointing to an Adobe statement on the Photoshop.com blog, that Adobe "will provide support for HiDPI displays in the coming months, including the Retina Display available on the new MacBook Pro." According to the post, the updates will be free.

Photoshop CS6 and Lightroom 4 users who have the new MacBook Pro Retina Display should see quite a positive difference once the updates are available.


The Digital Story on Facebook -- discussion, outstanding images from the TDS community, and inside information. Join our celebration of great photography!


Want a compact camera that you can take anywhere, even 40' underwater? I put the Olympus TG-1 iHSthrough a grueling test during an 8-day trip to Maui, and have published my findings on TechHive in the article titled, Field Test: Olympus Tough TG-1 iHS.

Black Rock, Maui Skin diving at Black Rock in Maui with the Olympus TG-1

I loved the image quality, built-in GPS, fast f/2.0 lens (at the wide end), 4X optical zoom, 12 MPs of resolution, fast handling, light weight, all weather construction, clean menus, and pretty LCD screen. I think the TG-1 is a good value at $369 USand will serve adventurers well for years.

On the downside, the TG-1 doesn't shoot RAW and the LCD is still hard to see in certain lighting conditions underwater (the latter may be just the way it is with any LCD camera).

Check out my full report of the TG-1 iHS on TechHive. This is a terrific camera.


twitter.jpg Follow me on Twitter