Recently in Photography

  Page 262 of 382 in Photography  

I love traveling light, yet still having all the tools I need to capture, process, and upload images. It's what I call "The Nimble Photographer."

DP Review has just published an excellent group test of the Canon S95, Panasonic LX5, and the Nikon P7000 -- three excellent choices for the shooter on the go.

Along with the micro four/thirds options, such as the new Olympus E-PL2, any of these capture devices can round out your travel kit nicely. But how do they stack up against each other?

Well DP Review has done a lot of leg work for us on the compact side. Their S95 - LX5 - P7000 roundup is excellent. My favorite of the bunch is the Canon S95, followed by the LX5.

If you want interchangeable lenses, I'm really liking the Olympus E-PL2 because of its ergonomic body, great lens options, and cool variety of accessories. I'm working on a full review of the E-PL2 now, and should have more published about it soon.


twitter.jpg Follow me on Twitter


iPhoto '11 Essential Training

There are now two ways to learn and have more fun with iPhoto '11: my iPhoto '11 Essential Training ONLINE at Lynda.com, and the new iPhoto '11 Essential Training DVD that you can purchase from the Lynda.com Store for $49.95 US.

Either way, you'll have at your fingertips more than 4 hours of tips, techniques, and pure, unadulterated iPhoto pleasure. I show you how to organize, edit, share, and do amazing things with your digital camera pictures. That means that you can finally take control of every image you capture.

You can see a video introduction to this title here. Oh, and one more thing: I'll have a handful of these DVDs to give away at my upcoming talks at Macworld 2011, Jan. 26-29 in San Francisco, CA.


twitter.jpg Follow me on Twitter


There are a lot of nifty tools stashed away in Adobe Photoshop Elements 9 (Win/Mac)that can help you improve your final output. I've been playing with Photomerge Exposure to draw the best tonal values from a set of bracketed images. It's so easy to use, and the results have been quite good.

Photomerge Exposure in Photoshop Elements 9 Choosing Photomerge Exposure in Photoshop Elements 9. Click on image for full screen version.

I usually start with a set of Raw files at varying exposures. I then use the Open command in Photoshop Elements 9. This first takes me to Adobe Camera Raw for initial processing. After that, the images move into the Project Bin in Elements. I select all three in the Project Bin, then go to File > New > Photomerge Exposure.

Smart Blending Using Smart Blending in Photoshop Elements 9. Click on image for full screen version.

I use Smart Blending in the Automatic tab to adjust highlights, shadows, and saturation. Then click Done, and the application does all of the exposure merging for me. The result is a Photoshop file that I can further play with if I want.

Final Output Final output from using Photomerge Exposure in Photoshop Elements 9. Click on image for full screen version.

There are a total of six photomerging technologies in Photoshop Elements 9. All of this, plus standard image editing tools and Adobe Camera Raw support, in a package that sells for $79on Amazon. Not bad!


Image captured with a Canon 60D with a 24-105mm f/4 L zoom. ISO 1600 and custom white balance using an ExpoDisc.


twitter.jpg Follow me on Twitter


Follow Up to TDS Aperture Workshop

We started conducting photography workshops in 2010, but last week we had our first Aperture Intensive Workshop at TDS Headquarters in Santa Rosa, CA. The next Aperture event is scheduled for May 21, 2011.

I can sum up the event (from my perspective) in one sentence: "It was a blast!"

Ed at Schulz Museum TDS photographer, Ed Shields working at Schulz Museum during the Winter TDS Aperture Workshop. After all, we needed some new source material to work with.

The difference, as one attendee put it (Ed Shields, pictured above), was that he didn't want someone just telling him about Aperture, instead, he wanted to have a discussion about technique while he learned more about the program. And I think this is a big difference between this workshop and other events that I do. It's a conversation as well as teaching.

Because the groups are so small (limited to 8), we have time over the two days to really talk about different approaches, share ideas, and explore ways to customize the workflow to each attendee's particular needs. The TDS studio is very comfortable, as any visitor will attest, and we can settle in and get our work done. It's like graduate school for software.

If you're interested in attending the next event that begins on May 21, 2011 in Santa Rosa, CA, just drop me a line. The tuition is $495 per person for the two days, and that includes lunches and goodies.


twitter.jpg Follow me on Twitter


I've had my Epson R2400 since 2006, and it's still doing the job. But there are features on the latest model, the R3000, that are very desirable. Can I justify spending $850 on a new fine art photo printer when my old axe still works fine? I wrestle with this issue during today's podcast. Plus I provide a first look at the Epson R3000 inkjet printer.

Listen to the Podcast

You can also download the podcast here (28 minutes). Or better yet, subscribe to the podcast in iTunes. You can support this podcast by purchasing the TDS iPhone App for only $2.99 from the Apple App Store.

Monthly Photo Assignment

Ground Level is the January 2011 Photo Assignment. You can read more about how to submit on our Member Participation page. Deadline for entry is Jan. 31, 2010. Our SizzlPix Pick of the month for the "High ISO" assignment is Curtis Johnson for "Chester Cathedral." Congrats Curtis!

TDS Summer 2011 Photography Workshop

We're making plans now for the Summer 2011 TDS Photography Workshop. If you want your name on the reserve list, just drop me a line.

More Ways to Participate

Want to share photos and talk with other members in our virtual camera club? Check out our Flickr Public Group. It's a blast!

Podcast Sponsors

Red River Paper -- Try the $7.99 Sample Kit.

Make Your Photos Sizzle with Color! -- SizzlPix is like High Definition TV for your photography.

Blurb believes passionately in the joy of books - reading them, making them, sharing them, and selling them. Learn more by visiting Blurb on The Digital Story.


Technorati Tags:
, , , , ,


epson_r3000.jpg

I want the R3000 to be my next photo printer. I've been using my trusty Epson R2400 since 2006, and it's still churning out great prints. But it does have a few annoyances that have been addressed by the new Stylus Photo R3000, Epson's latest generation professional 13" photo printer.

First improvement is auto switching between black cartridges for matte and glossy paper. Ink technology has also improved, and the R3000 uses "UltraChrome K3® with Vivid Magenta pigment ink, combined with Epson's innovative MicroPiezo® AMC™ print head, enables the R3000 to produce gallery-quality black-and-white output, plus vivid color prints with breathtaking blues and violets.". I'm not sure about the superlatives, but I have seen prints from the latest generation of Epson photo printers, and they do look terrific.

The R3000 holds nine 25.9 ml individual ink cartridges. So that large capacity should minimize frequent cartridge replacement. I can also easily put the R3000 on my network since its connectivity options include Hi-Speed USB 2.0, wireless 802.11n, and100 Mbit Ethernet support. And like the R2400, I should be able expect excellent black and white prints with the R3000's "advanced Black-and-White photo mode that creates neutral or toned black-and-white prints from color or monochrome images." Of all the printers I've tested, I prefer B&W from Epsons.

List price at B&H Photo for the R3000 is $849.99. Its estimated availability is March 2011. I'm seriously considering it.


twitter.jpg Follow me on Twitter


"Tiny Hands" - Grab Shot 207

michael_cortina_gs.jpg "I spend a lot of my time as an amateur photographer taking photos of my two grandboys," writes Michael Cortina. "They are my favorite subjects, and my wife uses the pics in her scrap-booking and brag-books."

"This an over the shoulder picture of my 11-month old Cristian. He is close to walking, so he spends a lot of time playing at the coffee table for stability."

"I snapped this shot with my Nikon D300s and a 50mm 1.8 lens. It was taken wide open at 1/200 in natural window light at ISO 3200."

"Tiny Hands" by Michael Cortina. Click on image for larger version.

This is our 207th Grab Shot! Wow. If you want to review the collection that began back in 2006, go to our Grab Shots page.

If you have a candid you'd like to share, take a look at our Submissions page, then send us your Grab Shot. We'll try to get it published for you on The Digital Story.

And you can view more images from our virtual camera club in the Member Photo Gallery.


The Digital Story Podcast App is the best way to stream or download weekly TDS podcast episodes. No more syncing your iPhone, iPod Touch, iPad, or even your Android phone just to get a podcast. And the best part is, The Digital Story Podcast App is your way to help support this show. Download it today!


twitter.jpg Follow me on Twitter


canon_60d_18-135.jpg

I've reviewed the Canon EOS 60D extensively, both on this site and for Macworld Magazine. I felt that this $999 DSLR body is a great value for serious enthusiasts who want both top quality images and video.

Pop Photo has now published their lab test of the 60D, saying that, "it's clear that this 18MP Canon is going to be a big star." One of the most interesting areas of the test had to do with high ISO performance.

"In noise suppression, the 60D pulled a surprise upset. Canon managed to keep noise lower at its default settings than Nikon [D7000] did, despite the 60D's extra megapixels. In our test, the 60D scored a Low or better ratings from ISO 100 through ISO 800. It didn't reach an Unacceptable rating until ISO 6400, while the D7000 did so at ISO 3200. In fact, the Canon turned in lower noise results at every ISO the two cameras share, except at ISO 800, where they tied. (The 60D doesn't go past ISO 12,800; the D7000 reaches one more stop to ISO 25,600.)"

If you're interested in the Canon EOS 60D, it's worth reading the Pop Photo Lab Test.


twitter.jpg Follow me on Twitter


Olympus E-5 DSLR Pros and Cons

Olympus E-5

I've been shooting with the new Olympus E-5($1,699 street price) with the fantastic Olympus Zuiko 12-60mm f/2.8-4.0 Digital ED SWD Lens($899 street price). Talk about a DSLR that inspires confidence when you hold it. The Olympus E-5 is a solid machine. My full review is posted on Macworld Magazine if you want to see more. In the meantime, here are my pros and cons for this flagship four/thirds DSLR from Olympus.

PROS

  • Very fast autofocusing
  • Great image quality at ISO 800 and below
  • Weather resistant body tops for the money
  • Articulated 900,000 pixel LCD
  • Dual card slots (CF and SDXC)
  • Wireless flash control built-in
  • Multiple Exposure capability (up to 4 frames)
  • Add Copyright Capability (2 fields)
  • Level guage
  • 2% Spot Meter
  • Cool Art Filters including Dramatic Tone can be used in PASM modes
  • Pop up flash
  • 100% Field of View Optical Viewfinder
  • In-camera Raw to Jpeg conversion
  • Zuiko Digital ED 12-60mm (24-120mm) 1:2.8-4.0 SWD lens is a good one
  • CONS

  • 12 MP sensor (that is basically the same as in the PEN cameras)
  • AVI Motion JPEG format at 30fps seems outdated (no 24 fps), Limited video options
  • Lackluster High ISO performance compared to other flagship DSLRs
  • Only 5 fps burst mode
  • No Mode Dial
  • E-5 Specs Compared to Previous E-3

  • 12.3MP vs 10.1MP
  • HD Movie mode vs None
  • Upgraded image processor
  • Improved AE Bracketing (2, 3, 5, 7) vs 3 frames
  • 10 Art filters vs None
  • 3" Articulated LCD at 920,000 vs 2.5" at 230,000 pixels
  • SD for second slot replaces xD Picture Card
  • Same battery

  • twitter.jpg Follow me on Twitter


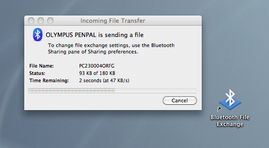
The just announced PENpal Bluetooth accessory for the Olympus PEN E-PL2 allows photographers to send images via Bluetooth to a variety of devices. This includes some smart phones, Windows computers, and Macs.


Accessory PENpal, originally uploaded by The Digital Story.

At first, I wondered how practical the PENpal would really be. After all, it's not that hard to take the memory card our of the PEN and insert it into my MacBook Air. But after some testing, I've found that the PENpal is saving me time. So I thought I would show you how.

My Normal Workflow

I have to do lots of quick turnaround work, especially with blog posts and other online projects. Usually it goes like this. I shoot the shots, take out the card, put it in the computer, browse the images in Adobe Bridge, find the one I like, sample it down to blog posting size, upload it, then return the card to the camera. Later, when I have time, I upload the entire shoot into my photo management system.

send_via_bluetooth.jpg

Olympus PENpal Workflow

Once I pair the E-PL2 with the MacBook Air, the two devices can talk to each other via Bluetooth. This changes my "quick turnaround" workflow considerably. Now, it's just these few steps:

  • Browse the photo on the 3" LCD of the E-PL2 to find the image I want to use. Right away I've saved a few steps because I immediately know the picture I want to use. If I need to, I can zoom-in on the camera to determine the quality of the shot.
  • Send the image to my Mac. It's quite easy to do. While viewing the shot on the E-PL2 in playback mode, I press the OK button to bring up the contextual menu. I choose "Send a Picture" and the photo goes directly to my Mac.
  • Upload the shot to my blog. Since the Olympus will automatically resample the photo for me before it sends it, I don't even have to open an image editor. I can choose from three sizes: Small 640x480, Large 1920x1440, or Medium 1280x960.

I'm done. And with Art Filters and other in-camera editing tools, I can actually create some pretty good looking stuff on the fly.

Does it Work with iOS Devices?

I was not able to get the PENpal to work with an iPad or iPhone. Bluetooth in those devices isn't as accessible as it is with Mac OS X. Too bad. That would a really sweet workflow to go from the PENpal to an iPad.


twitter.jpg Follow me on Twitter