Recently in Photography

  Page 278 of 382 in Photography  

When I work with the iPad, I want to work fast. Transferring images from my Canon PowerShot S90, even with the very cool Camera Connection Kit, takes longer than I want for blogs and social networking posts. Fortunately now, using the Eye-Fi Pro X2 WiFi SD Card, and a nifty application on the iPad called ShutterSnitch, I can send images directly from my camera to the iPad in about 3 seconds.

ShutterSnitch on the iPad 
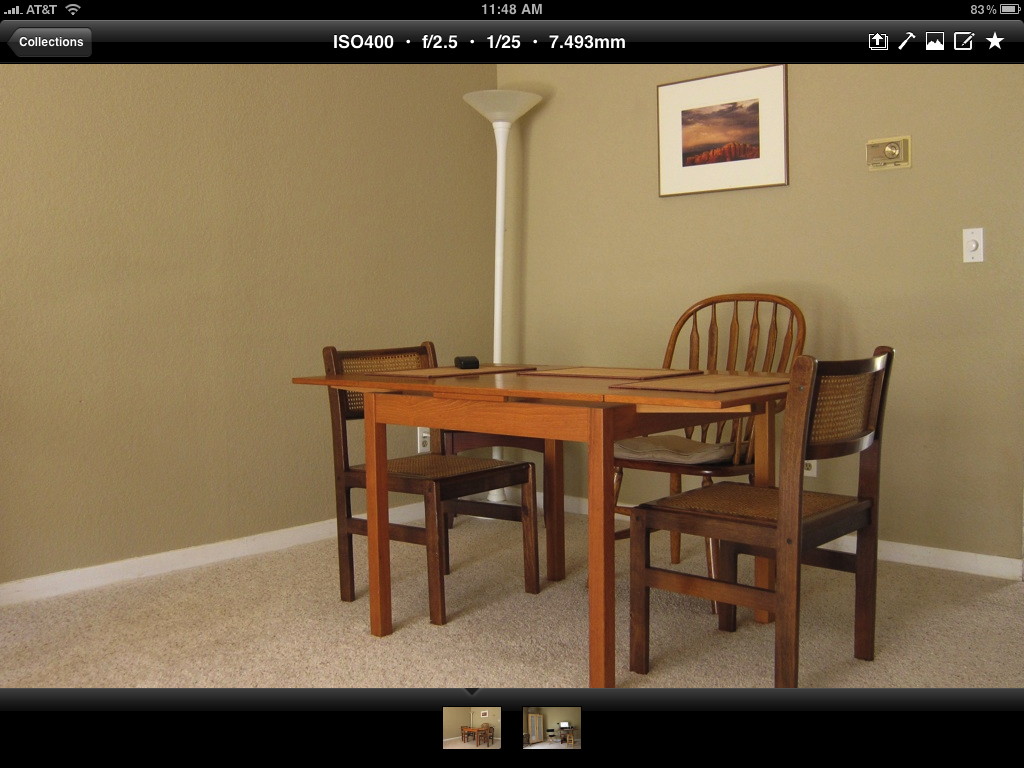
iPad image downloaded wirelessly from an Eye-Fi card using ShutterSnitch. Click for larger image.

I've been following this story since the initial release of ShutterSnitch, and have even exchanged emails with the developer. I'm just now writing about the application because I feel it's finally easy enough for most users to set up. Quite frankly, in the past it was too dificult. Now, as of version 1.1.6, all you have to do is this:

  • Set up your Eye-Fi Card - Make sure the wireless network you'll be using is registered with the card using Eye-Fi Center. Also make sure that "Public Hotspots" and "Relayed Transfer" is turned off.
  • Set up ShutterSnitch - Click on the Options button and choose "Set up Eye-Fi Access." You'll need your Eye-Fi user name and password.
  • Create a new Collection in ShutterSnitch - You have to be within a Collection to receive photos from the Eye-Fi card.
  • Take a picture - Within a few seconds ShutterSnitch will download it to the iPad.

Once the photo is on your iPad, you can send it via email, add star ratings to organize within the Collection, export to your Photos album, send up to Flickr, and more. The images sent via email were full size. Nice.

ShutterSnitch is available in the iTunes App Store for $8. And I'm happy to recommend it.

More iPad Articles

iPad Camera Connection Kit

How to Create and Deliver Content for the iPad

Acme Made iPad Cases for Style and Protection

Will the iPad Squish my Photos?

The $2 iPad Stand

Bluetooth Keyboard and iPad - A Powerful Combination

Turn Your iPad into a Live Camera

Lowepro Classified 160 AW is Perfect Bag for iPad Toting Photographers

Coolest iPad Apps for Photogs? Keynote and CameraBag

"iPad for Photographers" - Digital Photography Podcast 219


twitter.jpg Follow me on Twitter


Panasonic reminded us today that they're not ready to concede top honors for pro-toting compact cameras. With the release of the Panasonic Lumix DMC-LX5, they've provided tough competition to the Canon PowerShot S90.

Panasonic LX5

Let's take a look at a few of the specs:

Size: LX5 (110 x 65 x 25 mm) S90 (100 x 58 x 31 mm) -- Canon S90 is a bit more compact, but both cameras weigh-in around 175 g.

Image Sensor: LX5 (1/1.63" Type CCD - 11.3 MP) S90 (1/1.7" Type CCD - 10 MP) -- Again, a close call. The Panasonic sensor is a tad larger, but with more photosites crammed on there. So it may or may not perform better than the S90 in low light, given that all other variables are equal. My experience is that Canon does a better job with image noise than Panasonic. (Thanks Thomas for helping me with the math!)

Lens: LX5 (24-90mm - f/2.0 - 3.3) S90 (28-105mm f/2.0 - 4.9) -- Panasonic lens is a bit faster overall and is wider. Canon zoom has a bit more reach. Which is better will probably depend on your shooting style.

LCD: LX5 (3" 460K dots) S90 (3" 461K dots) -- A virtual tie.

Video: LX5 (up to 1280 x 720) S90 (up to 640x480) -- Panasonic gets this one.

Continuous Shooting: LX5 (2.5 fps for 3 frames) S90 (1 fps with not specified limit) -- Panasonic is better at capturing short bursts.

Auto Focus: LX5 (23 point) S90 (9 point) -- Panasonic has more focusing points.

Price: LX5 ($499 when released in Aug. 2010) S90 ($349 available now) -- The Canon is definitely more affordable right now.

The Panasonic LX5 has some other goodies that aren't available for the Canon S90, such as a hot shoe, accessory electronic viewfinder, and the ability to accommodate filters. On paper, the LX5 looks like a great camera that beats the Canon S90 in many categories. The bottom line will be image quality. We'll have to wait and see for that comparison.


twitter.jpg Follow me on Twitter


Olympus E-PL1 HD Movie Recording Rig

Imagine a complete HD recording rig -- LED light, external mic, and camera -- that weighs only 2.8 pounds? I started with an Olympus PEN E-PL1 micro four thirds camera, then added an Olympus SEMA-1 Mic Adapter for stereo audio recording. For lighting, I mounted a Litepanels LP Micro Compact LED Light Kit on a bracket to augment the ambient light and to balance facial tones. The entire rig was held together with a Stroboframe Quick Flip 350 Flash Bracket. This set up is so light that you can hold it with one hand, although I don't recommend that for recording.

You can watch this rig in action by checking out the movie trailer for Home Brew, a look at making beer at home with a very impressive stainless steel operation -- burners, pumps, fermentors, and more.


Super-light recording rig features an Olympus E-PL1, 14-150mm zoom, mic adapter with stereo mic taped to the bracket, and a Litepanels micro LED light for fill. Click on image for larger version.

Listen to the Podcast

You can also download the podcast here (30 minutes). Or better yet, subscribe to the podcast in iTunes. You can support this podcast by purchasing the TDS iPhone App for only $2.99 from the Apple App Store.

Monthly Photo Assignment

Torn is the July 2010 Photo Assignment. You can read more about how to submit on our Member Participation page. Deadline for entry is July 31, 2010.

The SizzlPix Pick of the Month for Photo Assignment 51 (Fire) is awarded to Dan Newsom for his non-literal interpretation of fire.

TDS Autumn 2010 Photography Workshop

The next TDS Photography Workshop will be Oct. 16-18, 2010. You can place your name on the reserve list now. Just drop me a line. We currently just have a couple spots open, so don't delay.

More Ways to Participate

Want to share photos and talk with other members in our virtual camera club? Check out our Flickr Public Group. It's a blast!


twitter.jpg Follow me on Twitter

-


Podcast Sponsors

Red River Paper -- Try the $7.99 Sample Kit.

Make Your Photos Sizzle with Color! -- SizzlPix is like High Definition TV for your photography.


Technorati Tags: , , , , ,

Blurb on The Digital Story

What's the best book-making tool for showing off your thoughts and images? The conclusion I've come to for our virtual camera club is Blurb. In my opinion, they rise above others for producing high quality print on demand books for photographers.


You can bookmark "Blurb on The Digital Story" or click on the bright blue Blurb logo in the Sponsors list (on every page of TDS) to see what's happening in the world of Blurb.


So, I started talking with them. The result of our discussions is Blurb on The Digital Story. This sponsored site provides you with weekly feature articles about books and bookmaking, incoming feed from the excellent Blurberati blog, ongoing Blurb Twitter conversations, and the crown jewel: Blurb Book Page of the Month.

Blurb Book Page of the Month

You know how much I like finding interesting avenues for you to share your work with others (especially if you get a little something extra in return). And now we have a new way to shine a light on your creativity. The Blurb Book Page of the Month will feature the most interesting book page designs from The Digital Story audience. Each month, a featured photographer will also receive a $75 Blurb certificate and a copy of How to Make a Gorgeous Photo Book. I have a copy myself, and it is informative and stunning. You can get all the details about participating in Blurb Book Page of the Month on the new Blurb on The Digital Story site. It's very easy. It doesn't cost you anything. And believe, it's very rewarding.

I've also updated the Member Participation page on TDS that explains all of the opportunities for sharing your work and communicating with us.


Blurb on The Digital Story is a sponsored site dedicated to using Blurb tools for telling your story through photographs and words.


When I travel, my motto is: make space, don't erase. At first this may sound insane to you. But as you plan your trips, try to calculate how much camera memory you'll need, then get your hands on enough of it to cover your estimated shooting. Why?

Because you always want to have your pictures live in two places. Many photographers upload their images to a laptop in the evening, then erase their cards in preparation for the next day. In that scenario, your images only live in one place, and that's on a computer hard drive. If you were to keep your photos on the memory card too, then you would be much better protected against mishap.

I also recommend printing your contact information on each memory card in case it is misplaced. Plus, if you leave your camera behind, the card that's in it will tell people how to find you.

Currently, I'm packing a variety of 16GB memory, including the Kingston Elite Pro 16 GB 133x CF Cards ($40), and the Sandisk 16GB Extreme CF card ($95).


twitter.jpg Follow me on Twitter

-

We've caught wind of the new Panasonic LX5, and one of its most important changes is the upgraded zoom lens (24-90mm f2-3.3 vs 24-60mm f2-2.8). Here's a quick comparison between LX3 and LX5.
aperture_icon.png

At the start of 2010, I switched from the Managed File approach in Aperture to Referenced Files. I think both systems are good. It depends on your particular situation as to which is best for you.

But, regardless of your choice, be sure to use the wonderful incremental backup system built into Aperture called the Vault. It's a simple one-click tool that saves all of your work to a separate hard drive. If you're using the Managed File approach, the Vault backs up your masters too. Referenced File users must back up masters separately. Either way, one thing I've discovered is: the work that I do to organize, edit, and add metadata to my images is as valuable to me as the pictures themselves.

During my week of coping with my Drobo problems, the bright spot was how I had previously organized my files and having the Vault to put everything back together on a separate drive.

In short, I moved my 2010 Referenced File structure to a hard drive that had an up-to-date 2010 Vault on it. I enabled a Vault Recovery on the drive, and in just a few minutes, Aperture put everything back together for me. All of my work was there, all of the Referenced Files were reconnected, and I was back in business.

Moral of the story for me is: the Aperture Vault is invaluable, regardless of which library system I'm using.

More Aperture Tips and Techniques

To learn more about Aperture 3, check out my Aperture 3 Essential Training on Lynda.com. Also, take a look at our Aperture 3 Learning Center. Tons of free content about how to get the most out of Aperture.


twitter.jpg Follow me on Twitter


"The Big Yawn" - Grab Shot 199

"My dog Daisy is a frequent model for me," writes Gabrielle Rhodes, "but sometimes our sessions go a little long and she gets bored. This week I caught her in the middle of a full yawn."

Gabrielle Rhodes Grab Shot 199

Photo by Gabrielle Rhodes. Click on image for larger version.

Gabrielle captured The Big Yawn with a Nikon D3000 and a 18-55mm zoom lens. ISO was set to 100, and fill flash was on.

If you have a candid you'd like to share, take a look at our Submissions page, then send us your Grab Shot. We'll try to get it published for you on The Digital Story.

And you can view more images from our virtual camera club in the Member Photo Gallery.


The Digital Story Podcast App is the best way to stream or download weekly TDS podcast episodes. No more syncing your iPhone or iPod Touch just to get a podcast. And there's more! Tap the Extras button for free passes and discounts and the current Grab Shot by our virtual camera club members. Each podcast episode has its own Extras button, too, that contains more goodies such as pro photo tips. And the best part is, The Digital Story Podcast App is your way to help support this show.Download it today!


twitter.jpg Follow me on Twitter


What's the best way to protect your Olympus, Panasonic, Sony, or Samsung compact DSLR and still look stylish? You bought one of these nimble cameras to travel light, yet have all the functionality that you need. I have three Lowepro camera bags that work great for the Olympus PENs, Panasonic G series, Sony NEX, and Samsung NX10 camera systems.

Lowepro Bags for Micro 4/3 Cameras From left to right: Lowepro Apex 110 AW, Impulse 110, and Edit 110 bags for compact DSLRs. Click on image to enlarge.

Lowepro Apex 110 AW ($40) -- For outdoor work where the elements come into play. Included All Weather cover, belt loop, shoulder strap, sliplock loops, memory card pouches, padded handle, rugged rubber trim, and micro fiber cloth. Heavily padded design.

Fits Olympus PEN with 14-150mm zoom lens, and Panasonic, Sony, and Samsung bodies with any zoom. Additional room for pancake lens (such as Panasonic 20mm, Olympus 17mm, or Sony 16mm). But no room for additional zoom lens other than what is mounted on the camera. Most rugged of three cases.

Lowepro Impulse 110 ($19) -- For urban work. Largest of the three bags with shoulder strap, top loop but no padded handle, side pockets and front document pocket.

Fits Olympus PEN with 14-150mm zoom lens, and Panasonic, Sony, and Samsung bodies with any zoom. Additional room for pancake lens (such as Panasonic 20mm, Olympus 17mm, or Sony 16mm) and kit zoom lens separately. Accessories can be stored in side pockets.

Lowepro Edit 110 ($17) -- Suitable for urban or outdoor work. Shoulder strap, padded top handle, 2 side pockets, zippered front pocket, zippered mesh pocket inside, and belt loop.

Fits Olympus PEN with 14-42mm zoom lens, and Panasonic, Sony, and Samsung bodies with kit zooms. Additional room for pancake lens (such as Panasonic 20mm, Olympus 17mm, or Sony 16mm). Accessories can be stored in side pockets, zippered front pocket, or zippered mesh pocket inside. Heavily padded, all purpose bag for those who don't use the long zoom lenses (such as the Olympus 14-150mm).

Bottom Line

Rugged outdoor types who like the longer zooms should consider the Apex 110 AW. It can withstand just about any environment and protect your gear. For those who need a bit more room and tend to work in urban environments, the Impulse 110 is an affordable choice. And shooters who sometimes venture into the great outdoors, but need a good all purpose bag at an affordable price should look at the Edit 110.


twitter.jpg Follow me on Twitter


nanocam on bike

There are all sorts of ways to record video while riding your bike... and here's another. I'm using an iPod nano placed inside of a badge holder (that we all have from trade shows and conferences). I set the nano to video record, and off I go.

nanocam rig using badge holder to house iPod nano while riding. Click on image for larger version.

The Details

I cut a square hole in the clear part of the badge holder for the iPod nano camera lens and microphone. I hang the badge holder around my neck, and add a little stability using a cord that is looped around the bike frame. This allows me to record when both hands are on the bike.

However, the best recording happens when I can take one hand and steady the badge holder while peddling. It's much easier to grip than the nano itself, plus you don't have to worry about dropping it. The holder also allows me to direct the camera at other angles. If I need to put both hands on the bike, I can while still recording, thanks to the security of the rig. I also found that if I loop my thumb around the stabilizing cord while both hands are on the bike, I can still record decent video. It's definitely a trial and error procedure, though.

Bottom Line

This is yet another silly contraption for video recording while biking. Since nearly everyone has a conference badge holder laying around, however, this is a method you can rig up in just a few minutes.


twitter.jpg Follow me on Twitter