Recently in Photography

  Page 283 of 382 in Photography  

I've always felt that shopping for camera batteries is about as exciting as buying tires for a station wagon. Yes, you need them both, but they cost more than you want to spend and are less than thrilling to use.

Since the manufacturer's batteries are pricy, it's tempting to save a few bucks using batteries made by other folks. So I decided to put this to the test with my Canon PowerShot S90 compact camera. When I purchased the second battery, I opted for the ProMaster NB6L Lithium at $24.95 instead of the Canon NB-6L Li-Ion Battery at $41.75.

The specs for both batteries are the same. And after a few months of alternating back and forth between the two, I haven't noticed any performance differences.

So my initial conclusion is: as long as the third party battery is of good quality, I don't see a reason to pay more for the manufacturer's brand. If you've tested this with other cameras, please post a comment with your findings.

The one accessory you never want to forget when traveling to sunny, colorful locals is the polarizing filter. This item alone will separate your images from those around you.

I recently explored the streets of St. George, Bermuda, and the Royal Naval Dockyard with my Canon 5D Mark II with 24-105mm zoom and a circular polarizer. Even though it's only a 2 hour flight from the Atlantic Coast of the US, St. George feels another world away. I was able to better show the texture and color of this town using the polarizing filter on a sunny day.

Later, in class, many of my students asked why my shots looked so much different than theirs. I cited the pola might be a factor, then asked how many remembered to pack one. No one did. Don't let this happen to you!


Rusty beams during a stop over at the Royal Na val Dockyard in Bermuda. Captured with a Canon 5D Mark II, 24-105mm f/4 zoom with a circular polarizer. Click on image for larger version. Visit the TDS Flickr Gallery for more images from Bermuda shot this way.


flickr_st_georges.jpg

To see the entire collection, visit the TDS Flickr Gallery.


twitter.jpg Follow me on Twitter

-


The magnification loupe in Aperture is more versatile than you may realize. In this short video, I show you a few of its tricks.

This video tutorial is from my Aperture 3 Essential Training on Lynda.com. There are more than 8 hours of hands on training there. Go check it out!

More Aperture Tips and Techniques

To learn more about Aperture 3, check out my Aperture 3 Essential Training on Lynda.com. Also, take a look at our Aperture 3 Learning Center. Tons of free content about how to get the most out of Aperture.


twitter.jpg Follow me on Twitter

photoshop_cs5_box.jpg

In addition to the sexy stuff, Adobe does a great job of adding refinements to each release of Photoshop. I just found this article by Jason Anderson, Five Best Kept Secrets of Photoshop CS5, and he lists some nice touches that you might not know of. My favorite of the bunch?

Sharing Your Monitor -- In CS5, the feature has been added where you can share your monitor with others so you can show people exactly what you are looking at. I can totally see this as a feasible solution for clients that are remote to your location, and travel costs need to be kept down. Even training seminars could be conducted this way...imagine sitting at your computer at work (or home) and watching an instructor teaching you live from their own desktop!

Be sure to check out the other four best kept secrets by Jason.

More About Photoshop CS5

How to Tame HDR Toning in Photoshop CS5

"Photoshop CS5" - Digital Photography Podcast 221


twitter.jpg Follow me on Twitter

-


When working with a two-flash set up on the go, you can easily change the power ratios between your main light and the fill light (without having to fiddle with moving light stands around). For my rig, I use the Canon Speedlite Transmitter ST-E2 with a pair of Canon 580EX II flashes.

To set up your rig, make sure the flashes are in slave mode and the transmitter is secured in the hotshoe and turned on. Set the 580 EX II flash on your left to "Group A," and the flash on your right to "Group B." Then all you have to do is press the Ratio button on the back of the transmitter, and choose the lighting scheme using the two navigation buttons to the right of the Ratio button.

Canon Transmitter ST-E2

For portraits, I usually start with a 4:1 ratio with this rig. But if I don't like the effect, I can easily adjust. I have a total of 13 ratio settings to choose from! This set up works great.


twitter.jpg Follow me on Twitter

-


I was curious as to what DP Review would write in their examination of the Olympus E-PL1, a camera that I'm quite fond of. Overall, I think they're on target, especially their assessment of its image quality:

"The most important aspect of any camera is its image quality and it is, without question, the E-PL1's strongest point. By just about any measure, the E-PL1's image quality is very good indeed and, thanks to one the most capable JPEG engines we've come across, is easily accessible to everybody. The camera's metering is dependable, meaning that in most circumstances you get bright, punchy images that make the most of the camera's capability."

I don't completely agree with DP Review's view that the E-PL1 is better for those moving up from a compact rather than photographers looking for a second, more portable DSLR. I think it works for both audiences. But, after all, these are matters of personal taste, and every potential customer has to decide for him or herself.

I think most people will agree that for a price of $575 for an E-PL1 kit, this camera is a good value.


twitter.jpg Follow me on Twitter

-


Business has been tough for everyone the last couple years. But we're starting to see a few bright spots in photography hires. Wedding shooters are reporting a bit of an upswing, both in bookings and in order size. This week, I sit down with working photographer Karen Linsley, the owner of Image Angels, a full service photography studio. Karen provides some great insights on not only the state of photography business, but on how she prepares for weddings and other big shoots. It's a conversation I'm sure you'll enjoy.

Listen to the Podcast

You can also download the podcast here (24 minutes). Or better yet, subscribe to the podcast in iTunes. You can support this podcast by purchasing the TDS iPhone App from the Apple App Store.

Monthly Photo Assignment

Fire is the May 2010 Photo Assignment. You can read more about how to submit on our Member Participation page. Deadline for entry is May 31, 2010.

Simone Brogini was the "Sizzlpix Pick of the Month" for Photo Assignment 49. The prize is an 11"x14" Sizzlpix of the winning photograph. Congratulations Simone! (BTW: it's pronounced "Si Mon Ne" regardless of how badly I pronounce it on the show.)

More Ways to Participate

Want to share photos and talk with other members in our virtual camera club? Check out our Flickr Public Group. It's a blast!


twitter.jpg Follow me on Twitter

-


Podcast Sponsors

Red River Paper -- Try the $7.99 Sample Kit.

Make Your Photos Sizzle with Color! -- SizzlPix is like High Definition TV for your photography.


Technorati Tags: , , , , ,

Wouldn't it be wonderful to build multimedia presentations of your work using HTML5 and publish them online to be enjoyed by iPads all over the world? As of today, you can. And it's easy.

iPad Publishing

Thanks to a new web site called Padilicious, you can download prewritten Automator Actions that allow you to create browser based content for display on the iPad and Internet-connected computers. Simply select the project images in Aperture, iPhoto, or the even the Finder, and run a simple Mac OS X Service that automatically builds an iPad web-app and hosts it on your MobileMe website for others to easily view on their computers and iPads.

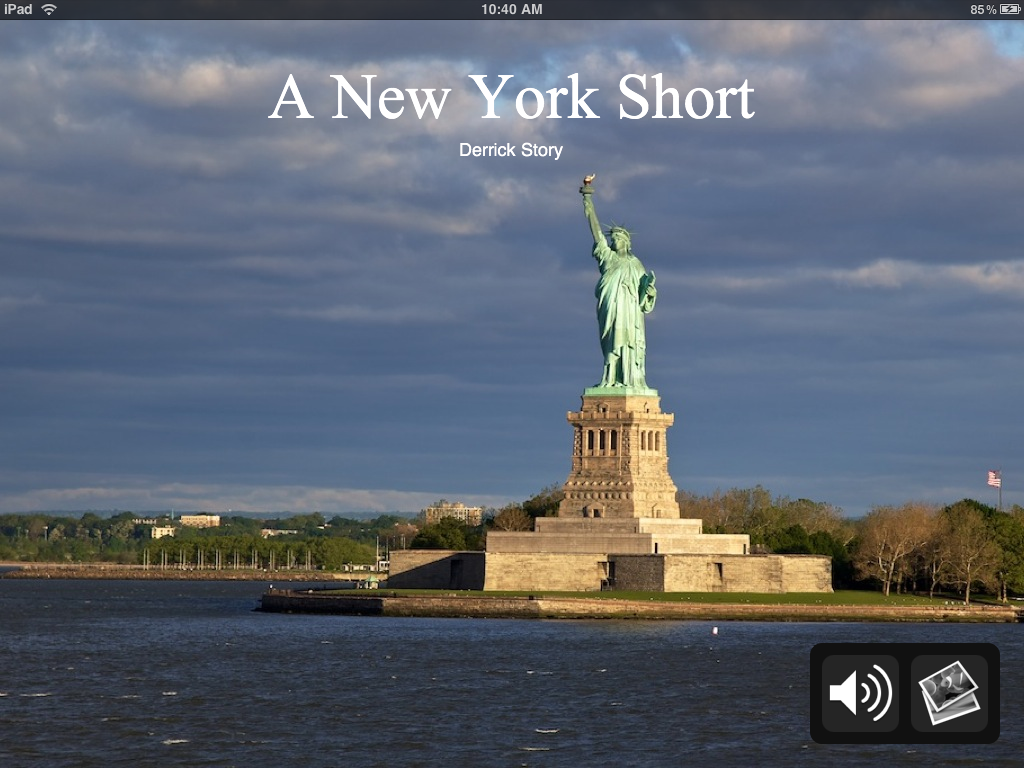
I created and published this presentation titled, A New York Short in about 15 minutes. You can view it on your computer, but the real magic happens when you access this URL via your iPad. If you want to watch it full screen on your iPad, simply Bookmark it (use the + symbol in Safari) and choose "Add to Home Screen" from the popup menu. Now all you have to do is tap on the new App icon you've created, and the iPad will allow you to enjoy the presentation in full screen mode.

This authoring tool opens new doors for content creators who want to build custom presentations for the iPad. All the instructions, plus the installers, are available at Padilicious.com. And it's all free.

One tip for MobileMe users. Be sure you publish your content in the Web folder on your iDisk. The path is: yourname > Web > Sites > yourpresentationfolder. I made the mistake of dropping it directly in the Sites folder at the top level. Ack! That doesn't work.

Photographers and writers... have fun with this!

More iPad Articles

Acme Made iPad Cases for Style and Protection

Will the iPad Squish my Photos?

The $2 iPad Stand

Bluetooth Keyboard and iPad - A Powerful Combination

Turn Your iPad into a Live Camera

Lowepro Classified 160 AW is Perfect Bag for iPad Toting Photographers

Coolest iPad Apps for Photogs? Keynote and CameraBag

"iPad for Photographers" - Digital Photography Podcast 219


twitter.jpg Follow me on Twitter

-


Working in full screen mode enables you to dedicate every pixel of display resolution to your photography. Aperture 3 includes many major improvements to this functionality, so many in fact, that you may not be taking full advantage of its capabilities.

In this free 5-minute video tutorial from my Aperture 3 Essential Training on Lynda.com, I show you how to quickly master full screen mode to work more efficiently, and, more enjoyable.

More Aperture Tips and Techniques

To learn more about Aperture 3, check out my Aperture 3 Essential Training on Lynda.com. Also, take a look at our Aperture 3 Focus Section. Tons of free content about how to get the most out of Aperture.


twitter.jpg Follow me on Twitter

"First Ride" - Grab Shot 196

"Lilly is a 3 year old who just started riding horses," writes Fred Brundick. "The first time she came to the farm, all we heard was 'Aunt Debbie, Aunt Debbie, when can I get on a horse?'"

"She has doubled-up a couple of times with the 8 year old girl who takes lessons on Tish. But I took this picture the first time that Lilly rode Tish by herself. I like Lilly's look of concentration, the pink and purple colors against the blurry green background, and the shine in Tish's coat."

Fred used a Nikon D70s with a Nikkor 55-200mm f/4-5.6 zoom lens. He was in aperture priority mode set to f/8. ISO was 400 resulting in a 1/640th shutter speed.

Photo by Fred Brundick. Click on image for larger version.

If you have a candid you'd like to share, take a look at our Submissions page, then send us your Grab Shot. We'll try to get it published for you on The Digital Story.

And you can view more images from our virtual camera club in the Member Photo Gallery.


The Digital Story Podcast App is the best way to stream or download weekly TDS podcast episodes. No more syncing your iPhone or iPod Touch just to get a podcast. And there's more! Tap the Extras button for free passes and discounts and the current Grab Shot by our virtual camera club members. Each podcast episode has its own Extras button, too, that contains more goodies such as pro photo tips. And the best part is, The Digital Story Podcast App is your way to help support this show.Download it today!


twitter.jpg Follow me on Twitter

-