Recently in Photography

  Page 302 of 382 in Photography  

"I took this at Spring 2008 Strawberry Music Festival," writes Moira Haines. "We were enjoying a short reprieve from the rainy weekend. It seems that bubbles are more captivating than religion to some, and I enjoyed watching the innocent fascination on the boy's face."

Moira used her Olympus C 770UZ digital camera to capture this captivating scene.

Photo by Moira Haines. Click on image to zoom to larger size.

If you have a candid you'd like to share, take a look at our Submissions page, then send us your Grab Shot. We'll try to get it published for you on The Digital Story.

And you can view more images from our virtual camera club in the Member Photo Gallery.


twitter.jpg Follow me on Twitter

-


Technorati Tags: , , ,

As I described in a recent podcast, The Simple Photo Shoot, I love grabbing my camera, going to the park, and shooting portraits. You'd be surprised at how well these images can look if you apply a few easy techniques.

In my new Lynda.com training, Photo Assignment: Natural Light Portraits, I take you on a photo shoot with me (and a lovely model) to illustrate some of my favorite natural light techniques. Once the shoot is over, we go back to the computer to analyze our images. Some techniques work better than others, but you get to see them all.

Photo by Derrick Story for the Natural Light Training Video. Canon 5D Mark II and 70-200mm f/2.8 IS L lens.

natural_light_portriats.png

Then here's the part I'm really excited about. I'm facilitating a Flickr Public Group page dedicated to sharing all of our images and ideas connected to natural light portraiture. The page just went live yesterday, and already we have lots of great stuff to look at, think about, and possible incorporate into our own bag of tricks.

This is the first of many photo assignment trainings that I'm doing for Lynda. If you want an easy way to learn new techniques, practice them, then share with others, I highly recommend both the Lynda.com training, and the participation on the Flickr page.


twitter.jpg Follow me on Twitter

-


The Canon BG-E5 Battery Grip ($117) provides comfort for larger hands, gives you two battery options, and adds a vertical shutter release button. An interesting side benefit that isn't listed in the specs is that it also makes either the Rebel T1i or XSi a bit more chunky and professional looking.

When I'm on the road in outdoor settings, I load up the battery grip with 6 Sanyo Eneloop rechargable AA batteries. That way, if I'm away from power for extended periods, I can keep shooting as long as I have AAs on hand. You can also use two LP-E5 lithium batteries instead. This configuration is much lighter than AAs. You get inserts for each of the two configurations. So switching back and forth is easy.

The built-in control buttons for vertical shooting include shutter release, AE/FE lock, main dial, and aperture/exposure. So no matter which way you turn the camera, you have maximum comfort.

Unlike with bigger cameras, when you want to travel lighter, just remove the battery grip, insert a single LP-E5 lithium battery, and you're ready to go. The bottom battery door does need to be removed to use the grip. It's easy to snap on and off. Just make sure you don't lose it when it's not in use.

Other Posts on the Canon Rebel T1i

Canon Speedlite 270EX Review - Versatile, Compact Flash

Canon Digital Rebel T1i Field Test at Bodie State Park, California

Street Shooting with Canon 500D/T1i

"Hands On Review of the Canon T1i (500D) - Digital Photography Podcast 179


twitter.jpg Follow me on Twitter

-


What is the simple photo shoot? I define it as one camera, one lens, and one accessory. That's all you take. The ginormous bag of lenses and modifiers stay home as you go "MacGyver" and improvise with the equipment that you have in hand.

In this week's show I discuss how important the simple photo shoot is, and detail my latest one, a portrait shoot with Bonnie at the park. My three pieces of equipment? 1) Canon 5D Mark II 2) Canon 70-200mm f/2.8 L IS zoom lens. 3) Canon 270EX compact flash. Listen to how I used these items during a relaxing photo session.

"Bonnie in the Park" by Derrick Story Captured with a Canon 5D Mark II and a 70-200mm f/2.8 lens. Click on image to zoom. See the entire gallery on The Digital Story Flickr page.

Listen to the Podcast

You can also download the podcast here (29 minutes). Or better yet, subscribe to the podcast in iTunes.

Monthly Photo Assignment

Feet is the Oct. 2009 Photo Assignment. Shoes, bare feet, paws, manmade objects, my gosh there are so many possibilities. You can read more about how to submit on our Member Participation page. Deadline for entry is Oct. 31, 2009.

More Ways to Participate

Want to share photos and talk with other members in our virtual camera club? Check out our Flickr Public Group. It's a blast!


twitter.jpg Follow me on Twitter

-


Podcast Sponsors

SiteGrinder lets you take ownership of your websites. Effortlessly output pages right from Photoshop.

Red River Paper -- Try the $7.99 Sample Kit.

Add Magic to Your Slideshows -- FotoMagico presentations are so amazing that your audience will be asking how you did it.


Technorati Tags: , , , , ,

lightroom_logo_sm.jpg

Lightroom's presets in the Develop module are one of the application's best features. Out of the box you get cool effects such as aged photo, antique light, selenium tone, punch, and much more. If you have the Navigator open, then you can mouse over the preset and see a sample of the effect applied to a thumbnail of your image. Great stuff. You can also create your own presets. So if you build an effect that you love, you can easily apply to future images.

Since presets are sharable documents, you can benefit from the creative experimentation of others. I found an excellent resource at Yanik's Photo School, Top Free Lightroom Presets that lists all sorts of terrific stuff. Yanik also shows you how to install LR presets, which I think is a helpful tip unto itself.

If you want the inside scoop on Lightroom, also keep an eye on the Lightroom Journal. It's info straight from the Adobe Lightroom team.


twitter.jpg Follow me on Twitter

-


Easy Geotagging with the Eye-Fi Geo

eye-fi_geo.jpg

In my latest Macworld Magazine article, a review of the Eye-Fi Geo, I show the ins and outs of the $60 SDHC card that provides wireless transfer of pictures to your Mac. Using WiFi to move images from camera to computer is nice, but the real beauty of this device is that it provides easy geotagging for urban shooters. And if you use iPhoto as your picture management software, the Eye-Fi Geo will send your images directly to the application. When you view your shots for the first time on the computer, they have already been tagged with location coordinates and places information. This is about as easy as capture geotagging gets.

This workflow is for Jpeg shooters. You can have all the images sent to iPhoto, or use the Protect key on your camera to mark the images your want transferred. During my tests, it took about 12 minutes to send 40 high rez Jpegs from a Canon T1i to a MacBook. When I opened up the pictures in iPhoto, all of the geodata was in place. So even though transfer takes longer than with a USB card reader, a lot of good stuff happens as a by product of the process.

Mac shooters who want a low-cost way to experiment with capturing geodata at capture might want to take a look at the Eye-Fi Geo. It's available exclusively at the Apple Store.

More Posts on Geotagging

Selective Transfer For Older Eye-Fi Cards Too

Copy and Paste Geodata in iPhoto 8.0.2 (iPhoto '09)

Macworld Magazine Article (by me): "Geotag your photos on-the-go"

A Quick Primer on Geotagging

"Introduction to Geotagging" - Digital Photography Podcast 165

Testing the Eye-Fi Explore Card at Home

Geotagging a Journey with photoGPS, iPhoto, and Flickr

iPhoto '09 as Your Geotagging Tool?

First Look at Jobo photoGPS Device and Software

Update to Geotagging Workflow, Including Jobo photoGPS

Finding a Reasonable Geotagging Workflow


twitter.jpg Follow me on Twitter

-


Technorati Tags: , , , , , ,

Editor's Note: Jim Garrett and I have exchanged emails about building a low cost photo workflow. I liked his thoughts and asked him if he would consider writing them up for publishing on The Digital Story. He agreed. So, here is his terrific article about building an efficient workflow. I think you're going to like what Jim has to say.

Diagraming Your Workflow

by Jim Garrett

After listening to I've Taken Great Pictures, Now What?, Podcast 176, I realized that I was using a lot of different software tools in my workflow, and I seemed to be jumping around a lot. I also realized that I was wasting time editing images that I had no intention of sharing -- just because I could. Although this improved my editing skills, I felt that if I could streamline the flow, it would mean spending less time on the computer and more behind the camera.

I am not a professional photographer. However, I am interested in making my pictures the best they can be. I do occasionally take family portraits for friends and family and have even taken pictures at wedding receptions for a nominal fee. I, like many enthusiasts, don't have the resources to purchase an all-in-one workflow solution like Lightroom or Aperture. I either use software that came with my camera, software that I got cheap or free with some piece of hardware, or freeware/shareware. This makes a workflow that moves from one program to another, since none of the cheap stuff does everything. For example, the software that came with my camera does a pretty good job processing my RAW images, but is slow and limited at image editing (removing red-eyes, cropping, repairing blemishes, etc.).

workflow_one.jpg

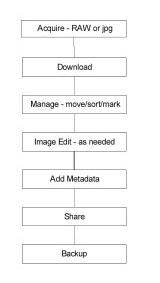
After listing to the podcast, I saw my workflow as a straight line, like this illustration.

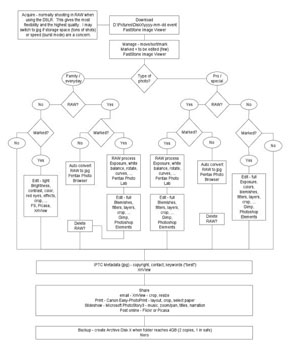
However, when I really looked at how and what I shoot, I realized that the path I take is not at all straight or simple. My workflow depends on 3 factors. First, it depends on what I am shooting. Most of my pictures are just family events like the kids playing sports, camping trips, or get-togethers. The vast majority of these images are fine right out of the camera. However, sometimes I am taking a family portrait (myself, friends, or paying customers), or shots at a wedding reception that I may share or sell. These images I want to treat differently. My workflow also depends on the format I captured my images in, RAW or Jpeg. Since storage for me is limited, I don't want to keep every image I ever shoot in RAW format. The last factor that determines my workflow is the quality of the shot, my personal rating. Images I really like and want to share/sell/publish, I will also treat differently.

Once I realized that my workflow is not a simple straight path, I decided to make a workflow diagram (see the second diagram). I did this using Microsoft Visio, but you could do it with any word processor, or even a pencil and paper.

Here's what building the diagram did for me. (Click on image to enlarge it.)

1. It made me take a hard look at what I am doing and why. I discovered that there was some rhyme behind my reasoning, some reasons why I was skipping around and opening so many different software tools after each download.

2. As I focused on each step of the workflow, this naturally led me to analyze each piece of software and compare its strengths to the others. With these discrete steps in the process, I was able to compare the tools in a much more meaningful way. For example, I had 5 ways to download my images from my camera. I decided what was most important to me about downloading (location and folder names on my hard drive, speed, and skipping duplicates), then I tested each one to see what worked best for me. I did the same thing with each step in the process. When 2 tools work about the same, I went with the one that was the same as the previous or next step in the workflow. This saves time changing programs.

3. I found that following my "optimized" workflow helped me get organized and stop wasting time on images that I don't need to spend a lot of time on. This frees me up to use my limited time working on what matters most.

In my current workflow diagram, (the one I have posted on my computer) I have the task, the most important subtasks and the software tool that best accomplishes them. This helps me to not forget any step, remember which tool to use, and what the major tasks are in each step.

After you make your diagram and decide on the tools that work best, post it on your computer and follow it religiously. If it doesn't work for you, change it. If it does work, use it all the time. It will improve your efficiency, make your work more consistent, and make you a better photographer.

About the Author

Jim Garrett, husband and father of three, is also a photo enthusiast. Jim shoots with a Pentax DSLR. He's a research engineer for a major tire manufacturer. Other hobbies include hiking, camping and cycling.

Tips for Creative Wedding Shots

When you're not the primary photographer at an event, you have more freedom to experiment. I just read an article with good suggestions for adding creativity to your shoot, 7 Ways To Be More Creative At Your Next Wedding. I'll add one of my favorite tips too.

I like to get the bride and groom in a different setting nearby to change the look of the album. Sometimes I feel like the shots are all starting to look the same, so by finding a new context, I can jazz things up a bit. Once you have the couple isolated from the guests for a few minutes, encourage them to play. They're more likely to "let their hair down" if they don't have an audience staring at them.

Photo by Derrick Story, captured with a Canon 5D, ISO 400.


twitter.jpg Follow me on Twitter

-


"Transport" challenged this month's contributing photographers to capture the world on the move. We have terrific images featured in this member gallery.

The October 2009 assignment is "Feet." Start working on your contribution now. Details can be found on the Member Participation page. You can submit photo assignment pictures up to 600 pixels in the widest direction.

Please follow the instructions carefully for labeling the subject line of the email for your submission. It's easy to lose these in the pile of mail if not labeled correctly. For example, the subject line for next month's assignment should be: "Photo Assignment: October 2009." Also, if you can, please don't strip out the metadata. And feel free to add any IPTC data you wish (These fields in particular: Caption, Credit, Copyright, Byline), I use that for the caption info.

Photo by David Bream. You can read more about how David captured this shot, plus see all of the other great images on the August 09 Gallery page.

Good luck with your October assignment, and congratulations to all of the fine contributors for September. It's a great collection of images.


twitter.jpg Follow me on Twitter

-


Now Available! The Digital Photography Companion. The official guide for The Digital Story Virtual Camera Club.

  • 25 handy and informative tables for quick reference.
  • Metadata listings for every photo in the book
  • Dedicated chapter on making printing easy.
  • Photo management software guide.
  • Many, many inside tips gleaned from years of experience.
  • Comprehensive (214 pages), yet fits easily in camera bag.

Technorati Tags: , ,

image_capture_icon.jpg

I've always been a big fan of the free application Image Capture, but with the release of Snow Leopard, new life has been breathed into this handy tool for photographers. In my latest Macworld article, Eight Amazing Image Capture Tricks, I show you how it can complement just about any workflow on the Mac.

What's interesting about the Macworld piece is that I had originally written it for Leopard. Even with the previous release of Mac OS X, I found Image Capture a noteworthy utility. But Snow Leopard brought about some major improvements.

  • You can control your WiFi connected scanners from any Snow Leopard Mac on your network. I've tested this with two multifunctional printer/scanners -- the HP C6380 and the older HP C8100. And it's not limited to rudimentary controls. Featured tasks include putting multiple photos on the flatbed and having them scanned into separate files, image adjustments, and even sharpening. Plus you can scan to a variety of formats. I use it all the time now for signed documents converted to PDFs.
  • I also like multiple device control for my various cameras and iPhone. I can set iPhoto to open for one device, and Aperture for another... or nothing at all. Very handy.
  • Another cool feature is network sharing of images on a device. So if I plug my iPhone into a computer downstairs, I can grab images off it from a Snow Leopard Mac upstairs.

If you haven't looked at Image Capture in a while, I encourage you to read the Macworld article and take it for a spin.


twitter.jpg Follow me on Twitter

-