Recently in Photography

  Page 306 of 382 in Photography  

"This shot was taken at a local balloon festival," writes Jim Garrett, "an Air Force band was playing and this toddler just came up to the edge of the stage."

Jim captured this flag waving shot with a Pentax K100D with the kit 18-55mm lens -- F5.6, 1/90 sec., ISO 200. He then edited in Picasa using "Focal B&W" tool.

Photo by Jim Garrett. Click on image to zoom to larger size.

If you have a candid you'd like to share, take a look at our Submissions page, then send us your Grab Shot. We'll try to get it published for you on The Digital Story.

And you can view more images from our virtual camera club in the Member Photo Gallery.


twitter.jpg Follow me on Twitter

-


Technorati Tags: , , ,

snow_leopard.png

Apple has announced that Snow Leopard (Mac OS X 10.6) will be available on August 28, 2009 as a $29 upgrade. Many of us Mac users are excited about this because of the improved performance and stability that comes with this release.

Along those lines, our photographer brains might be wondering about compatibility with existing Adobe apps, specifically Photoshop CS4. John Nack has posted about this issue on his blog and points to an official Adobe FAQ.

Photoshop CS4 users on a Mac might want to take a peek.


twitter.jpg Follow me on Twitter

-


canon_280ex.jpg

The Canon Speedlite 270EX is a compact hot shoe flash that is an excellent accessory for modern Canon DSLRs and G series compacts. For this review I've tested the 270EX on a Rebel T1i and G9. Owners of older DSLRs, such as the Canon XT have reported that the flash works, but you can't change some settings, such as switching from 1st curtain to 2nd curtain.

Menu Controls on T1i and G9

The story is much more interesting with the Canon Digital Rebel T1i. Mount the 270EX in the hot shoe then go to the Flash Control menu, and you have a variety options including E-TTL II or Manual exposure (1/64 to 1/1), Shutter Sync (1st Curtain, 2nd Curtain, or Hi-speed), Flash Exposure Compensation (-2 to +2), and E-TTL II Metering Pattern (Evaluative or Average). You also have access to two Custom Function settings: Auto Power (on or off) and Quickflash with continuous shot (on or off).


Both photos unedited. Top image captured with 270EX flash in bounce position on a Canon Rebel T1i. Bottom image captured with flash in same position on a Canon G9. The T1i renders a cleaner image with the flash. Click to enlarge. Photos by Derrick Story.


You have many options on the G9 too, even though it's an older camera. There's quick access to Flash Exposure Compensation (-3 to +3) via the Function button. If you open External Flash Settings on the Menu, you have Flash Mode (Auto or Manual 1/64 to 1/1), Shutter Sync (1st Curtain, 2nd Curtain, or Hi-speed), Slow Synchro option, and Safety FE option. The flash responds well to these settings.

Physical Characteristics

The bottom foot of the flash (that slides into the hot shoe) is well-constructed using a metal plate instead of a plastic fitting that we normally see. The flash head pulls forward to "Tele" position for focal lengths 50mm and longer. It also swivels upward at 60, 75, and 90 degrees. I love this feature and consider it a real bonus on such a compact flash. Another improvement that Canon had made over the 220EX is requiring fewer AA batteries from four to only two for the 270EX. And it still has plenty of pop with a guide number of 72 ft. at ISO 100 (28mm focal length). Since most of the settings are controlled via the camera menu, there are only two buttons on the flash itself: the on/off switch and the hot shoe lock lever.

Operation

The 270EX uses an intermittent flash firing system for autofocusing assist and exposure evaluation, regardless of the head position. This system worked fine on the T1i, but it isn't supported on the G9. As for the exposures themselves, I rate the 270EX as excellent on newer cameras. I'm especially impressed with the bounce flash exposures on the T1i. The E-TTL II system in Evaluative mode does a great job of rendering flattering exposures. The results weren't quite as good on the G9, which I attribute to older flash metering technology in the camera. The pictures were still quite good, but not the same amazing quality I saw on the Rebel T1i. (See photo examples for comparison.)

Bottom Line

The Canon 270EX is selling on the street for about $150 US. That's not cheap by any means, but reasonable compared to other Canon flashes such at the 430EX II at $264 or the 580EX II at $400. The 270EX fits in your pocket (or the palm of your hand) and is an excellent match for newer Canon DSLRs (40D on up) and is serviceable on many older Canon cameras such as the G9. The swivel head is the killer feature that really sold me on this accessory.

Technorati Tags: , , , , ,


twitter.jpg Follow me on Twitter

-


OttLites for Small Product Shots

OttLites are awesome! They offer full spectrum lighting that more accurately replicates natural outdoor lighting. It's perfect for people like myself who may need to take product shots, but don't own a lot of lighting equipment.

Right photo is with OttLite, left image with regular lamp.

In the past, if I needed to photograph a project for a magazine submission, it had to be done outside using natural light to capture true colors and accurately show what the project looked like. But what if it's raining, or the sun has already set? (Like so many people in my line of work, I tend to burn the midnight oil, which isn't very good lighting for photography.)

If something is photographed under a regular tungsten bulb, a yellowish-orange tint is cast over the object. Shooting the same object under my OttLite gives me the cleaner results of full spectrum lighting. Rain or shine, day or night, I achieve more accurate outdoor lighting each time I shoot indoors.

OttLites come in a variety of styles ranging from floor to desk lamps. The bulbs are easily replaceable, but that's something you won't need to do for quite a while. The low heat, low glare, OttLite bulbs and tubes are rated to last 8,000 to 10,000 hours! Wow! Talk about an enlightening experience.

Zeiss Lens on Olympus E-P1? Oh Yeah!

The Olympus PEN E-P1 is a versatile camera that can accept Leica, Nikon, and Zeiss lenses with the right adapter. I have a small cache of Zeiss prime lenses in the Contax M mount that are part of my Contax RX kit. Since I don't shoot very much film these days, I've been looking for a way to put this wonderful glass to work. I read about the Novoflex Four Thirds adapters, but I could not find the Contax mount anywhere (the Leica version seems more plentiful here in the States).


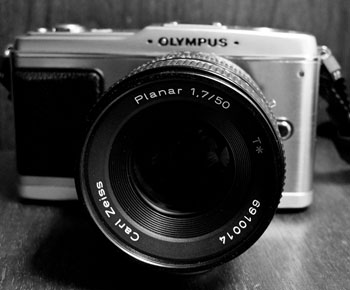
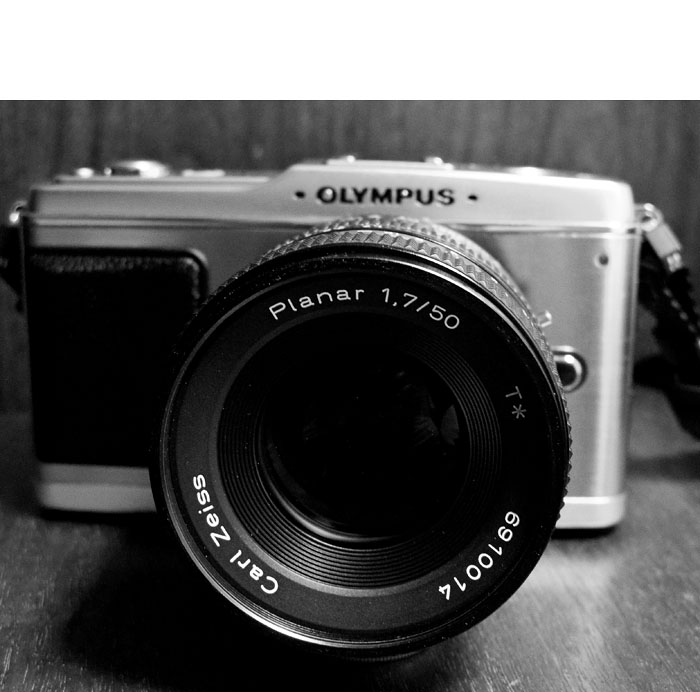
Carl Zeiss 50mm f/1.7 Contax MM mount on an Olympus E-P1 using a Rayqual CY to M 4/3 adapter. Photo by Derrick Story


The Search for a Contax Adapter

After scouring the Web for any adapter that would work, I found a great site called Japan Exposures that had all sorts of photographic exotica, including Rayqual Micro Four Thirds adapters for Contax M and Nikon F mounts. I purchased the Contax mount for 18,700 Yen, and they shipped it to me within a few days. I had a very good customer experience with them.

Mounting the Lens on the E-P1

The Rayqual mount is excellent. There's no wiggle at all. It's finely machined and has a solid feel. The first lens I tested on the E-P1 was the Zeiss 50mm f/1.7 MM. The set up is easy. You mount the adapter on the body, then attach the lens to the adapter. Everything clicks into place. There are no electronic contacts on the adapter, so you work in aperture priority mode. Focus with the lens wide open, then if you need too, stop down to make the exposure. The E-P1 sets the appropriate shutter speed for you. It worked great. If you have lots of light, then you can focus stopped down. Although I must admit, what I wanted to do was shoot wide open most of the time taking advantage of the unique qualities of the Zeiss Planar lens.


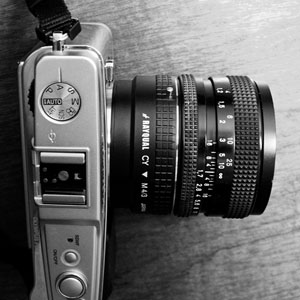
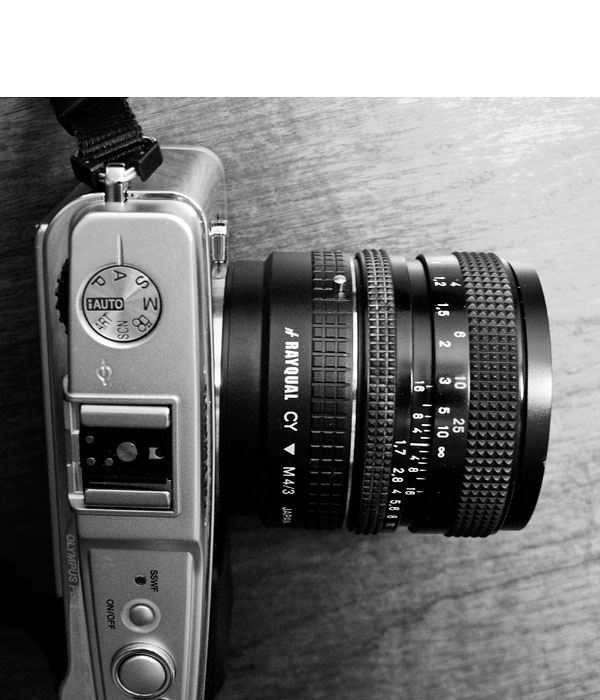
Top view of Carl Zeiss 50mm f/1.7 Contax MM mount on an Olympus E-P1 showing the Rayqual CY to M 4/3 adapter. Photo by Derrick Story


You can configure the E-P1 for manual focus-assist giving you 7X magnification with just a push of the OK button. I love this mode and use it to get the focus just right, then back off to normal view and take the picture. Focusing on the 3" LCD was easier than I expected. Working with the silky smooth focusing ring and the click-stop aperture ring on the Zeiss Planar provided a truly classic photographic experience.

Picture Quality

As far as picture quality, my favorite lens was the Zeiss Distagon 35mm f/2.8. The shots were beautiful at every aperture setting. Next, I also liked the 50mm f/1.7 and the 85mm f/2.8. They were a little softer on the edges than the 35mm, but still quite good. I was disappointed with both the Zeiss 135mm f/2.8 and 200mm f/3.5 telephotos. They weren't as sharp on the E-P1 as they are on the Contax bodies. It seemed to me that the E-P1 performs better with the wider and standard lenses than with the longer focal lengths. I will continue to test and report more on this.


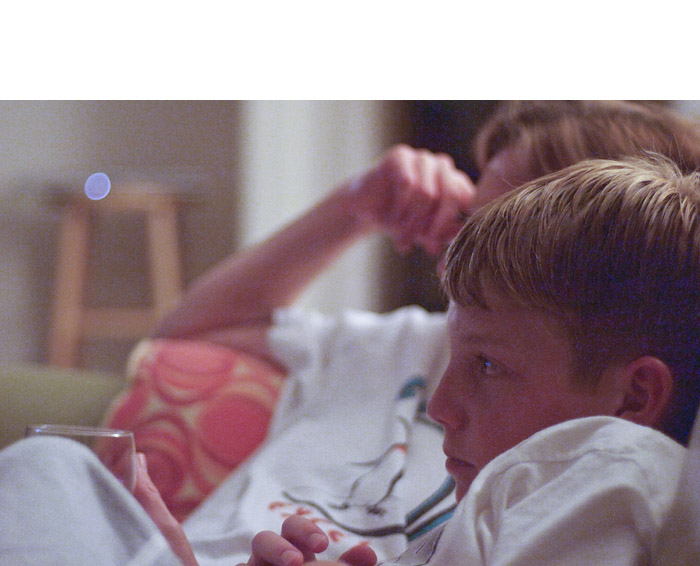
Existing light shot using the Carl Zeiss 50mm f/1.7 Contax MM mount on an Olympus E-P1. The ISO was set to 1600, aperture to f/1.7, and was able to get a shutter speed of 1/30th even in this very, very low light. Photo by Derrick Story


Final Thoughts

Shooting with the Contax lenses on the Olympus E-P1 is a brand new experience. It's so unique, it's almost hard to describe. I'm once again focusing the camera myself, yet I have a big 3" LCD with digital focusing assist to provide a new twist on the process. The camera looks good with any of the Zeiss lenses mounted, and the shooting is outright fun. Most of the camera functions work just fine, including flash, image stabilization, and even movie mode. There are a few gaps in the metadata because the camera can't report aperture or focal length, but you get ISO, white balance, shutter speed, etc. The shots look different than with any other lens/camera combination.

For the time being, I'm going to work with these lenses on the E-P1 and see how it affects my photography. I'm already feeling more creative every time I pick it up. I'll publish a collection on our Flickr site soon.


twitter.jpg Follow me on Twitter

-


Both the just-announced PowerShot G11 and the PowerShot S90 only capture in Standard Definition video (640x480). What? In the whacky world of hardware engineering, where we gain a high-sensitivity 10 MP sensor with DIGIC 4 image processing providing better noise reduction, being referred to as a "Dual Anti-Noise System," we don't get what Canon is pushing everywhere else: HD video.

It reminds me of the time a few years back when RAW was the premium feature photographers sought. Suddenly we saw RAW support dropped from high-end compacts, such as the Canon G series, and only available in DSLRs. Now we have RAW in the S90 and G11 (RAW returned to the G series with the G9), but HD video is omitted... even though we get HDMI output on the G11, not to mention the Vari-angle LCD that's perfect for video capture.

There might be an overriding technical reason for no HD video on these new cameras. And I would love to hear it. Because right now it feels a little like a sales and marketing decision. I hope it isn't.


twitter.jpg Follow me on Twitter

-


Want to create professional looking art notecards from your own images? In this podcast I explain the techniques I wrote about in the article Professional Photo Art Notecards Using Aperture and Red River Paper. These products, based on your photography, look great. I hope you give them a try.

Listen to the Podcast

You can also download the podcast here (30 minutes). Or better yet, subscribe to the podcast in iTunes.

Monthly Photo Assignment

Transport is the August 2009 Photo Assignment. Think both literally (car, bike, bus, etc) and figuratively. You can read more about how to submit on our Member Participation page. Deadline for entry is August 31, 2009.

More Ways to Participate

Want to share photos and talk with other members in our virtual camera club? Check out our Flickr Public Group. It's a blast!


Sample notecard before folding. Red River paper is scored in the middle so it's easy to fold and get a professional looking card. Click to enlarge image.


twitter.jpg Follow me on Twitter

-


Podcast Sponsors

SiteGrinder lets you take ownership of your websites. Effortlessly output pages right from Photoshop.

Red River Paper -- Try the $7.99 Sample Kit.

Add Magic to Your Slideshows -- FotoMagico presentations are so amazing that your audience will be asking how you did it.


Technorati Tags: , , , , ,

eye_fi_pro.png

I've been testing the new Eye-Fi Pro card (and will report on it soon), but I still have an older Eye-Fi Explore card too. For those of you who also have older cards, I want to remind you that there's probably a firmware update waiting (especially if you haven't used the card in a while). For my Explore card, the update provided me with "selective transfer," a function I had wanted for a long time.

Basically it works like this: After the firmware update, leave the card connected to the computer and go to the Settings tab in Eye-Fi Manager. Click on Upload Settings, and change the preference from Automatic to Upload Selected. Save your settings and unmount the card. Now, with the card back in the camera, initiate uploads by marking the images you want to transfer with the Protect key. Only those photos will be transferred via Eye-Fi Manager.

After you're done with the Eye-Fi transfers, you may want to Unprotect your pictures. Some photo applications won't let you image edit protected pictures...


twitter.jpg Follow me on Twitter

-


Want to view your Flickr images a new way? Check out Flickroom. This Adobe AIR application not only provides that beautiful charcoal colored interface that makes your photos pop, the Flickroom team has also included a host of useful features such as instant notifications for any activity on your photostream, upload photos by just drag-and-drop, add comments, mark faves, add notes, tweet about your photos, and chat with other Flickroom users.

I haven't replaced viewing Flickr with their traditional browser, but I do like Flickroom for "really looking at my photos online." The cleaner interface lets me see my shots differently than I do on Flickr. I also use Flickroom for looking at my site the way the public sees it since it doesn't display images I mark as private.

There wasn't much information about the folks behind Flickroom on their site, so I wrote them and asked about their story. They replied:

Flickr Essential Training

"Ours is a small startup company which has some very talented Flash/Flex/AIR developers and testers. We have decent experience in creating applications (for clients) based on these technologies. Some of the members of our team are photographers and share their pictures on Flickr. Sometime back they felt that the user interface of Flickr could be enhanced immensely if it were made a desktop application using a technology like Adobe AIR. So that led to the whole idea, and we started working on it. Although the current beta version that is available provides limited functionality, we are working on a lot of desktop-integration features that would make the Flickr experience really seamless. With every update of this application, we hope that the experience of Flickr users would get better and better."

Just in the short time I've been following this story, I have noticed remarkable improvements in the application. So much so, I now feel comfortable recommending it for others too. I have a feeling that within another few updates, Flickroom will become a favorite application among many Flickr users.


twitter.jpg Follow me on Twitter

-


"Ready, Set... Go!" Grab Shot 182

"The picture was taken at our son's school fete back in June," writes Michael Haley. "It's a very English kind of event -- a great fund raising event for the school put on by the parents. All funds from the event are used to fund school outings for the children."

Michael used a Canon 450D with a Canon EF-S 55mm to 250mm F4 - 5.6 IS lens, ISO 200, f5.6, 1/1250, colourspace RGB Adobe 1998.

Photo by Michael Haley. Click on image to zoom to larger size.

If you have a candid you'd like to share, take a look at our Submissions page, then send us your Grab Shot. We'll try to get it published for you on The Digital Story.

And you can view more images from our virtual camera club in the Member Photo Gallery.


twitter.jpg Follow me on Twitter

-


Technorati Tags: , , ,