Recently in Photography

  Page 312 of 382 in Photography  

I started paying attention to Canon Picture Styles about the time they put a button for them on the back of the camera. I figured if they got their own button, this must be important. When you go to the Picture Styles menu, you choose from a handful of settings: Standard, Portrait, Landscape, Faithful, etc., or you can create your own. Each Picture Style is determined by four parameters: sharpness, contrast, saturation, and color tone. This gives you more control over how the image is processed in the camera.

I've been running field tests with this function to decide how I feel about it. During the latest experiment, in Yosemite National Park, I shot in Raw+Jpeg mode on a Canon Digital Rebel T1i (500D) with a 24-105 mm L f/4 lens. I used the Landscape Picture mode, which affected the Jpegs, and then processed the Raw files in Adobe Camera Raw to my tastes, then compared them.

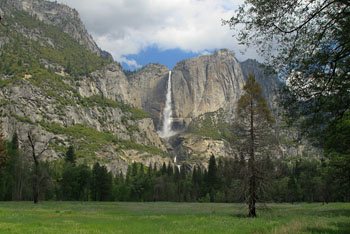
Yosemite Falls captured with Canon T1i using the Landscape Picture Style. Photo by Derrick Story. Click to zoom.

As you see in the sample photos, the greens and yellows were really pumped up in the stock Landscape Picture Styles Jpeg, almost like a Velvia film slide. Even though the Raw and the Jpeg versions were captured at the same split second, their unique processing renders them much different.

The Raw file was processed using the Adobe Standard profile as the starting point in ACR (Camera Calibration > Color Profile). A lot of people don't realize that all of the Canon Picture Styles are also there in the Camera Calibration tab when you process Canon Raw files in ACR. So if you want, you can switch among the different Styles in post production and choose the starting point you like best. I went with Adobe Standard for this shot.

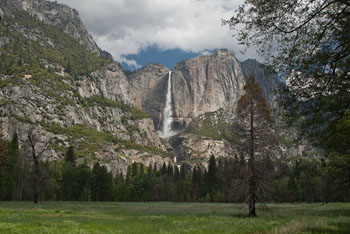
Yosemite Falls captured with Canon T1i in Raw format then processed in ACR. Photo by Derrick Story. Click to zoom.

So the question is, if you're shooting Jpegs, is Picture Styles worth considering? I would say yes if you did a little pre-work to create your own Styles settings. I think that's where their best value resides. The presets are fine, but they don't really express your photography. Of course, the ultimate control comes with Raw shooting. But if you have a Picture Style that you trust waiting for you in the Picture Styles menu, then you have a reasonable alternative to Raw shooting for those times that need it.

More About the Canon Rebel T1i

"Hands On Review of the Canon T1i (500D) - Digital Photography Podcast 179

Street Shooting with Canon 500D/T1i


twitter.jpg Follow me on Twitter

-


screenshot_01.png

"Workflow" is the kind of word that makes most hobbyist photographers cringe. But the fact of the matter is, if you've taken great photos with your digital camera, don't you want to find the easiest way to organize them and share with others?

If this sounds appealing to you, then you might be interested in my workshop later this month titled, I've Taken Great Photos, Now What?. You'll learn about the coolest photo management applications including Adobe Lightroom, Apple iPhoto, Photoshop CS4, Photoshop Elements, and Apple Aperture. We'll build a workflow tailored specifically for your needs. And by the end of the day, you'll see that managing your images can be as fun as taking them in the first place.

The workshop begins at 10 am on Sat. June 20 at Santa Rosa Junior College in Santa Rosa, California. You can sign up for the class online, or call for more information at 707-527-4372. The course fee is $63.

You can listen to the podcast that gives you a nice overview of the course by checking out Show #176.

twitter.jpg Follow me on Twitter

-


The Canon Rebel T1i is known for its HD video recording and 15 megapixel CMOS sensor. But this camera contains refinements in nearly every category. I recently published a field report with sample images tited, Street Shooting with Canon 500D/T1i, but I wanted to spend a little more time talking about the specifications and usability of the DSLR. And that's exactly what I do in this week's podcast.

Photo by Derrick Story with Canon Rebel T1i using the EF 75-300mm f/4-5.6 IS USM zoom lens. ISO 100, 1/640 at f/4.

Monthly Photo Assignment

Splash is the June 2009 Photo Assignment. You can capture anything from a child jumping in a pool to an olive dropping into a martini. You can read more about how to submit on our Submissions page. Deadline for entry is June 30, 2009.

Listen to the Podcast

You can also download the podcast here (29 minutes). Or better yet, subscribe to the podcast in iTunes.

Want to share photos and talk with other members in our virtual camera club? Check out our new Flickr Public Group. It's a blast!


twitter.jpg Follow me on Twitter

-


Podcast Sponsors

SiteGrinder lets you take ownership of your websites. Effortlessly output pages right from Photoshop.

Red River Paper -- Try the $7.99 Sample Kit.

Add Magic to Your Slideshows -- FotoMagico presentations are so amazing that your audience will be asking how you did it.


Technorati Tags: , , , , ,

lynda_aperture.png

Moving from iPhoto to Aperture can be a smooth transition. That is, if you make the right choices during the upgrade. In my Lynda.com training, iPhoto to Aperture: Going Pro, I show you in detail how to customize your Aperture environment for a successful "reloaction."

Think of this transition as you would moving into a new house. It's an opportunity to clear out junk, reorganize, and start fresh. Use these tips to get a clean start on your photography life.

  • Don't move everything from iPhoto to Aperture -- only your best stuff. Remember, you don't have to get rid of iPhoto. It can serve as your archive that is there whenever you need to look back into the past.
  • First, take some time to organize the images you want to move in iPhoto. Since Aperture can "see" iPhoto albums and import them intact, find your best work and put them in iPhoto albums.
  • Don't move your entire iPhoto library using the "Import > iPhoto Library" command. Aperture brings everything in, and you're just moving the mess from one application to another. Instead, click on the "Import" icon (down arrow), navigate to your iPhoto Library in your Pictures folder, then choose the iPhoto album you want to bring in. Aperture sees iPhoto albums and lets you import them.
  • Spend some time thinking about how you want to organize your new Aperture library. Learn about folders, projects, and albums.
  • Be patient. You can bring in a few iPhoto albums, play around with organizing them in Aperture, learn what works best for you, then bring in a few more albums.

As I mentioned at the top of this post, you can get more detail about all of these tips, and more, in iPhoto to Aperture: Going Pro. And if you're curious as to why you would want to consider the move in the first place, take a look at the free movie on the catalog page titled, "Ten Reasons to Move to Aperture."


twitter.jpg Follow me on Twitter

-


Technorati Tags: , , ,

It's a colorful world, and this month's photo assignment participants have captured its vibrancy to share with our viewers. This April 09 Photo Assignment Gallery is a delight for the eyes.

The June 2009 assignment is "Splash." Start working on your contribution now. Details can be found on the Submissions page. You can submit photo assignment pictures up to 600 pixels in the widest direction.

Please follow the instructions carefully for labeling the subject line of the email for your submission. It's easy to lose these in the pile of mail if not labeled correctly. For example, the subject line for next month's assignment should be: "Photo Assignment: June 2009." Also, if you can, please don't strip out the metadata. And feel free to add any IPTC data you wish (These fields in particular: Caption, Credit, Copyright, Byline), I use that for the caption info.

Photo by Maria Camillo.

Good luck with your June assignment, and congratulations to all of the fine contributors for April. It's an colorful collection of images.


twitter.jpg Follow me on Twitter

-


Now Available! The Digital Photography Companion. The official guide for The Digital Story Virtual Camera Club.

  • 25 handy and informative tables for quick reference.
  • Metadata listings for every photo in the book
  • Dedicated chapter on making printing easy.
  • Photo management software guide.
  • Many, many inside tips gleaned from years of experience.
  • Comprehensive (214 pages), yet fits easily in camera bag.

Technorati Tags: , ,

The Canon Digital Rebel T1i (500D) is a nimble DSLR that hangs light on the shoulder and responds quickly when you press the shutter. I mounted a Canon 70-200 mm L f/4 zoom on the 15 megapixel body and hit the pavement in San Francisco's Nob Hill district to see how the T1i would hold up on the streets.

The first thing I noticed is that the 70-200mm f/4 is a good lens for the T1i in this enviroment. The rig felt light and balanced, yet substantial enough to steady when shooting. Focusing was very fast. I set the AF pattern to the center point (cross sensor), which is the most sensitive of the nine focusing points. Automatic AF point selection worked well too. I'm just in the habit of telling the camera where I want it to focus.


Buildings on Nob Hill in San Francisco. Photo by Derrick Story with Canon Rebel T1i and 70-200 mm f/4 zoom. Image was captured in Raw and processed in ACR 5.4. Click on picture to zoom to larger size.


I shot in Raw, Jpeg, and Raw+Jpeg. Burst rate was good, hovering right around 3.5 frames per second. I usually had 9 frames available in the buffer for each sequence when shooting Jpeg or Raw. But it went down to 4 when shooting Raw+Jpeg. With a fast card (SDHC Class 6), the buffer empties quickly, and the camera seemed ready to go when I was. So the T1i's burst mode feels fine for street shooting. For fast action sports, you might have to wait on occasion, but the rest of the time, you should be fine.


Workers on Nob Hill in San Francisco. Photo by Derrick Story with Canon Rebel T1i and 70-200 mm f/4 zoom. Auto Lighting Optimizer was set to Standard for this image recorded as a Jpeg. Click on picture to zoom to larger size.


I had the Auto Lighting Optimizer set to Standard. This feature (customizable via the Custom Functions) is helpful in contrasty lighting conditions. It helps you hold detail in the shadows and highlights. You have four "strengths" for the ALO: Low, Standard, Strong, and Disable. I think it's helpful for street shooting because I often encounter strong highlights and shadows, and am usually working quickly. You can see the ALO at work with the Jpeg image of the workers in this article.

Jpeg file size (4752 x 3168) was around 6 MBs per shot at the high quality setting. Raw files weighed in around 21 MBs per shot. I processed the .CR2 files from the T1i in the latest release candidate for Adobe Camera Raw (5.4). I could also use the Digital Photography Professional software that came bundled with the camera. Keep in mind if you're shooting Raw+Jpeg, you're averaging around 27 MBs per shot.

Overall, I think this is a fine camera for street shooting. It's not a quiet picture taker, nor does it have Silent Shooting in Live View as does the Canon 5D Mark II. But with street noise, most people never hear you working anyway. This might be more of an issue, however, at weddings, I'll continue to test the Canon T1i in other situations and let you know. For this type of work, however, it's terrific.


twitter.jpg Follow me on Twitter

-


On June 2, Canon 5D Mark II owners will be able to download a firmware update that unlocks key functions in video mode. Movie makers will then be able to set ISO, aperture, and shutter speed.

This should propel the 5D2 to new filmmaking heights now that artists have the control they've been asking for.

When you hold the Olympus Stylus Tough 8000, you know immediately that this isn't your normal compact camera. Its visible screws, metal armor, and weatherproof gaskets protect a 12 MP sensor, 3.6X optical zoom, and 2.7" LCD monitor. Yes, the specs are good, but the design is what makes the difference here. This camera isn't just dunk-proof, you can take it diving to a depth of 33 feet. The Stylus Tough 8000 can also withstand cold environments (14 degrees f) and survive a drop from a height of 6 feet.

Olympus has had some fun with this theme of durability. They created a series of YouTube videos where the put the Tough 8000 in the hands of kids. You can watch Playground Proof, Ice Cream Proof, Fish Tank Proof, and a host of other "proof" episodes on YouTube. They're for smiles mostly, but they also make the point about how rugged this camera really is.

Shooting with the Olympus

The Tough 8000 zoom lens accommodates a wide 28 mm focal length and extends to 102 mm on the telephoto end, perfect for underwater on the wide end and portraits when zoomed out. To make the controlling the camera easier in extreme conditions, such as working in cold weather or snorkeling, Olympus included a nifty feature called Tap Control for some of the basic settings. When activated, one tap on the right side lets you change the flash mode, a tap on the left for Macro, tap the LCD to switch to Playback, and tap twice on top for OK. Unfortunately, the most obvious use for Tap Control -- to switch among Scene modes while underwater -- isn't included. So if I want to switch from Underwater Snapshot to Underwater Macro, I have to delve into the menu system.

As I mentioned, you can take this camera in the water with you. I took it along to the local pool and snapped away both topside and underwater. The results were fine, but the shots required work on the computer. I was hoping that the underwater scene modes would compensate more for the aqueous environment. For casual snapshooters, I'm sure the results will be fine. But more advanced photographers will probably relegate this camera into the "for fun only" category.

The Stylus 8000 has in-camera panorama stitching that lets you take 3 shots then meld them together into a single, extended-view image. My favorite of the trio of panorama modes is "Combine in Camera 1." You take the first shot, then pan in either direction slowing guiding a diamond shaped pointer to an onscreen target. When you reach the target, the camera takes another shot. Once you've completed the sequence, the Stylus 8000 builds the panorama and plays it for you on the LCD. The results were unpredictable in terms of accurate stitching, but when the Stylus 8000 nailed the sequence, it looked very good. And to tell you the truth, even some of the misfires made interesting compositions. This is one of my favorite features on the camera.

Bottom Line: This Is a Camera for Fun Times

What is remarkable about the Olympus Stylus Tough 8000 is that you really can take anywhere: from freezing ski slopes to the tropical waters of the Hawaii. The Tough 8000 provides the features you'd expect from a $399 camera, such as good resolution, crisp LCD, image stabilization, face detection, scene modes, movie capture, and exposure compensation. You don't have a tremendous amount of direct control over the settings in terms of aperture and shutter speed, but there are 19 scene modes and a host of other controls to help you adapt to just about any situation.

Overall image quality is fine as long as you don't push the camera to produce beyond its design. I made 13" x 19" enlargements from the 12 megapixel files, and they were OK, but I saw corner softness on only average detail. But I liked the 5" x 7" and the 8.5" x 11" prints much better. And I think that's where your expectations should be too.

This is a camera for fun times. You can put it in the hands of your kids without a worry. When you're on the go, grab the Olympus Stylus Tough 8000, and you'll have confidence that you can get the shot regardless of where you land.

Photos of underwater and panorama by Derrick Story with Olumpus Stylus Tough 8000. Click on them to zoom out to larger size.


twitter.jpg Follow me on Twitter

-


If the release of the Canon Digital Rebel T1i and the Panasonic GH1 are any indication of trends for 2009, HD video capture with our "still" DSLR cameras will soon be commonplace. I've been using the Canon 5D Mark II for a video project for The Digital Story, and am planning some fun tutorials on getting the most out of these types of devices.

But I have one simple reminder right now for those playing with video on their digital cameras (DSLR or compact): Don't forget to grab stills too.

Right after you shoot a video snippet, change modes and grab a few still shots too. If possible, even re-inact a scene or two. You can use these high resolution stills with the video, especially to cover mistakes and things that went wrong during the shoot, such as a misfocused moment or someone walking through the frame when they shouldn't have.

The nice thing thing about having a big high resolution still photo is that all of your options are open. You can animate it using the Ken Burns effect such as slowly zooming in or panning through the image. These effects are easy to achieve in iPhoto, Fotomagico, and iMovie.

So yes, have a great time shooting video with your still camera. Just remember to grab a few stills too. At some point, you'll be glad you did.


twitter.jpg Follow me on Twitter

-


Technorati Tags: , , , , , , ,

lynda_aperture.png

Ready to make the move from iPhoto to Aperture? If so, I have a great tutorial for you. In iPhoto to Aperture: Going Pro, I show you everything you need to know to make a smooth transition from iPhoto to Aperture.

And if you're not sure that you should even attempt the move, then take a look at the free videos titled, Ten reasons to move to Aperture and Comparing the strengths of Aperture and iPhoto. They are both available on the catalog page.


twitter.jpg Follow me on Twitter

-


Technorati Tags: , , ,