Recently in Photography

  Page 316 of 382 in Photography  

image_capture.jpg

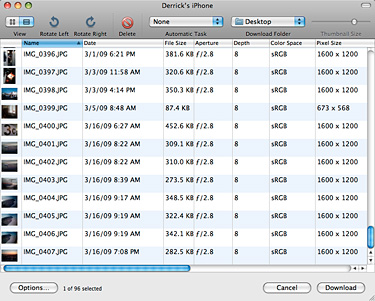
Along with Preview (The Simplest of All Raw Converters), Image Capture is one of those amazing hidden gems that comes on every Mac. Look in your Applications folder, launch it, then connect just about any photo device. Once you do, Image Capture recognizes the camera and presents you with lots of downloading options. In fact, Image Capture is the application I recommend to iPhone users for transferring full resolution pictures that they record with the device.

download_some.jpg

The trick is, when you launch the app and connect your iPhone, to click on the "Download Some" window. By doing so, Image Capture presents you with thumbnail versions of all the pictures on the device. You choose only the shots you want, decide where to put them, and then click the "Download" button.

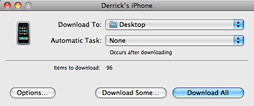
Be sure to check out the Options button, because that allows you to choose the color space that's applied to the images on download. You also have an informative list view available (shown at the top of this post) that displays your metadata for each shot on the device. And if that weren't enough, choose "Build Web Page" from the "Automatic Task" popup menu, and Image Capture will download the selected images, then build a web page with them complete with clickable thumbnails -- all in one step! There are lots of other options in that popup menu, including triggering Automator with its own scripts (select Custom for that).

One final note about Image Capture, it works with most Mac-compatible flatbed scanners. So if you need to connect a scanner for a quick job, this might be the best way to go.

Like I said, this is an amazing little app.


twitter.jpg Follow me on Twitter

-


Join me on March 28 for "How I Did It" - A Workshop in High-Impact Photography


Technorati Tags: , , , ,

cave_inside.jpg

I took a side trip on my way home yesterday to the Chumash Painted Cave State Historical Park north of Santa Barbara, CA. The sandstone cave contains drawings by the Chumash Native Americans that dates back to the 1600s. I love cave drawings and wanted to see them for myself.

When I arrived, however, the cave entrance was protected by a heavy iron grid. I totally understand the thinking here, but the large diameter of my Olympus DSLR lens could not navigate the iron bars without having them in the shot. Then it dawned on me the the lens barrel for my Canon G9 compact would easily fit through the openings in the grid. And sure enough, they did.

cave_entrance.jpg

So I increased the ISO to 400, steadied the camera against the iron gate, and recorded a series of images with the lens protruding through the grid. Since I shot in Raw mode, I had lots of latitude in post processing to bring out the detail of the religious drawings.

cave_detail.jpg

So, once again, carrying a compact camera with me in addition to the DSLR allowed me to get a shot that I might have otherwise missed.

Photos of the Chumash Painted Cave by Derrick Story, captured with a Canon G9, ISO 400 in Raw mode.


twitter.jpg Follow me on Twitter

-


Join me on March 28 for "How I Did It" - A Workshop in High-Impact Photography


Technorati Tags: , , , , ,

geotag-event_iphoto.jpg

When you have a series of photographs from a single location, such as the Golden Gate Bridge, you can geotag the entire shoot at once in iPhoto '09. Simply find the shoot in the Events browser. Click on the little "i" that's in the lower right corner of the key photo for the Event, then choose "New Place" for the "Enter Event Location" pop up menu. Once you've tagged the event, that geodata will be applied to all of the images in the series.

You can watch a free movie on how to do this as part of my new Lynda.com title, iPhoto '09: Ten Things to Know About Places.

Other iPhoto '09 Titles by Derrick Story

iPhoto '09: Ten Things to Know About Faces

See My Other Posts on Geotagging

A Quick Primer on Geotagging

"Introduction to Geotagging" - Digital Photography Podcast 165

Testing the Eye-Fi Explore Card at Home

Geotagging a Journey with photoGPS, iPhoto, and Flickr

iPhoto '09 as Your Geotagging Tool?

First Look at Jobo photoGPS Device and Software

Update to Geotagging Workflow, Including Jobo photoGPS

Finding a Reasonable Geotagging Workflow


twitter.jpg Follow me on Twitter

-


Join me on March 28 for "How I Did It" - A Workshop in High-Impact Photography


Technorati Tags: , , , , ,

derrick_story_teaching.jpg

In the free movie, Managing the Faces corkboard, I show a nifty Option key tip. By default, iPhoto '09 magnifies all of the faces on my corkboard so I can get a better look at the person. This makes sense, and I actually prefer it that way. But sometimes I want to see the context of the shot while I'm scrubbing through all of those bright eyes and beaming smiles. To do so, all I have to do is hold down the Option key while scrubbing, and I can see the entire composition, not just the cropped mug shot.

This is one of the many tips I provide in the new Lynda.com title, iPhoto '09: 10 Things to Know About Faces. "10 Things" is an entirely new product for the Lynda folks. I figure out 10 concepts that I think are important about a particular subject -- in this case Faces in iPhoto '09 -- then create 10 short movies on those concepts. In less than an hour, you can master all of the techniques and apply them to your work.

We're also mixing live action discussion with the traditional Lynda screencasting. I think the tandem is more entertaining and better for learning too. You can check out the free movies right now on the Lynda.com site. If you like what you see, you can subscribe for $25 a month, and that gives you access to thousands of movies on a variety of subjects. My next title covering "Places" should be released by the end of the week.

More Articles About iPhoto '09

5 Semi Secret Editing Tips in iPhoto '09

"Faces and Places in iPhoto '09" - Digital Photography Podcast 166

Loss of Sharpness When Straightening in iPhoto '09

iPhoto '09 as Your Geotagging Tool?


twitter.jpg Follow me on Twitter

-


Technorati Tags: , , , , ,

There are a handful of less obvious editing tools in iPhoto '09 that you may not have stumbled upon yet. Let's see how many of these five techniques you know.

recovery_slider.jpg

Recovery Slider -- If you open a Raw file in iPhoto '09, you have access to a highlight recovery slider. In editing mode, open the Adjustments panel, then hold down the Option key. The Exposure slider transforms into a highlight recovery tool, as shown in the graphic above. This only works with Raw files, however.

clone_tool.jpg

Use Retouch Brush as a Clone Tool -- I'll warn you, this tip is experimental at best. First, click on the Retouch tool. You can adjust the diameter of the tool by pressing the right and left bracket keys. The Retouch tool can behave as a clone stamp if you hold down the Option key and drag over an area of the photo that you want to copy. Then go to another area of the photo where you want to apply the copy, and click and drag again. You should get a clone of the area you copied. The results can be unpredictable, but sometimes they are just what you need. You can return to Retouch mode by simply clicking on an area without dragging. If you totally mess up your image by playing with this, just go to Photos > Revert to Previous, and everything will be OK.

Fine Tuning the Enhance Tool -- The Enhance tool is fairly magical, but it can also be a mystery. Didn't you ever want to tweak it just a bit? Now you can. Open the Adjustments panel first, then click on the Enhance tool. In iPhoto '09, the modifications made by the Enhance tool will appear in the Adjustments panel. All you have to do is tweak the particular slider that you want to modify. Pay particular attention to the Exposure, Saturation, Shadows, Temperature, and Tint sliders.

SHIFT Key to See Previous State -- Did you really improve the photo by making all of those adjustments? If you want to check your work, hold down the Shift key to see the previous state. Once you let go of the key, you'll return to the modified version.

Targeted Zooming -- To zoom in on a particular area of a photo, put your pointer exactly where you want a closer look, then press the 1 key for a 100 percent view of that area, or the 2 key for an even closer look. Return to "fit into view" mode by pressing the 0 key.

More Information About iPhoto '09

"Faces and Places in iPhoto '09" - Digital Photography Podcast 166

Loss of Sharpness When Straightening in iPhoto '09

iPhoto '09 as Your Geotagging Tool?


twitter.jpg Follow me on Twitter

-


Technorati Tags: , , , , ,

Turbo Prop Photo Phenomenon Captured with iPhone

I'm always fiddling with my iPhone camera when I fly. This morning, as I was heading out of San Francisco on a twin-engine turbo prop plane, I was snapping pictures through the window to pass the time. As we rose above the clouds, this shot caught my eye because of the weird phenomenon that appears on the right side of the frame. These ribbon-like lines were visible on the iPhone screen and were recorded when I took the shot. I took two other frames and got the same effect.

My guess is that they were created because of the angle of the lens, through double-pane glass, with the sun at just the right angle. But I don't really know what caused them. Unlike other optical aberrations, these ribbons are so distinct.

The interesting part is that they are pretty in a odd sort of way. If anyone has a theory as to how they were created, please add a comment at the end of this post.

"Turbo Prop Engine with Ribbon Lines" by Derrick Story, captured with an iPhone.


twitter.jpg Follow me on Twitter

-


Join me on March 28 for "How I Did It" - A Workshop in High-Impact Photography


Technorati Tags: , , , ,

strobist_logo_sm.jpg

I just read an interesting piece on Strobist about how to make a homemade barn door for a LumiQuest Soft Box III. In the piece, Idea: SB-III Barn Door Mod, you first learn some good background information about using the LumiQuest (mounted on a shoemount flash) for portraits. Then, you see how to create a modifier out of gaffer's tape to further control the light. It's a fun and useful piece that I think you would enjoy.


twitter.jpg Follow me on Twitter

-


Technorati Tags: , , ,

Ghost Village HDR and Tutorial

michel_bricteux_hdr.jpg

"This is a picture of an abandoned pigeon house taken in Otero de Sariegos, a ghost village located in the vast plains of Castilla, Spain," writes virtual camera club member Michel Bricteux. "It's actually composed of seven pictures bracketed at -2EV,-1 1/3EV, -2/3EV, 0EV, +2/3EV, +1 1/3EV, +2EV. Camera settings were ISO 400, 24mm focal length, f/7.1, 1/1000sec, with a Nikon D3 and a Nikkor 24-70mm f/2.8 zoom lens."

"For the HDR post-processing, I used Photomatix Pro. It allowed me to keep details and texture in the highlights (mainly the sky) and deep shadows, giving this picture its intensity."

Photo by Michel Bricteux

If you're interested in HDR, you might want to check out this tutorial, How to Create High Dynamic Range images using Photomatix. It provides a good foundation and includes handy tips.


twitter.jpg Follow me on Twitter

-


Join me on March 28 for "How I Did It" - A Workshop in High-Impact Photography


Technorati Tags: , , , , ,

Making Prints from Your Panoramas

manu_pano_web.jpg

Since it's so easy these days to create panoramas, why not make prints of them too?

Red River Paper has put together an informative Print Inkjet Panos resource center that gives you the inside scoop on technique, printer set up, software, paper supplies, and web resources.

Don't leave your panoramas trapped in your computer. Use these techniques to make giant prints with the inkjet photo printer you already own.


twitter.jpg Follow me on Twitter

-


Join me on March 28 for "How I Did It" - A Workshop in High-Impact Photography


Technorati Tags: , , , , ,

new_mexico_road.jpg

If you'd like to take a Saturday to focus on your photography, then consider joining me in Santa Rosa, CA for "How I Did It" - A Short Course in High-Impact Photography on March 28, 10 am to 3 pm.

Many high-impact photos are a combination of opportunity and technique. In this workshop, I'll show you examples of compelling photographs and explain how they were captured. By the end of the day, you will have learned many of the secrets that top shooters use to distinguish their work from others.

You can register online, or call Santa Rosa Junior College at 707-527-4372. The course fee is $63. I'll have some fun photo accessories to give away, materials to browse, and will sign books too if you bring them along. I think you'll really enjoy this workshop.


twitter.jpg Follow me on Twitter

-


Now Available! The Digital Photography Companion. The official guide for The Digital Story Virtual Camera Club.

  • 25 handy and informative tables for quick reference.
  • Metadata listings for every photo in the book
  • Dedicated chapter on making printing easy.
  • Photo management software guide.
  • Many, many inside tips gleaned from years of experience.
  • Comprehensive (214 pages), yet fits easily in camera bag.