Recently in Photography

  Page 318 of 382 in Photography  

red_river_logo.gif

You can now post and read reviews for all of the Red River paper stocks on their site. This new feature was just launched, and I thought that our virtual camera club could help get things rolling by posting reviews of your favorite papers. Red River is a solid supporter of The Digital Story, and their product is outstanding. I just posted a review of Arctic Polar Luster, the surface that I like best.

If you haven't tried Red River paper yet, you can get their Sample Kit for $7.99, including free shipping. You get two 8.5" x 11" sheets for 19 different papers. It's a great way to discover the best stock for your printing needs.

Other Posts About Red River Paper

Getting Started with Inkjet B&W Printing

Red River's Arctic Polar Luster and the HP B8850 Printer

Welcome Aboard Red River Paper


twitter.jpg Follow me on Twitter

-


Technorati Tags: , , ,

sitegrinder_video_utube.jpg

Have you ever watched those timelapse videos of someone building a house or creating something else cool? I just found this nifty SiteGrinder movie on YouTube by Fmlad where an entire web site is designed in 8 minutes. I think this piece does a good job of giving you a feel for the power of SiteGrinder 2.

Previous Posts about SiteGrinder

Introduction to SiteGrinder for Beautiful, Easy Web Design


twitter.jpg Follow me on Twitter

-


Technorati Tags: , , ,

serbian_wedding.jpg

After the wedding was over, our next challenge was to cull the best images from the 2,300 shots we captured over the course of the day. Between the two of us, we had amassed over 32 GBs of Raw files, and we had to transform that data into a customer-friendly deliverable.

My assistant, Danielle, uses Adobe Photoshop Lightroom for her post production. I use Apple's Aperture. By midweek, Danielle had worked through the entire shoot, and delivered a CD to me of high quality Jpegs (at full 5D Mark ll resolution). I had already winnowed down my shoot to a collection of favorites.

I integrated Danielle's picks with mine in Aperture, then sorted by "time captured." This put the entire shoot in order. The only slightly strange parts were when I went off to shoot the boys before the ceremony, and she was shooting the empty reception hall. But other than that, everything meshed together perfectly.

The final gallery count was 447 -- that included both Danielle's and my best shots. I then exported the images out of Aperture as high quality Jpegs constrained at 2200 pixels in either direction. The pictures were uploaded to my Shutterfly Pro account, and I sent the URL out to as many family members and wedding participants as I had email addresses for, encouraging them to pass along the link to anyone they wish.

On Shutterfly, viewers can watch a slideshow or manually click through the images in the gallery. If they see something they like, they can order a print on the spot. Shutterfly handles the printing, business transactions, and delivery. I can monitor activity via my Shutterfly Pro account.

I also prepare a CD of high resolution Jpegs and send it to the clients. I know a lot of photographers don't believe in this, but I want my clients to have their own master collection that they can play with and print as they wish. That will be the last step for me in the assignment. Then I can check it off my list and move on to next week's work.

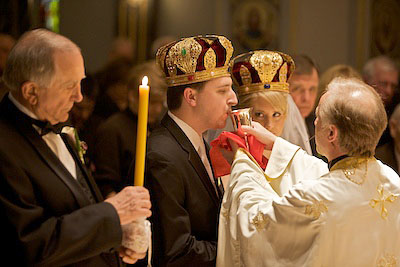
Photo of happy couple after the ceremony by Derrick Story, captured with a Canon 5D Mark ll using fill flash.

Previous Installments of the Wedding Photographer Chronicles

Wedding Photographer Chronicles: Chapter 1, the Rehearsal

Wedding Photographer Chronicles: Chapter 2, Analyzing the Church

Wedding Photographer Chronicles: Chapter 3, During the Ceremony


twitter.jpg Follow me on Twitter

-


Technorati Tags: , ,

joel_meyerowitz_utube.jpg

Joel Meyerowitz is a serious photographer who specializes in street shooting. Since this month's Photo Assignment is "Street Shot," I thought you might enjoy this video by Joel on street photography. He provides lots of tips on how to position yourself and what to look for.

As I mentioned earlier, Street Shot is the February 2009 Photo Assignment. Time to hit the pavement and discover the interesting moments of life that happen all around you. You can read more about how to submit on our Submissions page. Deadline for entry is Feb. 28, 2009.


twitter.jpg Follow me on Twitter

-


Now Available! The Digital Photography Companion. The official guide for The Digital Story Virtual Camera Club.

  • 25 handy and informative tables for quick reference.
  • Metadata listings for every photo in the book
  • Dedicated chapter on making printing easy.
  • Photo management software guide.
  • Many, many inside tips gleaned from years of experience.
  • Comprehensive (214 pages), yet fits easily in camera bag.

Technorati Tags: , , ,

wasabi_printer.png

I was reading about the new Wasabi Ultramobile Photo Printer that fits in your back pocket and enables you to produce 2"x3" prints from your mobile phone or via USB connection. The key to this device is a very interesting technology called ZINK paper, which means "zero ink."

"ZINK Paper is an advanced composite material with cyan, yellow, and magenta dye crystals embedded inside and a protective polymer overcoat layer outside. When heat is applied in just the right way, full color images appear like magic on the paper."

All of this seemed too good to be true. So I did a little price evaluation of the printer and the paper. You can get the Wasabi Ultramobile Photo Printer from Dell right now for $99 US, and the paper is available from folks like B&H for $9.99 for 30 sheets. In other words, this seems like an affordable technology.

This could be a good device to have in your bag when you shoot events. You could make prints on the spot, or have an assistant to it. If you're a Raw shooter, make sure you capture in RAW + JPEG mode. You can make the prints from the JPEGs and use the RAWs to create the final product.


twitter.jpg Follow me on Twitter

-


Technorati Tags: , , , ,

marin_airporter.png

Now that there's a Mac version of the Jobo photoGPS software, I could streamline my workflow for geotagging a journey home from a business trip. As I left the last meeting of the day at Lynda.com, I mounted the Jobo photoGPS Geo Tagging Flash Shoe on my Canon 5D Mark ll and documented my departure. I snapped pictures all along the way. It was a car-plane-bus-car trip making it perfect for documenting.

Once I returned home, I had the photoGPS write the geodata directly to the Jpegs on my memory card via the photoGPS software and my card reader, then I launched iPhoto '09 and imported the images off the card and into the application. This two-step process actually went faster than I anticipated. I chose the images I liked, put them in an iPhoto album, then uploaded directly from iPhoto to Flickr.

In order for your geodata to travel with your images into Flickr, you have to set the permissions in your Flickr preferences. Go to Your Account > Privacy & Permissions > Import EXIF location data (yes). Do this before you upload your images from iPhoto. Also in iPhoto, you can add descriptions for each image, and those captions will travel with the photos in to Flickr.

In my case, I told the story of a business trip home. You can see it by visiting From Lynda to Home. As you click from image to image, you learn about each stop along the way. If you click on the map link for each photo, you can see the location where it was taken. You can also click on the map link for the set to see all of the pins for the entire journey.

lynda_map_flickr.jpg

By clicking on the detail link for the set, you're presented with medium thumbnails for the trip with captions and map links. Flickr provides you with many different views and lots of information. It's really quite useful.

I'm going to keep playing around with this particular workflow. But I thought you'd like to see what can be done, even at the early stages. If you don't have a geotagging device such as the photoGPS, you can add the geodata in iPhoto '09, then upload to Flickr. You don't get as much geodata that way, but it's still a great option.

See My Other Posts on Geotagging

iPhoto '09 as Your Geotagging Tool?

First Look at Jobo photoGPS Device and Software

Update to Geotagging Workflow, Including Jobo photoGPS

Finding a Reasonable Geotagging Workflow


twitter.jpg Follow me on Twitter

-


Technorati Tags: , , ,

ceremony_d_story.jpg

Sometimes you get lucky. During the rehearsal, I was concerned because the couple was standing beneath a bank of lights shining directly down on the tops of their heads. I wasn't sure how I was going to capture flattering shots of them. To make matters worse, the wedding coordinator had specifically requested that I didn't use flash during the ceremony.

Here's where I got lucky. The next day, I'm in position during the ceremony, and it's the priest is standing in the glaring light, not the couple. This time, they were standing back a few feet basking in the glow of light bouncing off the white robe of the priest. He was a human reflector.

I composed the shot on a Canon 5D Mark ll with the 70-200mm f/2.8 IS lens set wide open. The shutter speed was 1/60th of a second and the ISO was set to 1600. I had enough light, and more importantly, the right kind of light, so I never considered turning on the flash. Prepare for the worst and hope for the best.

In the next installment I'll talk a bit about the post production of four, full, 8 GB cards.

Photo of wedding ceremony by Derrick Story.

Other Installments of the Wedding Photographer Chronicles

Wedding Photographer Chronicles: Chapter 1, the Rehearsal

Wedding Photographer Chronicles: Chapter 2, Analyzing the Church

Wedding Photographer Chronicles: Chapter 4, Delivering the Goods


twitter.jpg Follow me on Twitter

-


Technorati Tags: , ,

church_alhambra.jpg

When we arrived at the church for the rehearsal, I was very impressed. It's absolutely beautiful. And if we didn't have to actually photograph people in there, life would be terrific.

The problem is that all of the lighting is designed to show off the architecture. So, for example, when the wedding couple was standing at the altar during the rehearsal, the only lighting on them was coming straight down from the ceiling, nothing from an angle. This is what I call Halloween lighting: the forehead is bright, the eyes go hollow, and the nose radiates to the point where there's no detail.

Typically, the solution is to use fill light. Great! Except that the wedding coordinator doesn't like flash during the ceremony. So I had to negotiate "some flash" and the rest existing light shots. So I think our plan will be to make sure we have at least a couple shots via flash of every major activity during the ceremony, then go for existing light artistic for the rest.

We're shooting with Canon EOS 5D Mark II bodies, so we can push the ISO up to 1600 for the artistic stuff. I'll probably use ISO 400 for the flash photography to keep the intensity at a minimum and for faster recycling times.

In the next report, I'll let you know how this plan worked out.

Other Installments of the Wedding Photographer Chronicles

Wedding Photographer Chronicles: Chapter 1, the Rehearsal

Wedding Photographer Chronicles: Chapter 3, During the Ceremony

Wedding Photographer Chronicles: Chapter 4, Delivering the Goods


twitter.jpg Follow me on Twitter

-


Technorati Tags: , ,

It's true, every wedding is different. But oddly enough, I prepare for each one the same way. So I thought it would be fun to walk you through a wedding weekend where my assistant and I are the photographers.

We've already completed the planning for the event. I have a detailed shot list that the clients and I have agreed to. So the next step is rehearsal night. Yes, I go to the rehearsal.

I believe this is one of the keys to my success. Both my assistant and I show up with shot list in hand. We make notes about the environment. We meet the family members and note their names. The rules of the road are explained to us by the wedding coordinator. And we have a chance to scout out locations for the various group shots on our list. After the rehearsal is over, we compare notes and prepare for the big shoot the next day.

Tonight, we'll also make an appearance at the rehearsal dinner. I'll have a bite to eat and snap a few candids. This gives me the opportunity to see if I have any "blinkers" in the wedding party and discover any other quirks that I should know about.

Once I have my plan in place, I go to bed. No late night partying, no goofing off. I need to be fresh and on top of my game for the upcoming event.

I'll probably post the next installment in this series tomorrow morning. Until then, wish me luck.

Other Installments of the Wedding Photographer Chronicles

Wedding Photographer Chronicles: Chapter 2, Analyzing the Church

Wedding Photographer Chronicles: Chapter 3, During the Ceremony

Wedding Photographer Chronicles: Chapter 4, Delivering the Goods


twitter.jpg Follow me on Twitter

-


Technorati Tags: , ,

iphoto_logo.jpg

Editor's note -- Virtual camera club member Steve Cooper has been wrestling with a problem in iPhoto '09. He identified that there's an apparent loss of sharpness when using the crop or straighten tool. He has some good information here on the issue, so I thought I'd share it with you. The following text was written by Steve and sent to me via email.

I was delighted to learn that a new version of iPhoto ('09) was released just as I was starting work on a large number of travel vacation photos. I was not so delighted to find out that a significant problem I had observed in iPhoto ‘08 was not fixed in the new version, and that the workaround I had previously used was no longer effective.

If you have an image containing a lot of fine detail and are working with it in iPhoto’s Edit mode, you’ll find that if you crop or straighten it, it will lose some of its original sharpness. Further, if you then use the Sharpness slider to try to remedy the situation, it may appear to have no effect unless you apply a very large amount of sharpening. (It turns out that printing results in a sharp image — it's the on-screen display that's deficient here.)

I have recently found that moving the Picture Size slider just a tiny bit to the right restores the screen image sharpness, but this is true only if you keep the slider away from its normal leftmost position. While a reasonable (if annoying) workaround when viewing a single image, this is not a practical solution in many situations.

My workaround in iPhoto '08 was to open the image in Photoshop (using it in External Editor mode from within iPhoto) and apply some insignificant change just to ensure that the JPEG was rewritten when saved back into iPhoto. This worked well, but unfortunately no longer does so in iPhoto '09.

The only way to fix an affected image in iPhoto '09 appears to be to export the image from iPhoto and reimport it. While this doesn’t result in the loss of any EXIF data (except of course for the "Imported" date), you will lose your ratings and keywords. If you’ve imported the image back into the library from which it came, it's easy enough to copy the ratings and keywords from the neighbouring original image, which you can then delete entirely by Command-Option-Deleting its thumbnail. This could be tiresome if dealing with a large number of images, but at least it works.

One thing I have learned while exploring this problem is never to discard an image from iPhoto just because it seems to be "out of focus" and not responsive to the Sharpness slider. Always nudge the Picture Size slider fractionally to the right and see what happens. If sharpness improves by a useful amount, use the workaround above to "rescue" the shot.

Finally, I can report that Aperture 2 seems to be free of any problem of this kind.


twitter.jpg Follow me on Twitter

-


Technorati Tags: , ,