Recently in Photography

  Page 338 of 382 in Photography  

Hands On PMA - Sony A350 DSLR

sony_a350_web.jpg

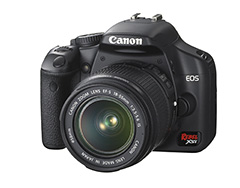
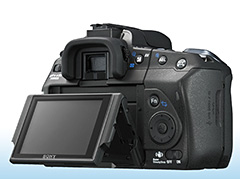
I stopped by the Sony booth at PMA 2008 to test the Sony alpha A350 DSLR (available as preorder for $899.99 US with 18-70mm lens on Amazon). What intrigued me most about this camera was the combination of Live Preview and a tiltable 2.7" Clear Photo LCD Plus screen. The screen angles upward for low angle shooting and downward for capturing shots while holding the camera over your head. You can also press it flush against the back of the body.

This opens up additional shooting possibilities for DSLR fans who weren't previously able to compose shots at extreme high and low angles. Plus, if you're working on a tripod, you can position the screen for your most comfortable viewing angle regardless of its shooting height.

I tested the Live Preview and it worked well, however, moving subjects weren't as smooth as I had anticipated. Since this is a still DSLR and not a camcorder, I don't see that as a huge drawback.

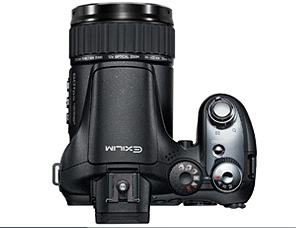
Other specs are impressive too: 14.2 MP Super HAD CCD sensor, up to 3200 ISO, CCD based stabilization for any lens mounted on the camera, robust battery, anti-dust technology, 9-point center cross AF sensor, and dual media slots for Memory Stick PRO Duo and CompactFlash.

The camera felt good in my hands and is quite light, making all day shooting treks less straining on the neck and back. I'll keep an eye out for follow up reports once the production model hits the streets in late April. But I think Sony has taken another positive step forward with this advanced consumer DSLR body.

Technorati Tags: , , ,

Shooting from a helicopter is tricky business. You have to photograph through glass that is often curved and full of reflections. Unlike with other through-glass shooting, you can't put your camera lens up against the surface because of the rotor vibration while flying. I was dealing with all of these factors while capturing this image of Hoover Dam with Lake Mead in the background at the Arizona/Nevada border in Southwestern USA.

hoover_dam_web.jpg

So here's how I did it. I used a Panasonic LUMIX TZ5 (just announced at PMA) in aerial scene mode. What that does (and what you can do on your own) is activate image stabilization and "warm up" the white balance to offset the coolness of shooting from above. I then looked for a patch of clean glass and held the camera as close to it as possible without touching it. I watched the reflections as the pilot maneuvered, and shot when the reflections weren't apparent.

You can increase your odds of success by wearing dark clothing (that doesn't reflect in the glass as much) and bringing a polarizer filter. Both help minimize reflections in the glass. If you're using a compact, bring one that has as wide a focal length as possible. The TZ5 goes to 28 mm, which helped considerably for capturing big scenes.

Photo of Lake Mead and Hoover Dam by Derrick Story using Panasonic TZ5, 1/320th at f-3.3, ISO 100, using aerial scene mode.


"How I Did It" is a new feature of The Digital Story featured on The Digital Photography Companion mini site. These are techniques from virtual camera club members who have built upon information in The Digital Photography Companion, or have come up with new tips altogether.

We're building a living library of knowledge for everyone to use (and contribute to). If you have a "How I Did It" tip to share, just send it to me with the sample photo, and put "How I Did It" in the email subject.

Technorati Tags: , , , , ,

Here's a new feature for The Digital Story: "How I Did It." These are techniques from virtual camera club members who have built upon information in The Digital Photography Companion, or came up with a new tip altogether.

The "How I Did It" tips will appear on The Digital Photography Companion mini-site, so we can build a living library of knowledge for everyone to use (and contribute to). If you have a "How I Did It" tip to share, just send it to me with the sample photo, and put "How I Did It" in the email subject.

This week's "How I Did It" is from Hans Stolz. Hans attended my Five Shooting Techniques to Make Your Pictures Look Better than Everyone Else's at Macworld SF (which was based on content from Digital Photography Companion). He liked the "Shoot at Night and Twilight" tip, and gave it a try from his hotel room in San Francisco. Here's what Hans had to say.

Hans_twilight_sf_hidi.jpg

"I own a Canon 10D and a Canon IXUS 65 camera," says Hans. "The photo, however, was shot with the IXUS 65 in my hotelroom in the Westin (former Argent) after your talk at the MacWorld conference. I followed your instructions on night shots."

"Here is how I actually did it:"

  1. I used my office chair which I rolled to the window.
  2. The camera was positioned on the armrest of the chair. I adjusted the camera so that it didn´t look in a right angle to the window (I think that is better for focusing).
  3. I set the camera in manual mode, the ISO to 80, flash off and the self timer to 10 seconds. 2 seconds didn´t work because the chair was still vibrating after 2 seconds.
  4. All the lights in the room were turned off.

"Fortunately, the Argent has floor to ceiling windows."

Hans camera was set to: ISO 80, f-2.8 with a 1 second exposure. Thanks Hans for sharing your work and your ingenuity!

Event Calendar

Events! See the TDS Event Calendar for photography workshops, speaking engagements, and trade show appearances.


Technorati Tags: , , , , ,

canon_xsi_front.jpg

There are a lot of things to like about the just-announced Canon Digital Rebel XSi (450D). Inclusion of the DIGIC III processor is important. I'm using that processor in the G9, and it elevates the game noticeably. Also, 3.5 fps in a Rebel? My gosh, I don't have that speed in my EOS 5D. Having such a fast frame rate in a camera that sells for $799 US is a boon to folks who want to leverage burst mode. And you can shoot up to 53 JPEGs in burst, or 6 RAWs. Not bad at all.

The 3" Live View LCD is also a nice touch. Canon has designed this LCD so you can use it at odd viewing angles. You know how hard it is to shoot through a DSLR at ground level. Now with Live View on this well-designed LCD, low-angle shooting won't be a back-breaking task.

canon_xs1_back.jpg

Believe it or not, I'm not as thrilled about the 12.2-megapixel sensor, especially if the DIGIC III can't control its noise at high ISOs. Since I haven't shot with the camera yet, it's too early to tell for sure. But I do know that my 10 megapixel XTi is nosier than the 8 megapixel XT. I'd like to see what the DIGIC III can do with a 10 megapixel sensor instead. But more to discover on this front.

I should also mention that, if you do go for the kit with the 18-55, that lens is now optically image stabilized, and it only costs you $100. Something to consider.

Overall, the Canon Rebel XSi looks like a great upgrade at a compelling price. I think its going to put great image quality and versatility in the hands of promising photographers... and the result will be more beautiful pictures. I'll follow up after I have a chance to play with the camera in Las Vegas at PMA.

The Canon XSi is available on Amazon for $799 US.

Technorati Tags: , , , , ,

A Cornucopia of Keywording Advice

keywords.jpg

I was reading Jon Canfield's post this morning, Using Standard Keywords, and I began to wonder about how many articles we've published on O'Reilly Digital Media on the art and science of using keywords.

So I did a quick search on the subject, and came up with list of 20 posts that help you organize your photo library. This is a true cornucopia of keywording advice.

So, for those of us in the middle of winter, now might be the opportune time to finally figure out what our approach is to organizing our libraries. And even if you don't want to actually do anything about it, you can read these cool articles and tell yourself it's research.

Event Calendar

Events! See the TDS Event Calendar for photography workshops, speaking engagements, and trade show appearances. I'm teaching an Aperture Lab at PMA next week.


Technorati Tags: , , ,

nikon_d300.jpg

Nikon's D300 DSLR ($1,799 US) is the successor to the popular D200 that has been seen in the hands of many pros. Initial reports about this camera have been very positive, with improvements in high ISO shooting.

PhotobraphyBLOG has just reviewed the Nikon D300 and writes:

"The mid-range digital SLR camera market has never been so competitive, with new models recently announced by virtually all the major manufacturers. The Nikon D300 is the latest prosumer model to pass through our review lab. With the highest price-tag of any of the main contenders, it has a lot to live up to, but a quick glance at the spec sheet reveals some impressive features. A new 12.3 APS-C sized sensor, 51 point AF system, 3 inch LCD screen, 6fps continuous shooting, Live View mode and ISO range of 100-6400 are all squeezed into the D300’s dust and water resistant magnesium alloy body. We published some impressive photos and an in-depth report when nature photographer Jan Vermeer took the D300 all the way to Antartica. Now Gavin Stoker hits the not-quite-so-cold streets of London to find out what the Nikon D300 is capable of in a more everyday setting."

Nikon shooters take note. This looks like a sweet body for sure.

Technorati Tags: , , , , ,

photo_finder.jpg

Since we don't have Geotagging in most of our cameras yet, here's a slick device for SD Card shooters that enables us to add GPS position data directly to JPEGs. ATP's Photo Finder is a pocketable GPS tracking device that lets you insert the SD memory card from your time-synced camera, then it writes the positions directly to the file header of each shot. You can then plot the data with Google Earth to see the location of each photo.

The $100 device seems easy enough to use. Just make sure that your camera's internal clock is in sync with the Photo Finder, and that the device is on while you're out taking pictures. When you take a break, just remove the SD card from your camera, insert it in Photo Finder, and the data is added to each shot. Later, when you upload the images to your computer, you'll see the GPD info in the EXIF data.

If you shoot RAW, my guess is that you'll have to shoot RAW+JPEG and use Photo Finder for the companion files. Also, it doesn't accommodate CF Cards directly, but as shown in the illustration, can tag them via a USB memory card reader. This is an interesting device that I want to explore more.

If you have any experience with it, please post a comment.

Technorati Tags: , , , , ,

Previewing Matte Colors in iPhoto '08

iphoto_matte.jpg

I've been sharing a lot of iPhoto '08 tips lately at Macworld SF in the O'Reilly Booth. But I discovered a new one this weekend that I thought you might enjoy. When you have a print, and want to figure out the perfect color for the front matte, you can do so right on your computer.

One of the new goodies in iPhoto '08 is the Customize function in the Print dialog box. It allows you to design (and print if you want) single and double mattes in a variety of color combinations. I wanted to figure out a good color standard matte to use for a few prints I had just output, so I loaded the images into iPhoto and used Customize to preview different colors.

It worked great! After a few minutes, I had figured out just the right combinations for all of my prints. Now I can order the mattes online, or just head down to the local art store with my notes.

You may be thinking at this point, "how does it look when you actually make a print with these "virtual mattes"? Actually, they look pretty cool. And for fun I wouldn't hesitate at all. But you will use a lot of ink for those big solid areas, plus, I still like the way a real rag paper matte looks. But in a pinch? Never say never.

Technorati Tags: , , , ,

casio_ex-f1.jpg

I stopped by the Casio booth here at Macworld and played with the Casio EXILIM Pro EX-F1. It's still in the final stages of development, but they should have a full production model ready for testing by PMA. I have an appointment with Casio there to test the latest version.

I'm excited by these specs: 60 fps still photography, CMOS sensor, DNG format, 7 fps burst mode with flash, HD and SD video, external mic jack, and tons of other goodies. This camera is a true speed demon.

I'll report more after testing the finished model in Las Vegas, but I wanted to get it on your radar now.

Technorati Tags: , ,

dpc_116x180.jpg

The Digital Photography Companion is the culmination of two years work. To prepare this book, I spent hours working with photographers and aspiring photographers to find out exactly what they wanted. As a result, I settled on an 8.5" x 5.5" trim size that allows enough room for healthy-sized photographs, yet fits in the backpack, purse, camera bag, or jacket pocket.

The book is designed to help you make pictures that distinguish your work from others. By mastering the controls on your camera and learning a few basic techniques, you can create virtually any type of image you want. The book will be your companion for such an endeavor. And you can order it now, and receive it by early March.

I also wanted to create a companion site for the book, so we've launched the The Digital Photography Companion online. Here I will publish tips to augment the information in the book, and feature photos from TDS members who have used these techniques to create their own look. More on this once the Companion is published.

In the meantime, I will be adding content to the DPC page regularly. I hope you enjoy this new addition to The Digital Story and share it with your friends.

Event Calendar

Events! See the TDS Event Calendar for photography workshops, speaking engagements, and trade show appearances.


Technorati Tags: , ,