This is The Digital Story Podcast #713, Nov. 12, 2019. Today's theme is "Which Photo Software Should You Use?" I'm Derrick Story.
Opening Monologue
For many photographers, the quest for the right photo management software continues. You would think, now that we're two decades into the digital age, that the dust would have settle. But if anything, the landscape is more cloudy than ever. On today's podcast I share insights from our photography community on what they're using and why. I hope you enjoy the show.
Which Photo Software Should You Use?
As part of my job, I have to be somewhat software agnostic. That doesn't mean that I don't have my favorites. But I try to discuss as many viable applications as possible. Because, quite honestly, one of them might be best for you.
For a while there, it looked like things had settled in to Lightroom, Aperture, and iPhoto. But then Apple turned over the cart, and we seemed to be right back where we started.
This did, however, open the door for new software to make the scene that might have otherwise received no attention. And now we have many choices.
I polled our Inner Circle members, they shared what apps they're using now. Here's the list in defending order.
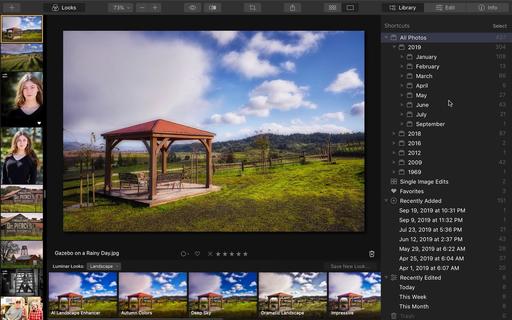
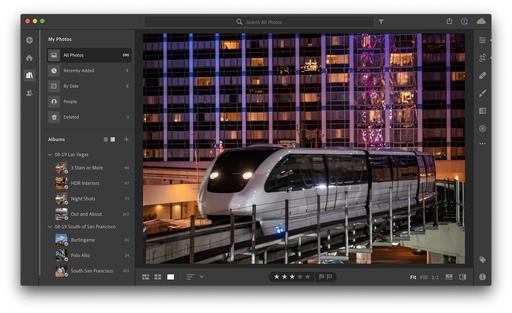
- Photos for macOS - 30 votes
- Adobe Lightroom Desktop Version - 26 votes
- Other - 20 votes
- Adobe Lightroom, Creative Cloud Version - 19 votes
- Adobe Photoshop, with or without Bridge - 15 votes
- Capture One Pro - 15 votes
- OnOne Suite - 9 votes
- DxO PhotoLab - 6 votes
- Exposure X5 - 1 vote
I think Charles sums up the position of many photographers these days: "I primarily us Lightroom Classic to manage and edit my images. I use Photoshop if and when the image requires PS's advanced editing capabilities. Apple's Photos app is used primarily to share images with my Apple centric family. While Lightroom (formerly Lightroom CC) gets used mostly so I can check what's going on in the Creative Cloud. I also use Lightroom Mobile, Luminar and Aurora HDR. Since I've been a Lightroom user since its first beta, I don't think I'll ever change as long as Adobe keeps up its current rate of advancing the platform."
Andrew adds: "Lightroom Classic is my go to now but I use Capture Pro for my my Fuji pictures. I still miss the organisational abilities of Aperture. My workflow is built around Lightroom now and that is my biggest barrier to change. I think things like Luminar are interesting from a processing perspective but it's difficult to find a time to experiment. Lightroom CC and Photos I mainly use to support mobile devices."
Andrew, a former Aperture user, writes: "Nothing has quite replaced Aperture. However, Capture One meets most of my needs although the catalogue isn't quite there. I think Photos is better than many people think and good enough for most. Plugins cover the gap in process. Luminar's catalogue features are pretty basic at the moment, but it's a great plugin."
And finally, Rob chimes in: "I am sticking with LR /PS. A lot of images are in it and I know them well enough for what I do. I do use Luminar and photolab ( they do the best noise reduction ). Luminar I use but via the flex plugin. I find it too slow for culling.
Not mentioned but I do like LR mobile on my iPad and it's ability to synchronize with LR desktop. I can do edits and share easily enough that way.
I just tried PS for the iPad. Very disappointed. How can you release a product without refine edge ? For now on the iPad I am sticking with affinity on the iPad.
I then went over to our TDS Facebook page where I asked the question: ""Which Photo Software Should You Use?" - And I want your input. What do you love/hate about the photo software that you're using now."
Lawrence wrote: "My current software suite is Lightroom for catalog management along with light editing (can't say I love it, but I've stuck with it because of the tagging/collections/rating I've done there over the years. I also use Luminar for heavier editing but I am VERY disappointed that they made a big deal out of Libraries, but then quietly dumped supporting import of Lightroom Libraries). I'm also not thrilled with their move into compositing with sky removal. And lastly, I use a series of other tools as plugins to Lightroom (Excire visual search, ON1 B&W conversion, TopazLabs DeNoise AI)"
Jim added a very interesting comment: "I use Lightroom Classic. I did switch fully to Lightroom CC because I love the idea of having my images in the cloud (backed up locally of course) because I want to move to a mobile only workflow doing all my editing and management on the iPad. It's so much more convenient for travel! I was very pleased with Lightroom Cc but then I discovered a big issue. The mobile applications (phone and iPad) actually store a smart preview of EVERY image and there is no limit on how much space it will use on your mobile device. I confirmed with Adobe that it will consume 100% of device capacity if needed. That was a show stopper that caused me to switch back. None of the other Adobe competitors will work for me because none of them offer desktop, mobile and cloud support. Only Adobe offers all three. I hope one of the others like Skylum one day hits all three!"
I think Peter's comment is interesting: "After many years I've been looking for alternatives to LR. Currently using ON1 as my default and like it. Started to develop a rhythm with it. I like that it doesn't rearrange my file structure. The raw processing works fine for me. HDR module is pretty useless IMO, but that's not a deal breaker. Lots of options to fine tune images to get to my vision.
I really wanted to like Luminar, but haven't been able to zero in on a workflow I can get my head around. Did get Aurora, their stand alone HDR software to try out. We'll see. Will go back and try brackets that failed in ON1 and see what Aurora gives me.
Retraining my brain to new software is a painful process. Actually have to think about what I'm doing."
And finally, Bob adds:" I currently use LR, with Aurora, Luminar, PS, NIK and a few others when LR falls short. I have a lot invested in LR as a DAM, that getting me to switch off of it would require a huge jump in capabilities to go through the effort. Overall, I feel Adobe is abandoning the LR+PS photographers in favor of pursuing their cloud strategy that does NOT work for me."
So where does that leave us? If you prefer the Adobe ecosystem, there are advantages to using Lightroom + Lightroom Mobile + Photoshop as needed. iPhone photographers and Apple fans should definitely revisit Photos and its substantial bullpen of Editing Extensions. Tethered shooters, RAW aficionados, and those who don't care about having a companion mobile app might want to consider Capture One Pro. And if not of these work for you, there's still the OnOne suite, DxO PhotoLab, Luminar with Libraries, and a handful of others.
Skillshare for Photographers

Skillshare is an online learning community with thousands of classes for creators, entrepreneurs, and curious people everywhere. You can take courses in photography, videography, audio production - you name it, they've got it. So whether you're picking up a new skill for your day job, figuring out your next side project, or pursuing a long-time passion, Skillshare has classes for you.
The photography courses are amazing. One that I recommend is "Documentary Photography: Capturing Places and People" by National Geo photographer Ami Vitale. She is both a great photographer and a compelling personality. And this is just one of many top notch titles on Skillshare.
Join the millions of students already learning on Skillshare today with this special offer for TDS listeners: Get 2 months free. That's right, Skillshare is offering The Digital Story community 2 months of unlimited access to thousands of classes for free. To sign up, go to skillshare.com/tds.
And a big thanks to Skillshare for sponsoring this show!
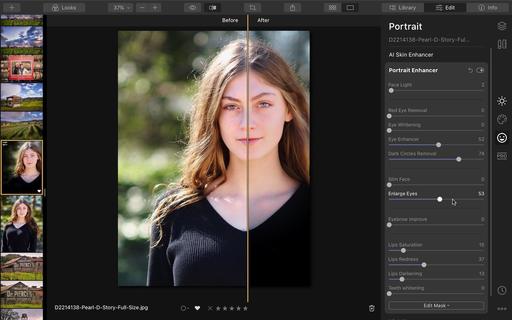
Don't Stop with Portrait Mode - Make Your iPhone Shots Even Better
You can read the entire TDS article here complete with step-by-step illustrations.
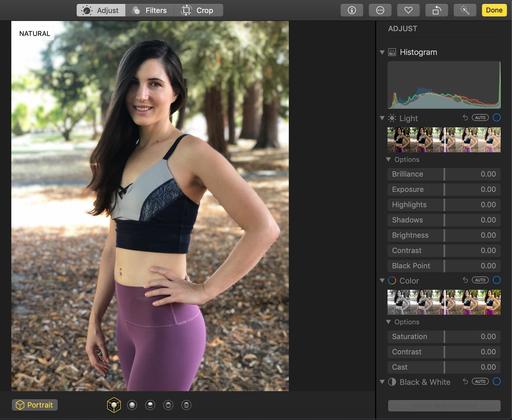
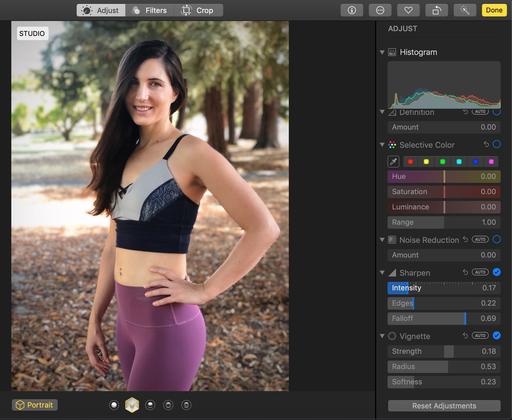
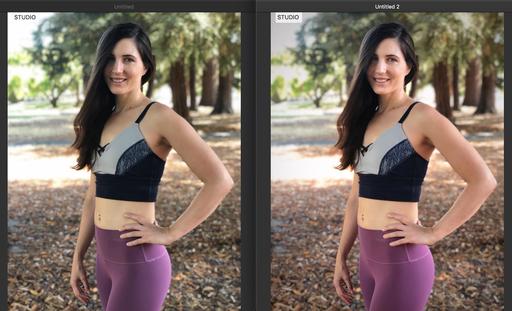
Portrait mode on current iPhones is incredible. Just open the Camera app, slide the options to Portrait, and shoot away. And as impressive as the results initially look, you can make them even better with just a few clicks. Here's how.
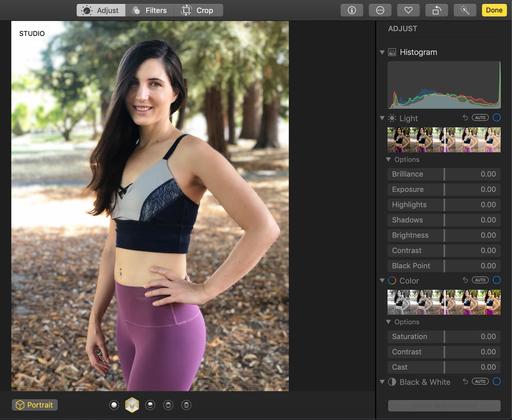
- Choose the best lighting scheme.
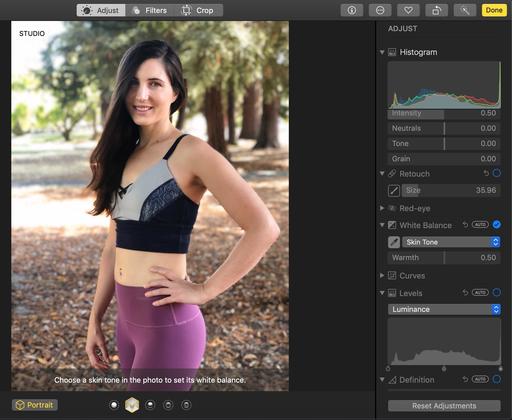
- Improve skin color.
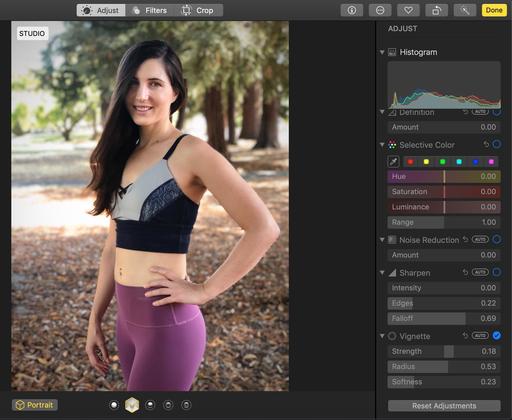
- Add a soft vignette.
- Don't forget a dash of sharpening.
Now, thanks to iOS 13 and iPadOS, all of these techniques can be applied on the iPhone and iPad as well, with the exception of White Balance. When in Photos for mobile devices, use the Warmth and Tint adjustments instead.
Our LA Street Photography Experience is Coming this March
This 3-day event on March 13-15 explores classic Los Angeles locations and architecture. Our excursions will take us as far west as Venice Beach, as well as famous movie spots and the back streets of this fascinating Southern California area.
You will learn new techniques for safe and effective street photography, how to capture the vibe of great architecture, and enjoy some classic California cuisine along the way.
Olympus Educator, Mike Boening, is our co-instructor. Those of you who have worked with Mike at our SF Street Photography events know how much he brings to the table. Not only is he an official Olympus Educator, he's an accomplished street photographer, and he's going to bring gear for you to test and learn about.
If you want to join Mike and me this coming March, just visit the information and registration page, or go to www.thenimblephotographer.com and click on the Workshops link, or go to the Olympus site - no matter how you get there, Mike and I are looking forward to working with you this coming Spring.
Updates and Such
Inner Circle Members: A big thanks to those who support our podcast and our efforts!
Podcasting Skills Course - Big thanks to everyone who attended our Podcasting Skills Course this past Saturday. I really enjoyed sharing all of those gems with you.
B&H and Amazon tiles on www.thedigitalstory. If you click on them first, you're helping to support this podcast. (The Digital Story is supported by its audience. When you purchase through links on our site, we may earn an affiliate commission.) And speaking of supporting this show, and big thanks to our Patreon Inner Circle members:
Affiliate Links - The links to some products in this podcast contain an affiliate code that credits The Digital Story for any purchases made from B&H Photo and Amazon via that click-through. Depending on the purchase, we may receive some financial compensation.
And finally, be sure to visit our friends at Red River Paper for all of your inkjet supply needs.
See you next week!
More Ways to Participate
Want to share photos and talk with other members in our virtual camera club? Check out our Flickr Public Group. And from those images, I choose the TDS Member Photo of the Day.
Podcast Sponsors
Red River Paper - Keep up with the world of inkjet printing, and win free paper, by liking Red River Paper on Facebook.
Skillshare is an online learning community with thousands of classes for creators, entrepreneurs, and curious people everywhere. Get two months of learning for free by visiting www.skillshare.com/tds.
The Nimbleosity Report
Do you want to keep up with the best content from The Digital Story and The Nimble Photographer? Sign up for The Nimbleosity Report, and receive highlights twice-a-month in a single page newsletter. Be a part of our community!
Want to Comment on this Post?
You can share your thoughts at the TDS Facebook page, where I'll post this story for discussion.
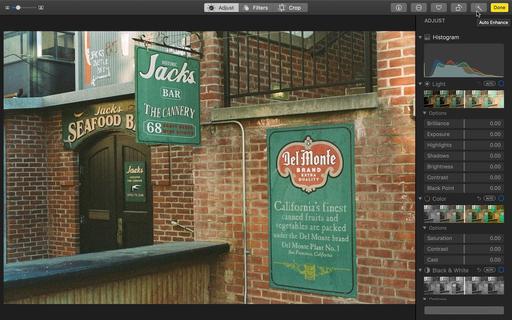 Del Monte Plant No. 1 captured in expired Kodak Gold 200 with a Nikon FM and Nikon Series E 50mm f/1.8 lens. I like the shot, but it was just a bit too off-color for my tastes. Photo by Derrick Story.
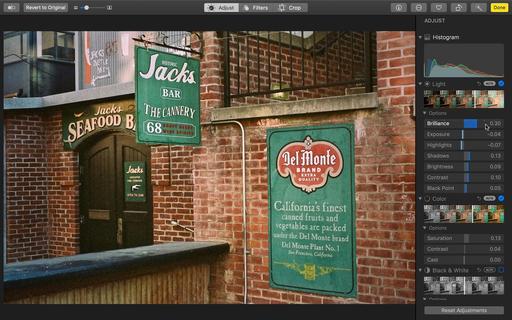 After just a few clicks in Photos for macOS, I found a sweet spot between the original image and one that I much prefer, but still retaining the original film feel.