Recently in Photography

  Page 67 of 382 in Photography  

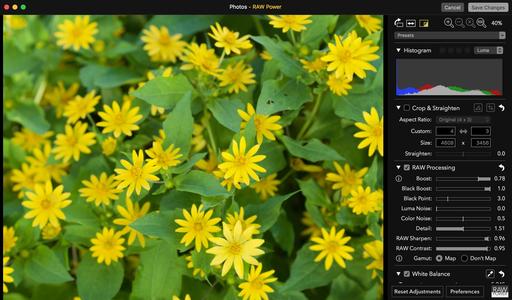
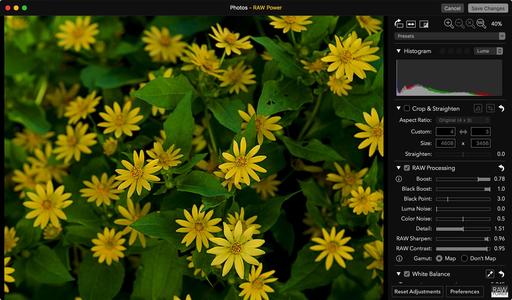
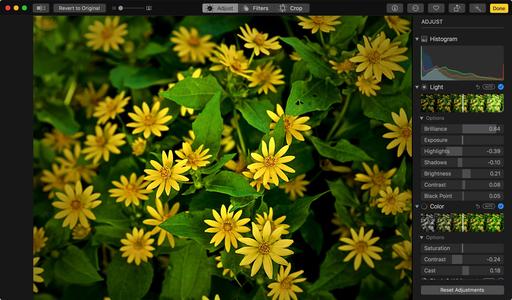
Using the RAW Power editing extension ($13.99) with Photos for macOS can squeeze every bit of image data from your files, even a ho-hum flower shot. Here are the 3 steps I use.

original-flower-raw.jpg Original flower shot I quickly grabbed one morning on my way to work. Here's how it looked before processing in RAW Power.

raw-power-processing.jpg Decoded image in RAW Power. I used its sliders to breath life into my RAW file.

finished-image.jpg Final touches added in Photos. Once I save changes in the RAW Power editing extension, the image is automatically returned to Photos for macOS for finishing.

Because of the wonderful ecosystem that Photos offers, more users are processing their RAW files in Photos for macOS. As you can see, RAW Power is one of those affordable, powerful tools.

New Photos for macOS High Sierra Training!

Is it time for you to learn the ins and outs of the latest version of Photos? Take a look at Photos for macOS High Sierra Essential Training on LinkedIn Learning, or on lynda.com. Maximize your iPhone photography and complement the work you do with your mirrorless cameras as well. You'll love your cameras even more...

Also be sure to check out my new book, The Apple Photos Book for Photographers, 2nd Edition. It's completely up to date!

You can share your thoughts at the TDS Facebook page, where I'll post this story for discussion.

This is The Digital Story Podcast #638, June 5, 2018. Today's theme is "Scott Kelby's Surprising Printing Talk at Photoshop World" I'm Derrick Story.

Opening Monologue

I was anticipating a number of topics covered at the Photoshop World Keynote address. But the importance of printing was not one of them. Yet, after the T-Shirt tosses and Beatles parodies, Scott Kelby maneuvered from the importance of backing up to the even greater value of printing. The five points that he used to build his argument is the top story of today's TDS podcast.

"Scott Kelby's Surprising Printing Talk at Photoshop World"

IMG_549467943.jpg

It was interesting how Scott led into his printing talk - by outlining the shortcomings of most backup systems. Prints are the exception. They are device independent. He then told a story to illustrate may of the reasons why he thinks prints are important.

Here are the five points that Scott covered in his talk:

  • Connection to the Viewer - Holding a print elevates the experience to a whole new level.
  • Stand Out from the Competition - The gift of a print blows away an email attachment.
  • Impact - A 13"x19" print has more impact than tiny images we view on our digital devices.
  • A Print Has Value - If you were willing to pay $200 for a print to hang on your wall, how much would you spend for a digital version of it on a flash drive?
  • Protect Your Visual History - Will our generation be able to leave behind a visual history as rich as what our parents left for us?
  • You can imagine how thrilled I was by this talk...

    The Portfolio Project - Week 5 - James Batt Wildlife Photographs

    James Batt is our featured photographer this week with his Portfoliobox site, www.jamesbatt.com.

    His incredible collection of bird images are categorized in a beautiful, wildly educational way. I'm keeping his page bookmarked not only for its beauty, but for reference as I enjoy my own birdwatching activity. You have to check this out.

    If you've signed up for a Portfoliobox Pro account, and have published at least one page, then send me the link to that site. Use the Contact Form on the Nimble Photographer and provide your name, the link, and the subject of the page or site you've published.

    I'm also building a directory of user sites and publish it on TheDigitalStory. And all through the month of June, I will feature one of those sites on this podcast.

    I love using Portfoliobox for these reasons:

    • My images look great, both on my computer and on my mobile devices.
    • It's easy to use. Without any instruction, I'm adding a high quality page in just minutes.
    • It's affordable. There's a free plan and a Pro version. The Pro version is only $82.80 per year or $8.90 per month USD, and that's before the 20 percent TDS discount.

    Highlights with the Pro Plan

    In addition to unlimited pages, you get a personalized domain name, web hosting, and up to 1,000 images.

    Get Started Today

    Just go to the TDS Landing Page to get started with your free account, or to receive the 20 percent discount on the Pro version. And if you want to see the page that I've begun, visit www.derrickstoryphotography.com.

    Interview with Rick Sammon

    After reading Rick's new book, The Route 66 Photo Road Trip, I sat down with him in Orlando for this interview. My opening question, "Rick, why do we need another book about Route 66?" Here's what he had to say.

    Signed Print Winner!

    Congratulations to Craig Tooley who wrote, "I very much enjoyed your title on Luminar 'Mastering the Basics,' as with all of your titles, very well done."

    Craig will receive the signed print from the Maui Project. Woohoo!

    Reservation Forms have been sent for the Burney Falls and Lassen Volcanic National Park Workshop

    We have our cabin reservations secured for Sept. 27-29, 2018 for the Burney Falls and Lassen Volcanic National Park Workshop. I sent out reservation forms this last weekend. So if you are on the reserve list, you should have received an invite.

    Updates and Such

    You can become a member of our Inner Circle by clicking on this link or by clicking on the Patreon tile that's on every page of The Digital Story.

    B&H and Amazon tiles on www.thedigitalstory. If you click on them first, you're helping to support this podcast. And speaking of supporting this show, and big thanks to our Patreon Inner Circle members:

    And finally, be sure to visit our friends at Red River Paper for all of your inkjet supply needs.

    See you next week!

    More Ways to Participate

    Want to share photos and talk with other members in our virtual camera club? Check out our Flickr Public Group. And from those images, I choose the TDS Member Photo of the Day.

    Podcast Sponsors

    Red River Paper - Keep up with the world of inkjet printing, and win free paper, by liking Red River Paper on Facebook.

    Portfoliobox - Create the site that your best images deserve by visiting Portfoliobox. And get a 20 percent discount by using our landing page!

    The Nimbleosity Report

    Do you want to keep up with the best content from The Digital Story and The Nimble Photographer? Sign up for The Nimbleosity Report, and receive highlights twice-a-month in a single page newsletter. Be a part of our community!

    Want to Comment on this Post?

    You can share your thoughts at the TDS Facebook page, where I'll post this story for discussion.

Airplane window photography is one of the great bonuses of travel. You already have to get there, and if you can capture a few shots along the way, all the better.

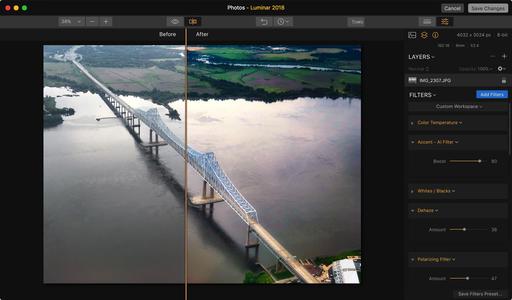
finished-airplane-shot.jpg "Pennsylvania Bridge" - Captured with an iPhone X through the plane window and processed in Luminar 2018. Photo by Derrick Story.

Just like I think that Luminar 2018 is the perfect app for drone photography, I think it's just as powerful and amazing for airplane window work.

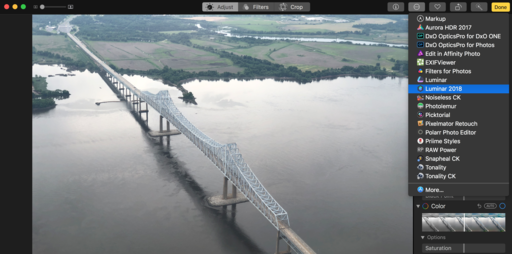
For this image, captured with my iPhone X and automatically imported into my Photos for macOS app, I used the Luminar Editing Extension that's bundled free with the app. It's easy to use. Just click on the 3 dots at the top of the editing tools and choose Luminar 2018.

sending-to-luminar.png Sending the original image to Luminar 2018 from Photos for macOS.

I then choose the Aerial Photography Workspace in Luminar. It's a great starting point for the edits. I decided to add a couple additional Filters (Vignette and Image Radiance), then clicked the Save Changes Button to return to Photos. As you can see by the Before/After illustration below, there is a dramatic improvement to the image.

luminar-before-after.jpg The Before and After in the Luminar Editing Extension.

The workflow could not be simpler. The iPhone image was automatically uploaded to my Mac via iCloud. It was waiting for me in Photos. The Luminar Editing Extension is ready to use. I spend a minute or two improving the shot. Then the saved changes are automatically shared to all of my devices, including back to my iPhone.

Airplane Window Photography has never been easier, or more beautiful.

New Photos for macOS High Sierra Training!

Is it time for you to learn the ins and outs of the latest version of Photos? Take a look at Photos for macOS High Sierra Essential Training on LinkedIn Learning, or on lynda.com. Maximize your iPhone photography and complement the work you do with your mirrorless cameras as well. You'll love your cameras even more...

Also be sure to check out my new book, The Apple Photos Book for Photographers, 2nd Edition. It's completely up to date!

You can share your thoughts at the TDS Facebook page, where I'll post this story for discussion.

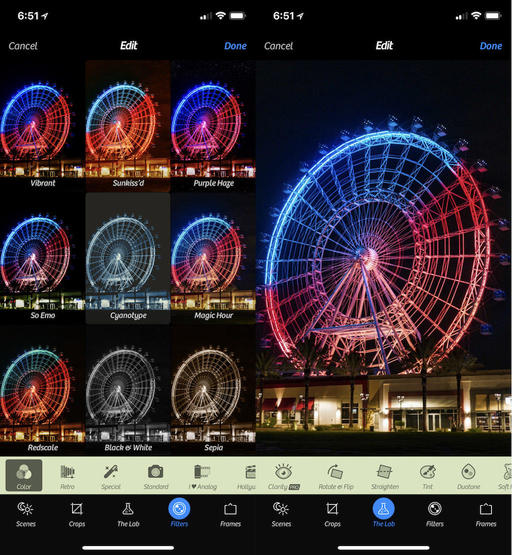
I read the announcement about Camera Plus 2 on DP Review and decided to give it a spin. I had been a big fan of the original, and thought the new version might be good for RAW capture with my iPhone.

camera-plus-2-tds.jpg

After an evening of testing, I do like the updated interface. I had no problem controlling my captures and getting the results that I wanted. As for RAW photography, as long as I shot RAW+Jpeg, the images showed up perfectly in Photos on my Mac. They appeared as RAW+Jpeg pairs with the Jpegs on top - the same way images come in from my Olympus and other interchangeable lens cameras.

If I shot the RAWs and Jpegs as separate files, however, there appears to be a bug where the RAW comes in as a thumbnail only. My guess is that this will be fixed soon. But in the meantime, I would stick with RAW+Jpeg as a combined file for Mac photographers.

All the other features worked great (including the wonderful editing interface). And for a one-time fee of $2.99, this app is a gem. I'm going to continue to test it during my assignment in Orlando. If I discover anything new, I will update here and on social.

New Photos for macOS High Sierra Training!

Is it time for you to learn the ins and outs of the latest version of Photos? Take a look at Photos for macOS High Sierra Essential Training on LinkedIn Learning, or on lynda.com. Maximize your iPhone photography and complement the work you do with your mirrorless cameras as well. You'll love your cameras even more...

Also be sure to check out my new book, The Apple Photos Book for Photographers, 2nd Edition. It's completely up to date!

You can share your thoughts at the TDS Facebook page, where I'll post this story for discussion.

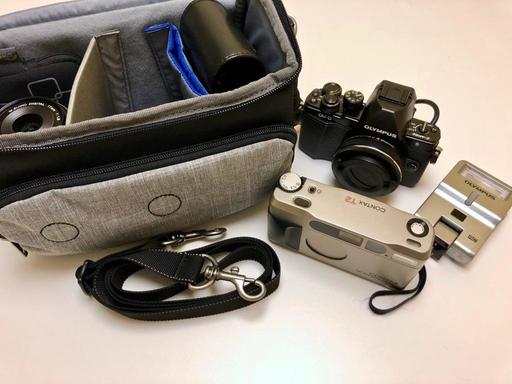
I have lots to do during this trip to Orlando, so I want to travel light. My Super Nimble kit is only 9" wide by 4.5" deep, yet it packs two cameras, 4 lenses, wireless flash, and all the necessary accessories. Incredible!

super-nimble-1024.jpg

I start with a Think Tank Mirrorless Mover 20 camera bag ($54.75) that's beautifully designed and crafted. When I'm out on foot, it slings lightly over my shoulders. When I'm flying, it stashes neatly inside my gear backpack.

Inside the Mirrorless Mover I've arranged:

You may be wondering why I chose the OM-D E-M10 Mark II over my other Micro Four Thirds cameras. Beyond just the fact that I love shooting with it, it has a popup flash. I can use the popup as a wireless controller for the FL-300R for super versatile (and highly compact) off-camera flash. This is really handy when covering events on the go.

The Contax T2 is a premium 35mm camera with AF and manual focus, programmed exposure, aperture priority exposure with click-stop settings, and exposure compensation up to +2/-2 stops.

I have the iPhone X in my pocket, so I can transfer images from the OM-D to the smartphone for immediate publishing. And when the weather gets bad, there's a protective rain cover for the Think Tank that I can quickly put on.

This is a kit that I can carry all day and well into the night. And to be honest, I can tackle just about any photo opportunity with it. Follow me on Instagram, Twitter, and Facebook to see how it goes.


Nimble Photographer Logo

This kit has a (super) high Nimbleosity Rating. What does that mean? You can learn about Nimbleosity and more by visiting TheNimblePhotographer.com.

Want to Comment on this Post?

You can share your thoughts at the TDS Facebook page, where I'll post this story for discussion.

This is The Digital Story Podcast #637, May 29, 2018. Today's theme is "The Future of Lightroom" I'm Derrick Story.

Opening Monologue

After the fall of Aperture, Lightroom stood tall as the best all around digital asset manager for serious enthusiasts and many pros as well. But a number things have changed since then - some initiated by Adobe, and others by external forces. And suddenly, Lightroom's future is a bit more cloudy than it was a couple years ago. And that's the top story in today's TDS Podcast.

"The Future of Lightroom"

It's probably a good idea or a really bad one to discuss the future of Lightroom as I board a plane for Orlando to attend Photoshop World. But here we are.

lightroom-splash.jpg

Here are the five factors that I think will influence Lightroom's future:

  • The End of the Perpetual License - In October 2017 Adobe announced the end of its perpetual license for new versions of Lightroom. If photographers want to stay current, they will need Creative Cloud subscriptions.
  • Locked In Workflow - A few years back, Adobe redesigned Lightroom's import dialog. What followed was a good example of how software design becomes locked-in and unable to change to meet an evolving ecosystem.
  • New Competitors - Later this year, Skylum will release their digital asset manager for Luminar. This highly anticipated update, if good, will continue to erode Lightroom's existing user base.
  • Smartphone Popularity - Even though Adobe has done a good job with its mobility apps, the trend among consumer photographers is to let their smartphones handle all of their photography needs. For this group, a Creative Cloud subscription might not be that appealing.
  • Software Fatigue - Sometimes you just need a change.
  • What Adobe has going for it... First, it's not easy to switch from one digital asset manager to another. Many photographers will remain with Lightroom as the path of least resistance. Plus, Adobe has done a good job with its mobility apps. So those in the Adobe ecosystem can integrate their smartphone photography with their more serious work. And finally, Lightroom is a good app. It's had its ups and downs, but at the end of the day it is a solid processor, editor, and manager.

    The Portfolio Project - Week 4 - Your Portfoliobox Sites

    I've received enthusiastic mail about how setting up a Portfoliobox site has rekindled the creative juices. So I thought what we could do is share this work with each other.

    If you've signed up for a Portfoliobox Pro account, and have published at least one page, then send me the link to that site. Use the Contact Form on the Nimble Photographer and provide your name, the link, and the subject of the page or site you've published.

    I will build a directory of user sites and publish it on TheDigitalStory. And all through the month of June, I will feature one of those sites on this podcast.

    I love using Portfoliobox for these reasons:

    • My images look great, both on my computer and on my mobile devices.
    • It's easy to use. Without any instruction, I'm adding a high quality page in just minutes.
    • It's affordable. There's a free plan and a Pro version. The Pro version is only $82.80 per year or $8.90 per month USD, and that's before the 20 percent TDS discount.

    Highlights with the Pro Plan

    In addition to unlimited pages, you get a personalized domain name, web hosting, and up to 1,000 images.

    Get Started Today

    Just go to the TDS Landing Page to get started with your free account, or to receive the 20 percent discount on the Pro version. And if you want to see the page that I've begun, visit www.derrickstoryphotography.com.

    The Creative Luxli Cello 10" RGBAW LED Light

    I recently reviewed the Luxli Cello 10" RGBAW LED Light, and I want to talk about why I think this is an incredible LED panel for photographers.

    Great Online Training Titles for Efficient Learning

    I have some terrific photography titles on both LinkedIn Learning and lynda.com. You may want to visit my lynda.com Author Page or my LinkedIn Learning Author Page. Here's a look at some of the titles waiting for you.

    • Capture One Pro 11 Essential Training
    • Luminar Essential Training
    • Photos for macOS High Sierra Essential Training
    • Dropbox for Photographers
    • Sharing Photos with Flickr
    • A Photographer in Cuba
    • High School Seniors Portrait Photography

    Signed Print Giveaway - If you watch one chapter for any of my training videos on lynda.com or LinkedIn Training during the month of May, send me a notification after the viewing via the Contact Form on The Nimble Photographer. (You can sign up for a free trial on lynda.com.) Just say, "I watched a chapter on lynda.com or LinkedIn Learning!"

    You name will be entered into a drawing for a signed print from the Maui Project. The lucky recipient will be announced on the June 5, 2018 podcast. (Promotion ends on May 31, 2018. Void where prohibited.)

    Reservation Forms have been sent for the Burney Falls and Lassen Volcanic National Park Workshop

    We have our cabin reservations secured for Sept. 27-29, 2018 for the Burney Falls and Lassen Volcanic National Park Workshop. I sent out reservation forms this last weekend. So if you are on the reserve list, you should have received an invite.

    Updates and Such

    You can become a member of our Inner Circle by clicking on this link or by clicking on the Patreon tile that's on every page of The Digital Story.

    B&H and Amazon tiles on www.thedigitalstory. If you click on them first, you're helping to support this podcast. And speaking of supporting this show, and big thanks to our Patreon Inner Circle members:

    And finally, be sure to visit our friends at Red River Paper for all of your inkjet supply needs.

    See you next week!

    More Ways to Participate

    Want to share photos and talk with other members in our virtual camera club? Check out our Flickr Public Group. And from those images, I choose the TDS Member Photo of the Day.

    Podcast Sponsors

    Red River Paper - Keep up with the world of inkjet printing, and win free paper, by liking Red River Paper on Facebook.

    Portfoliobox - Create the site that your best images deserve by visiting Portfoliobox. And get a 20 percent discount by using our landing page!

    The Nimbleosity Report

    Do you want to keep up with the best content from The Digital Story and The Nimble Photographer? Sign up for The Nimbleosity Report, and receive highlights twice-a-month in a single page newsletter. Be a part of our community!

    Want to Comment on this Post?

    You can share your thoughts at the TDS Facebook page, where I'll post this story for discussion.

I've really enjoyed working with bi-color LED lights for my portrait work. But the Luxli Cello 10" RGBAW LED Light expands this color versatility to a dizzying new height.

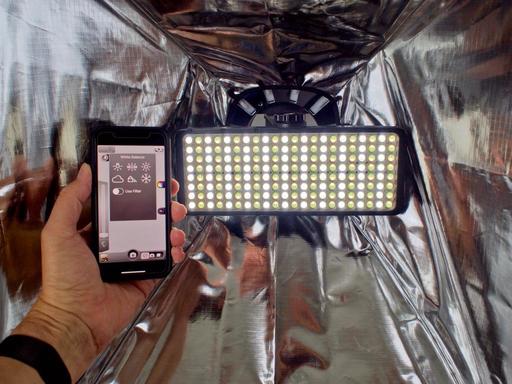
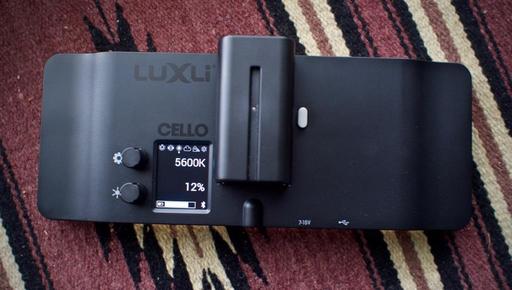
light-with-app-1024.jpg The Luxli LED panel inside a softbox with its Bluetooth controller app running on my iPhone.

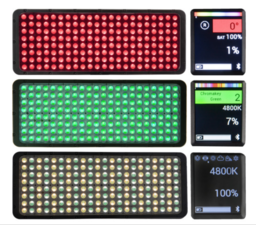
variety-of-colors.png

Each of the 176 individual LEDs inside the panel can reproduce red, green, blue, or white. These color options can be mixed using three modes - white (or color temperature) mode, RGB mode, or filter mode. So all of my options are open. I can tune the panel for precise color temperature control during a portrait shoot. Or I can create an effect using its virtual color gels.

There are two ways to enable these controls. The built-in LCD display on the back of the panel is intuitive and easy to read. I can adjust brightness, then switch between the RGB, gel filter, and CCT modes with the touch of a button. Or, I can use the free Conductor app (iOS and Android) to make these same changes.

I use both control options. Typically, I first set up the lighting with the back LED panel. But I've also been using the Luxli in my portrait softbox. And for those shoots, it's super convenient using my iPhone to change the light settings. I can stay where I am in shooting position, adjust the light, then fire off another series. I never have to disrupt the flow of the shoot by walking over to the softbox, opening it up, and fiddling with the controls. The iPhone is always in my pocket, and it is my lighting remote control.

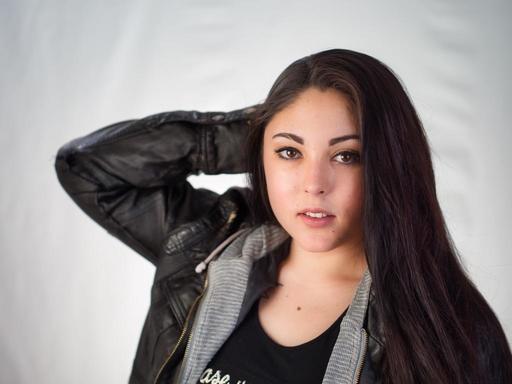
Bella-With-Jacket-1024.jpg Even though the Luxli Cello is compact enough for on-camera work, it's powerful enough for lightbox lighting in the studio.

Here are the basic specs for the Luxli Cello 10" RGBAW LED Light ($399):

  • 10" 176 RGBAW LED Light
  • Adjustable Full Color Light
  • iOS/Android App Control via Bluetooth
  • White Mode: Standard Bicolor Operation
  • RGB Mode: Select Color from RGB Wheel
  • Filter Mode: Colored Gel Sampling
  • Discreet Dimming and Color Knobs
  • 100 to 0 Percent Brightness Dimming
  • 1/4"-20 Mounting Thread

The Luxli uses the same Sony L-Series battery that my other LEDs use, so it fits into my family of lighting gear. It also accepts plug-in power via a wall adapter.

back-panel-1024.jpg The back panel showing the LCD display and the Sony L-Series battery.

The kit includes:

  • Luxli Cello 10" RGBAW LED Light
  • Shoe-Mount Ball Head
  • NP-F750 Battery
  • Battery Charger
  • Limited 1-Year Warranty
  • iOS and Android app available for download

If you're looking for versatile, powerful lighting in a compact package, the Luxli Cello is certainly an LED panel to consider.

You can share your thoughts at the TDS Facebook page, where I'll post this story for discussion.

Luminar is almost magical for aerial photography. Using the free bundled Aerial presets, the images spring to life. And this is one of the scenarios where I think Luminar 2018 is the perfect plugin complement to Lightroom.

Take a look at this round trip from Lightroom to Luminar and back.

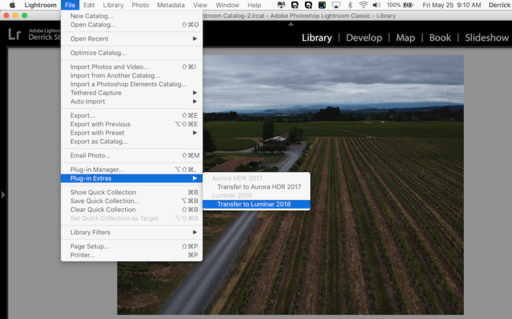
lr-to-luminar-tds.png Unedited drone image sent to Lightroom using the Luminar 2018 plugin.

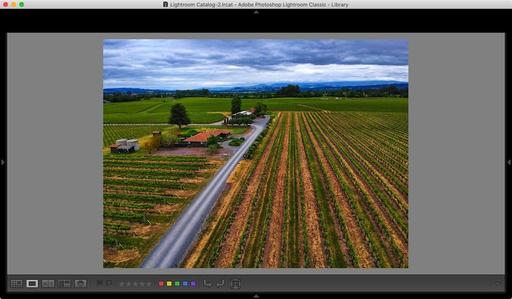
returned-image-tds.jpg Returned image after using an Aerial preset in Luminar. The entire process took about 1 minute. Photo by Derrick Story.

Setting this up is easy. First, make sure the plugin is enabled by opening Luminar 2018, and going to "Luminar 2018" > Install plugins. There are four choices: Lightroom, Photoshop, Aperture, and Photos. Click on Lightroom. The open Lightroom, find an image, and go to File > Plugin Extras > Transfer to Luminar 2018.

Enhance the image in Luminar 2018 and click the Apply button. The edited image will return to your Lightroom catalog. It's that easy. And the results are amazing.

Rock Luminar with my new Essential Training

You learn all the ins and outs of Luminar 2018 via my Essential Training on lynda.com and on LinkedIn Learning. It's fun, and I promise, you will learn a lot.

You can share your thoughts at the TDS Facebook page, where I'll post this story for discussion.

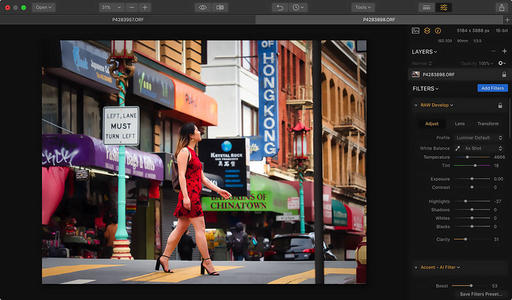
For many of us, Luminar has evolved from an app that we use some of the time for special images, to most of the time in our daily workflow. As a result, efficiency is more important than ever. And keyboard shortcuts really help with that.

luminar-sf-ds-1024.jpg

I have my favorites that I use all of the time, and I thought that you might want to learn these as well. (These and others are from the Skylum Luminar User Manual page. Windows shortcuts are there as well!)

For controlling the interface, I use:

\ Activates before/after comparison. When the key is pressed, the original image will be shown. Releasing the key will reveal the enhanced image. This is much faster than moving the mouse pointer up to the top toolbar.

Tab Show/Hide the Preset panel at the bottom of the window and Side panel along right edge. The key will activate previously shown windows. I've been using this more lately because it displays my my image with a less distracting interface.

Working with tools:

  • B Activate the Masking Brush tool
  • G Activates the Gradient Mask tool
  • R Activates the Radial Mask tool
  • Cmd+J Clone & Stamp tool
  • Cmd+E Erase tool
  • C Enter the Crop tool

The two I use the most from these favs are the B and the C keys. They are super handy because the functions are otherwise buried in slower popup menus.

Brush and mask controls:

  • [ Decrease the brush radius
  • ] Increase the brush radius
  • Shift+[ Decrease the brush softness
  • Shift+] Increase the brush softness
  • X Switching between painting/erasing modes
  • / Show current layer mask in the form of red transparent image imposition
  • Cmd+I Invert the layer mask

When I get in a zone with brushing, I just want to work fast. These commands really speed things up.

Viewing your image:

  • Cmd++ Zoom In
  • Cmd+- Zoom Out
  • Cmd+1 Original Size
  • Cmd+0 Fit to Screen
  • F Show a full-screen preview of just the image

What's interesting is that most of these shortcuts work with the editing extension version of Luminar as well. So if you're using Luminar in conjunction with Photos for macOS, then you can accelerate your workflow there as well.

You can see all of the shortcuts on the Skylum Luminar User Manual page, but these will get you headed in the right direction.

Rock Luminar with my new Essential Training

You learn all the ins and outs of Luminar 2018 via my Essential Training on lynda.com and on LinkedIn Learning. It's fun, and I promise, you will learn a lot.

You can share your thoughts at the TDS Facebook page, where I'll post this story for discussion.

This is The Digital Story Podcast #636, May 22, 2018. Today's theme is "The True Summer Advantage" I'm Derrick Story.

Opening Monologue

Summer is the season of family vacations, solo adventure, BBQing, baseball games, picnics, and bare feet. But for photographers, there's another benefit that might not be immediately apparent, but can be wildly useful and enjoyable - and that's the subject of today's TDS photography podcast.

"The True Summer Advantage"

Light is the one thing that we need for photography, and there's plenty of it during the summer. And it's not so much the warmer days that I'm talking about, but the longer ones.

Even if you can't take as many photo vacations or workshops as you wish, with a little planning, you can substantially increase your captures. Here's how.

Let's say that you have a job that requires your presence from 8:30 am to 5:30 pm daily. If you're lucky, your workplace isn't far from home. Typically, that's not the case, however. But you can use this to your photography advantage.

If the commute to work is 30 minutes, for example, then that puts you in a new environment away from the house. In prime summer, there's working light until roughly 8:30 pm. Using your workplace as a jumping off point, you have 3 extra hours for creative pursuits that you did not have in the winter.

audi-vineyard-1024-tds.jpg

Open a map and draw a 1-hour radius from your work. What are the photo opportunities within that circle? Conceivably, you could bring your camera gear to work, leave the office at 5:30 pm, travel to one of these locations within radius, shoot a series of images, and be home by 9 pm.

That is one extra shoot that didn't require you to use any of your weekend or vacation time. And what if you identified numerous locations within this radius? (And that's not to mention revisiting the ones that you liked the first time.)

If you set this up to do just twice a month during the summer, you could add 6 or more quality photo shoots to your library without disrupting family obligations or daily routine. Think about the possibilities here.

The Portfolio Project - Week 3 - Wandering

The latest gallery that I added to my Portfoliobox project is Wandering. And the process that led me to this topic is quite interesting (as explained during the podcast).

I also tried a new feature. Mouse over any of the images on the gallery page, and a very attractive screen appears show the location for the shot. This allows me to add context to the image without cluttering up the gallery.

One of things that I really noticed when assembling this collection was how important it was for the images to work together on the page. I started with over 60 candidates, and experimented with many combinations before I settled on the 16 that's displayed there now.

I love using Portfoliobox for these reasons:

  • My images look great, both on my computer and on my mobile devices.
  • It's easy to use. Without any instruction, I'm adding a high quality page in just minutes.
  • It's affordable. There's a free plan and a Pro version. The Pro version is only $82.80 per year or $8.90 per month USD, and that's before the 20 percent TDS discount.

Highlights with the Pro Plan

In addition to unlimited pages, you get a personalized domain name, web hosting, and up to 1,000 images.

Get Started Today

Just go to the TDS Landing Page to get started with your free account, or to receive the 20 percent discount on the Pro version. And if you want to see the page that I've begun, visit www.derrickstoryphotography.com.

Panasonic Lumix TS7/FT7 is the first rugged compact camera with a built-in EVF

DP Review reports: "Panasonic has announced its Lumix DC-TS7 (FT7 outside of North America) which is the first waterproof/rugged compact to have an electronic viewfinder. The viewfinder is 0.2" in size and has an resolution equivalent to 1.17 million dots and a magnification of 0.45x equivalent. Obviously, you won't be able to use the EVF if you have a scuba mask on, but for shooting in bright light on land it could come in handy. There's also a 3" non-touch LCD available for composing and reviewing your photos."

"The TS7 has a 20.4MP, 1/2.3" BSI CMOS sensor and an F3.3-5.9, 28-128mm equiv. lens. It's able to go 31m/102ft underwater, can take a fall from 2m/6.6ft and can withstand 100kg / 220lb of crushing force. It's also freezeproof to -10C / +14F."

Great Online Training Titles for Efficient Learning

I have some terrific photography titles on both LinkedIn Learning and lynda.com. You may want to visit my lynda.com Author Page or my LinkedIn Learning Author Page. Here's a look at some of the titles waiting for you.

  • Capture One Pro 11 Essential Training
  • Luminar Essential Training
  • Photos for macOS High Sierra Essential Training
  • Dropbox for Photographers
  • Sharing Photos with Flickr
  • A Photographer in Cuba
  • High School Seniors Portrait Photography

Signed Print Giveaway - If you watch one chapter for any of my training videos on lynda.com or LinkedIn Training during the month of May, send me a notification after the viewing via the Contact Form on The Nimble Photographer. (You can sign up for a free trial on lynda.com.) Just say, "I watched a chapter on lynda.com or LinkedIn Learning!"

You name will be entered into a drawing for a signed print from the Maui Project. The lucky recipient will be announced on the June 5, 2018 podcast. (Promotion ends on May 31, 2018. Void where prohibited.)

Reservation Forms have been sent for the Burney Falls and Lassen Volcanic National Park Workshop

We have our cabin reservations secured for Sept. 27-29, 2018 for the Burney Falls and Lassen Volcanic National Park Workshop. I sent out reservation forms this last weekend. So if you are on the reserve list, you should have received an invite.

Updates and Such

You can become a member of our Inner Circle by clicking on this link or by clicking on the Patreon tile that's on every page of The Digital Story.

B&H and Amazon tiles on www.thedigitalstory. If you click on them first, you're helping to support this podcast. And speaking of supporting this show, and big thanks to our Patreon Inner Circle members:

And finally, be sure to visit our friends at Red River Paper for all of your inkjet supply needs.

See you next week!

More Ways to Participate

Want to share photos and talk with other members in our virtual camera club? Check out our Flickr Public Group. And from those images, I choose the TDS Member Photo of the Day.

Podcast Sponsors

Red River Paper - Keep up with the world of inkjet printing, and win free paper, by liking Red River Paper on Facebook.

Portfoliobox - Create the site that your best images deserve by visiting Portfoliobox. And get a 20 percent discount by using our landing page!

The Nimbleosity Report

Do you want to keep up with the best content from The Digital Story and The Nimble Photographer? Sign up for The Nimbleosity Report, and receive highlights twice-a-month in a single page newsletter. Be a part of our community!

Want to Comment on this Post?

You can share your thoughts at the TDS Facebook page, where I'll post this story for discussion.