Recently in Creative Output

  Page 3 of 3 in Creative Output  

This week Stephanie begins by taking you shopping to a bargain store, then heads back to the studio to design a custom notebook that features your photography on the cover. Even though they are easy to assemble (and very affordable), these beautiful notebooks make excellent gifts.

You'll learn, step by step, how to take apart an existing notebook, customize the front and back covers, then reassemble it. The final product becomes an expression of your art.

Other Creative Output Projects with Stephanie

Make a Custom Photo Gift Bag (Video Tutorial)

Buckle-Up Frame Present for Dad on Father's Day

A Time to Remember - Make Your Own Photo Clock

Packing Tape Transparencies

Buckle-Up Frame Present for Dad on Father's Day

Unfortunately, many people these days have to tighten their belts to make ends meet. It's tough to think about gift giving when so much of your money is put toward paying bills. But that doesn't mean you should forget about good ol' dad on Father's Day (June 21).

Consider making a picture frame that's not only unique looking, but surprisingly inexpensive as well. Pay a visit to your local thrift store and purchase a leather belt and frame. The belt can be any color, however, the width of it should be approximately the same size as the frame's surface.

Measure the sides of your frame, corner to corner. Buckle the belt and cut it into strips that are the same length as the sides of the frame. Position the strips over the frame and miter the corners (45 degree cut) for a clean look. Adhere the pieces of the belt to the surface using a strong adhesive like Beacon's 3-in-1 Advanced Craft Glue.

After the glue dries, it's ready for your photo. Select one that's personal and special to both of you. The frame will look like it was an expensive purchase, and your picture will be a priceless keepsake.

A Time to Remember - Make Your Own Photo Clock

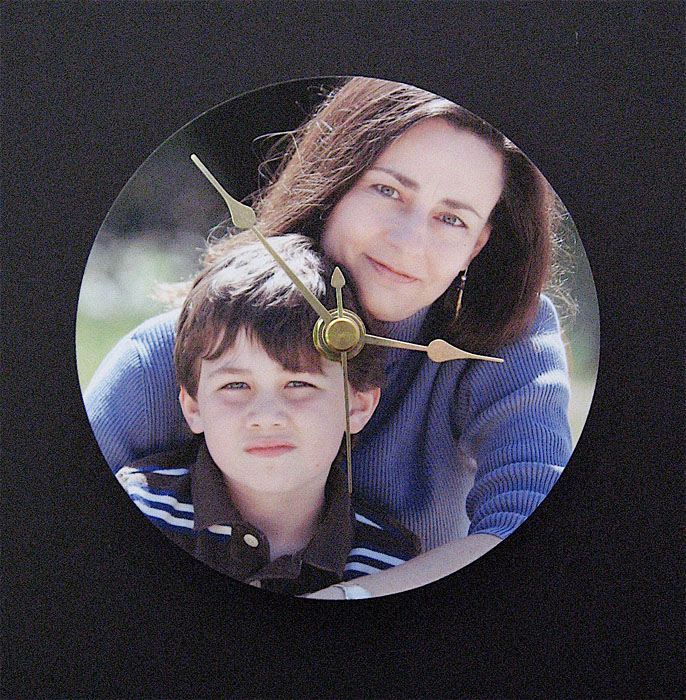
I absolutely love it when I can create something cool out of an object that would normally get thrown away. Case in point... CD discs. These little silver platters offer the perfect surface for creating decorative and meaningful wall clocks. All you need is a CD, a photograph, and a clock mechanism that's available at almost any bargain store.

When you print out your picture make sure it's about the same size as the disc, if not a little larger. Since a CD is about 4.5" in diameter, a 5" x 7" print will usually do the trick. Adhere your image to the CD using a spray adhesive. Trim off the excess paper from the edges and poke a hole in the center.

To turn it into a timepiece, you will need to insert a clock mechanism through the hole and attach it to the back using an industrial strength glue. Carefully remove the clock arms for this phase of the project. You'll reattach them in good time. Clock mechanisms are available at most craft stores, or you can always salvage one from an old wall clock (that isn't as handsome as your work).

Once the mechanism is adhered to the CD, reattach the clock arms and second hand. Mount on the wall, and you have a timepiece that's pretty as a picture. Or to be precise, pretty as one of your pictures.


Event Calendar

Events! See the TDS Event Calendar for photography workshops, speaking engagements, and trade show appearances.

"Make a Custom Photo Gift Bag"

Your photos can be used to make beautiful custom gift bags. And the best part is, you don't even need a photo printer. Stephanie Scheetz shows you how to transform your images, printed on regular white office paper, into personalized gift bags that will impress your friends and family. All you need is a little tape and Stephanie's expert guidance.

Packing Tape Transparencies


Sure packing tape has many uses, but in photography? And crafting? Certainly! Packing tape transparencies are not only simple to make, but offer countless crafting possiblities.

Print your favorite photo on to copy paper. Since packing tape is narrow (usually 1 1/2" or 2") be sure your printed image is small. Place a piece of clear tape over the printed photo and press firmly. Excess paper should be trimmed away from the edges of the tape. Wet the back of the paper with water and gently wipe the surface with your fingertip until the paper starts to ball up. After the paper is removed, you will discover that the printed ink remains on the tape giving the illusion of a transparency or slide.

To mount your picture, lightly spray the back of the tape with an adhesive and adhere it to the front of a blank notecard. You can decorate the card front with words or other embellishments.

Now it's easy to achieve the look of a vintage photo without having to turn back the hands of time!

Clipboard Frame

It's amazing what can be turned into a frame. During a recent trip to my favorite Salvation Army store in search of a frame, I had what I would call an "Aha" moment. In simplest terms, a frame is a flat surface on which a picture can be secured and displayed. I remember seeing an old office clipboard and thought, "Nice flat surface, clip that can secure a photo... what a perfect frame!"

'The original surface might be o.k., but if you want to make your clipboard frame special, consider covering the surface with a decorative paper or, better yet, a shelving liner with a self-adhesive backing. Place your photo onto the surface and cover it with a piece of glass or plexiglass. Scrap pieces can be found at local hardware stores or salvaged from old frames. A note of caution, if you're using glass, you should cover the sharp edges with an electrical or masking tape. They come in a variety of colors these days, so it will be easy to color coordinate it with your paper. Position the glass under the clip and everything will stay put.

You can display your masterpiece on the wall by hanging it from the hole at the top of the clipboard. Or for a fun look, place it on an easel. Makes a perfect gift for Father's Day or for that favorite teacher or executive in your life.

Meet Stephanie

Meet Stephanie Scheetz. She's a photographer, an artist, and is very handy with do it yourself crafting projects too. In this first of a series of "Creative Output" instructional videos on The Digital Story, Stephanie introduces herself and previews a couple of the projects she'll be showing you in upcoming episodes.

Close to Your Heart Jewelry

I've been known to cry at the movies- but while watching the Academy Awards? I have to admit though, when I saw Mickey Rourke wearing a pendant displaying his recently deceased dog, Lodi, the water works began to flow. What a wonderfully simple way to remember someone special in your life.

mickey-rourke_515x386.jpg

Amate Studios and Judikins are both fabulous sources for photo jewelry which comes in a wide variety of metals and finishes. You might choose a pin or a ring to place your picture in or, like Mickey, a neckalace with a pendant.

After your image is trimmed and place into the jewelry, you will need to pour a liquid (also available at Amate and Judikins) over the top to seal and preserve it. It's a perfect way to keep a loved one literally close to your heart.