Recently in Photography

  Page 281 of 382 in Photography  

Andy Katz just released his latest photography book, Sonoma. I caught up with him in Healdsburg, CA (in the heart of Sonoma County Wine Country), and asked him to reveal what he was toting in his Lowepro Classified 250 AW bag. This is what he had to say.


twitter.jpg Follow me on Twitter

-


I just read this great post on Digital Photography School titled, How to Get Your Camera Back When You Lose It. Shooter Andrew McDonald publishes a series of shots that you can leave on your memory card. If the curious person who finds your camera looks at its images, they will be treated to a fun visual story... complete with information on how to return the gear to its rightful owner. Definitely worth a look.


twitter.jpg Follow me on Twitter

-


Eye-Fi Control on Sony NEX-5

On of the pieces of good news about the Sony Alpha NEX-5 is that it accepts SDHC cards in addition to Memory Sticks. I wasn't aware of that at first, but I am so happy that Sony is giving us this option. In addition to general convenience, it allows us to use Eye-Fi cards in the NEX-5 so we can transport images directly from the camera to a computer or online photo site. (I just tested this capability with the Eye-Fi Pro X2 8GB SDHC Card.)

In fact, if you scroll down to the bottom of the Setup menu on the NEX-5, you'll see that you have an on/off switch for the Eye-Fi card.

Eye-Fi Control on Sony NEX-5 You can turn on and off the wireless function on the Eye-Fi card via a menu setting on the Sony NEX-5.

Now I have complete control over the Eye-Fi card. Plus, when it's uploading, there's an icon on the Sony LCD that lets me know the status of the card: sending images, idle, or off.

I love this integration and would like to see it on more cameras.

More on the Sony NEX-5

Sweep Panorama Is Impressive on Sony NEX-5

"Sony NEX-5: Where Does it Fit?" - Digital Photography Podcast 228

Viewing Sony's NEX-5 AVCHD Movies on a Mac


twitter.jpg Follow me on Twitter

-


Knowing how to get the most from your flash provides you with endless lighting options. This week we remove the strobe from the camera's hotshoe and explore how to create professional looking portraits with a minimal amount of equipment. With just a single light stand, a couple of umbrellas, and a pair of dedicated flashes, you can have a portable studio that is easy to transport, but yields amazing results.

As a bonus, those with the TDS Podcast App can watch a slideshow that demonstrates the various lighting techniques I discuss in the podcast. You'll find it under "Extras" for this episode. The TDS Podcast App works on the iPhone, iPad, and iPod Touch.

Light Modifiers

Listen to the Podcast

You can also download the podcast here (23 minutes). Or better yet, subscribe to the podcast in iTunes. You can support this podcast by purchasing the TDS iPhone App from the Apple App Store.

Monthly Photo Assignment

Float is the June 2010 Photo Assignment. You can read more about how to submit on our Member Participation page. Deadline for entry is June 30, 2010.

JD Felton was the "Sizzlpix Pick of the Month" for Photo Assignment 50. Who will be the winner for Photo Assignment 51? The prize is an 11"x14" Sizzlpix of the winning photograph.

More Ways to Participate

Want to share photos and talk with other members in our virtual camera club? Check out our Flickr Public Group. It's a blast!


twitter.jpg Follow me on Twitter

-


Podcast Sponsors

Red River Paper -- Try the $7.99 Sample Kit.

Make Your Photos Sizzle with Color! -- SizzlPix is like High Definition TV for your photography.


Technorati Tags: , , , , ,

Use Phone on the Right

When I was walking about Hamilton, Bermuda with just a Canon PowerShot S90 in my pocket, I spotted this most unusual shot. To this day, I'm not sure of the purpose of this particular phone, there, off to the side of the street.


Use Phone on the Right Photo by Derrick Story. Canon S90, ISO 80, Raw, 1/400 at f/4 Click for larger image.


twitter.jpg Follow me on Twitter

-


Dateline: New Orleans, Louisiana, USA. On the scene account by photographer Julie Dermansky. Politicians and BP officials who assure the public all that can be done is being done to protect and clean up the Gulf Coast, might want to reconsider those statements.

Gulf Oil Spill Photo by Julie Dermansky

This is not what I have seen. Brown pelicans on Queen Bess Island are living dangerously close to splotches of oil stuck inside and outside the boom meant to protect the island. Many of them have been rescued by wildlife and fishery officials, while countless others have died. The cleanup effort ramps up when VIP's are around; other than that, the cleanup and containment effort is sporadic at best.

Last weekend, Christopher Hernandez of Grand Isle called members of the press down to show them around the day after 600 workers were bussed in to clean the beach for Obama's visit. Post-Obama, the cleanup crews numbers dwindled and their work hours were almost nonexistant.

Editor's note: Professional photographer Julie Dermansky has been on the scene in the Gulf Coast since the early stages of the oil spill. You can follow her photographic coverage on her Flickr page.

One of the promises of the micro four thirds system is lens interchangeability between Olympus and Panasonic cameras. I was able to try this for myself recently by mounting a Panasonic 20mm f/1.7 on an Olympus E-PL1 body.

All functions seemed to work well, and the lens looked good on the camera. As for the results, I thought I'd let you decide for yourself. Click on the image below to view it full size without any image editing.

Panasonic 20mm on Olympus E-PL1 20mm Panasonic lens on Olympus E-PL1. No image editing on the shot. Click on image to see unedited full size photo.

Camera Data: Olympus E-PL1 body, Panasonic 20mm lens, ISO 800, 1/60th, f/1.7.


twitter.jpg Follow me on Twitter

-


Setting Up for the Tall Guy

I snapped this shot during a set change while working on my latest photography title at Lynda.com. You'll notice that the crew is trying to emulate my height while setting the scene. Oh, and guy sitting on the stool, Andrew, will be replaced by a very pretty model once the shoot begins.


Studio Setup at Lynda.com Building the set for a tall guy. Click on image for a larger version.

You'll get to see the beautiful model, and hear much more about this photography training title, once we finish it.


twitter.jpg Follow me on Twitter

-


Raw+Jpeg Workflow on an iPad

Even at this early stage in its development, the iPad has become a important part of my photography workflow. As I described in The Nimble Photographer, I can travel light (less than 6 pounds), but still be able to capture and manage high quality photographs. The key for me is using the Raw+Jpeg workflow.

In my latest Macworld Magazine article, A photographer's workflow for the iPad, I explain step-by-step how I work with the basic tools on the iPad to manage this.


Raw+Jpeg on an iPad 
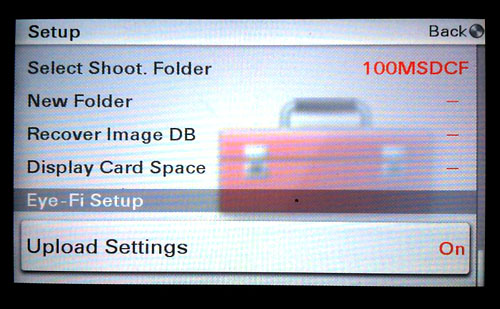
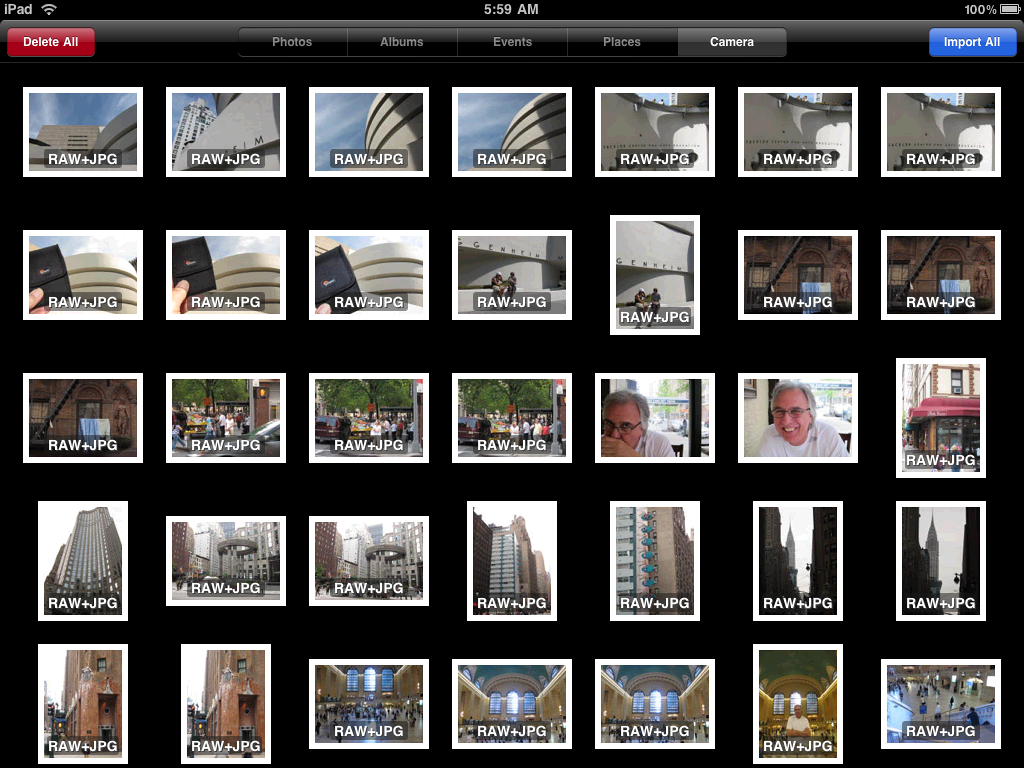
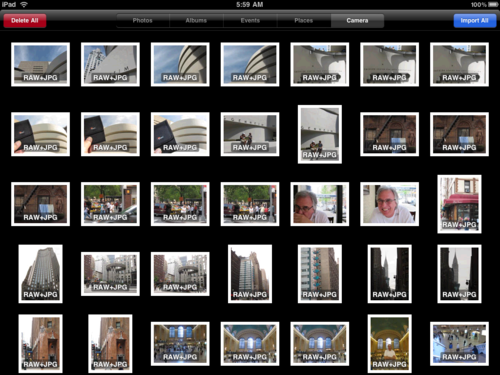
Imported Raw+Jpeg pairs on an iPad using the Camera Connection Kit. What do you do from here? Click on image to enlarge.


The trick is to shoot Raw+Jpeg at capture and upload the pairs to the iPad via the Camera Connection Kit. Then when you're back in the office, offload the Raws to your computer, and leave the Jpegs you want on the iPad. Being able to separate the pairs is important because you don't want to fill up your iPad with large files.

I use the 3G model of the iPad, so I'm able to view, manipulate, and send off photos while still in the field. This is terrific for posting to social networking sites, blogs, or even sharing images with family and friends. Yet I know I have the Raw masters for more detailed post production when I return home.

You'll notice in the follow up discussion on the A photographer's workflow for the iPad article, there are still a lot of tools that photographers want, but aren't available yet on the iPad. This is always the case with a new device. But I predict that within months we'll have more capable applications that further enhance our ability to work on the run.

More iPad Articles

How to Create and Deliver Content for the iPad

Acme Made iPad Cases for Style and Protection

Will the iPad Squish my Photos?

The $2 iPad Stand

Bluetooth Keyboard and iPad - A Powerful Combination

Turn Your iPad into a Live Camera

Lowepro Classified 160 AW is Perfect Bag for iPad Toting Photographers

Coolest iPad Apps for Photogs? Keynote and CameraBag

"iPad for Photographers" - Digital Photography Podcast 219


twitter.jpg Follow me on Twitter

-


In-camera panorama processing seems like one of those features that's just too good to be true. But after testing this function with a Sony Alpha NEX-5, I'm here to say it's for real.

Sweep Panorama with Sony NEX-5 This sweep panorama of a high school football field was captured with a Sony NEX-5 with a 16mm f/2.8 lens. Click to enlarge.

The process is simple. You set the camera in Sweep Panorama mode, press the shutter, then pan your scene following the marker in the viewfinder. Once the image is completed, go to Playback mode, and your panorama is ready for viewing.

The finished resolution is 8192×1856 (15.2 MP), so you don't get the mega-dimensions that you'd see if you took a series of images and stitched them together in Photoshop. But what you do get is an impressively merged photograph that's ready to share right out of the camera. Click on the image above to examine a larger version. Not bad.

Moving objects do present a problem for Sweep Panorama. So this technique is best applied to static scenes (although the effects of movement are sometimes interesting and worth playing with). This technology will hopefully lead to more expansive shots from photographers who like showing the big picture.

More on the Sony NEX-5

Eye-Fi Control on Sony NEX-5

"Sony NEX-5: Where Does it Fit?" - Digital Photography Podcast 228

Viewing Sony's NEX-5 AVCHD Movies on a Mac


twitter.jpg Follow me on Twitter

-