Recently in Photography

  Page 218 of 382 in Photography  

One of the challenges we grappled with at the Sonoma Historic Motorsports Festival during the TDS Action Photography Workshop was how to show the speed of these beautiful cars.

Mustang Motor Sports How to get this type of shot? Slow shutter speed, panning, and a little luck to capture this Mustang in motion. Photo by Derrick Story. To see more images from the racetrack, visit the TDS Flicker Gallery.

As we reviewed the results from the day, the winning combination was often slower shutter speeds combined with good panning technique. Although this seems counterintuitive to normal action photography with a long telephoto lens, the results can be very exciting.

mustang_metadata.jpg

"It seems foolish until you see it work," commented Carl Short. "If you want to convey the motion of motor sports, you have to find a way to show it," added Rohith Thumati.

We had great access at the speedway, and across the board, everyone in the workshop produced terrific images. "You have to allow the motion to happen," added Brad Parrett.

I couldn't agree more.

To see more images from the racetrack, visit the TDS Flicker Gallery.


The Digital Story on Facebook -- discussion, outstanding images from the TDS community, and inside information. Join our celebration of great photography!


For the April 2012 Photo Assignment, TDS shooters got "up close and personal" with their subjects. See for yourself how the world changes with a tight perspective in our gallery, Macro. And which one will be the SizzlPix Pick of the Month?

hamish_carpenter_macro.jpg

Photo by Hamish Carpenter. "I recently purchased the Canon 100mm f2.8L Macro lens and this assignment gave me an excuse to get out and do some experimenting. For this photo, I set up a standard cheese grater on a table with a towel underneath and placed a colored gel on a speedlight to get this effect. Mild effects were added in Color Efex Pro4. I think it came out pretty well. I look forward to spending more time finding new objects to shoot with this lens - it is amazing!" To see all of the other terrific shots from April, visit the Macro gallery page.


Participate in This Month's Assignment

The June 2012 assignment is "Signs." Details can be found on the Member Participation page. Deadline is June 30, 2012.

Please follow the instructions carefully for labeling the subject line of the email for your submission. It's easy to lose these in the pile of mail if not labeled correctly. For example, the subject line for this month's assignment should be: "Photo Assignment: June 2012." Also, if you can, please don't strip out the metadata. And feel free to add any IPTC data you wish (These fields in particular: Caption, Credit, Copyright, Byline), I use that for the caption info.

Good luck with your June assignment, and congratulations to all of the fine contributors for April.


twitter.jpg Follow me on Twitter

-


Now Available! The Digital Photography Companion. The official guide for The Digital Story Virtual Camera Club.

  • 25 handy and informative tables for quick reference.
  • Metadata listings for every photo in the book
  • Dedicated chapter on making printing easy.
  • Photo management software guide.
  • Many, many inside tips gleaned from years of experience.
  • Comprehensive (214 pages), yet fits easily in camera bag.

Technorati Tags: , ,

lowepro_sweepstakes.jpg

Lowepro launched a sweepstakes with some very tempting prizes, including a Pro Roller Lite 250AW($295 street price), Pro Trekker 300 AW($289 street price), Photo Sport 200 AW Backpack($149 street price), and more.

To throw your lens cap in the ring for a chance to win one of these great bags, enter here. It's easy. Takes about 15 seconds.


The Digital Story on Facebook -- discussion, outstanding images from the TDS community, and inside information. Join our celebration of great photography!


Know How to Shoot Sharp

A sharp image gives us more detail. And sometimes it's the details that separate a decent shot from a terrific one. So here are a handful of tips to keep in mind to help you sharpen up your shots.

sphere_in_sun.jpg 
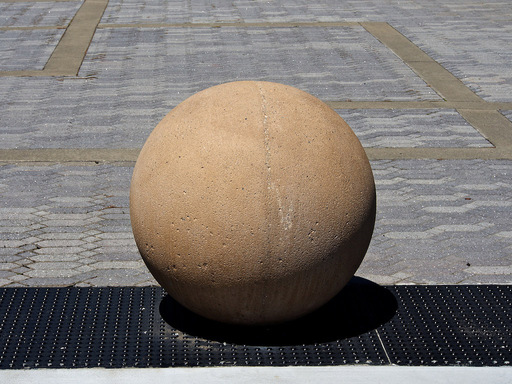
Even a simple shot, such as this sphere, becomes more interesting when you can see the detail in its surface.

Start with the Basics

I read a article at photojojo.com titled, Get Sharp Photos with These Easy Tricks. There's some good stuff there, including bracing yourself against a solid surface during exposure and using various types of tripods. (I didn't agree, however, with their take on post production sharpening. More on that later.) Bottom line here is that good camera technique often leads to crisper images.

Make sure that you're focusing on the most important area of the image, and that it's locked there when you press the shutter button. Pay attention to how you you hold the camera. The one-handed grab shot while leaning out the car window probably won't get you a detailed image. Instead, when possible, use your body as a stable platform for the camera.

Know Your Lens

Practically every DSLR lens on the planet has been lab tested by an independent source. Those are worth looking at for your glass. Pay attention to the aperture settings that provide the sharpest results. Often it's in the middle of the range, such as f/5.6, 8 and 11. Keep those in mind when detail is an important factor for the image.

Don't Depend on Post Production Sharpening

Using sharpening in post production can give the illusion of a better focused image, but it doesn't fix the focusing or camera shake problem itself. Basically, most good sharpening filters increase edge contrast at the pixel level. Sharpening is great as a finishing touch, but the real work happens at capture. So make sure you use good camera technique to record a detailed image, then sharpen to taste in post. And when you do, use a high quality filter such as Unsharp Mask, Smart Sharpen, or Edge Sharpen. General rule of thumb is, if the filter just says, "sharpen," stay away from it.

High Quality Jpegs or Raw

Check your camera settings to make sure you're capturing at the highest quality Jpeg option, or use Raw. You want to hang on to as much image detail as possible when you take the shot.

Invest in Good Glass

The quality of the optics attached to the camera makes a difference. Not every lens in your camera bag has to be top-notch pro glass. But it does pay to have one or two razor sharp lenses in your kit for those images that require lots of detail.

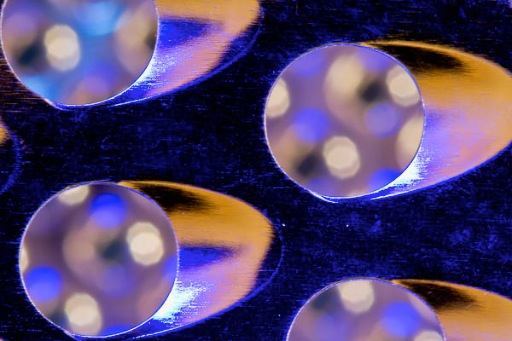
Use Sharp Against Soft Technique

By carefully focusing on the object that you want to render with great detail, then opening up the aperture to limit the depth of field, you can create an image that has a sharp object against a "soft" background. By doing so, your foreground image will really pop.

Sharpness Isn't Everything

When you want a crisp image, you need to know how to capture it. But every shot doesn't have to be razor sharp. Use the right technique for the photo. Elderly subjects, for example, might appreciate a softer approach to their portraits.


The Digital Story on Facebook -- discussion, outstanding images from the TDS community, and inside information. Join our celebration of great photography!


Apple's iPhoto for iOS is a terrific app, but you can easily run aground if you want to move your best shots from the mobile device to a Mac. Photo Stream can get you moving again if you use this simple workflow.

share_iphoto_ipad.png In iPhoto for iOS, copy your best images to the Camera Roll using the Share button.

On my Mac, I use Aperture as my primary photo database. That allows me to let iPhoto manage my Photo Stream. (So, I have Photo Stream *turned off* for Aperture, and have it *turned on* for iPhoto.) Using this setup, any image copied to my Camera Roll on the iPhone or iPad automatically is available on the Mac via iPhoto. It just shows up. That allows me to separate the gems from the failures in an organized photo management environment.

This system can be put to work for a semi-automatic iPhoto for iOS to Mac connection. Once I work on the shot in iPhoto for iOS and decide that I want to move it to my Mac, I tap the share button in iPhoto for iOS and copy the image to my Camera Roll.

Within a minute or so, the picture shows up in iPhoto on my Mac. Now, I can catalog it there, if iPhoto has become my dedicated mobile photography manager, or I can move it to Aperture, Lightroom, or any other system I already have in place.

This integration will improve up the road with new software and operating system releases. But for now, you can manage the images you work on in iPhoto for iOS without making yourself crazy in the process.


The Digital Story on Facebook -- discussion, outstanding images from the TDS community, and inside information. Join our celebration of great photography!


Adobe Photoshop CS6 recently debuted with new features such as non-destructive cropping, Adaptive Wide Angle adjustments, enhanced video tools, and so much more. We thought it would be a great to find out from Bryan Hughes the inside scoop on these features. Why Bryan? Well, he's a photographer and the Photoshop Product Manager -- the perfect guy for our audience.

After the interview, I switch gears and talk a bit about the latest time lapse movie I recorded with iStopMotion for iPad, titled TWiG in 60 Seconds. This time, I also used a Losmandy StarLapse system so I could add panning shots to the video. I explain all during this segment of the show. Plenty of food for thought. I hope you enjoy it.

Listen to the Podcast

You can also download the podcast here (40 minutes). Or better yet, subscribe to the podcast in iTunes. You can support this podcast by purchasing the TDS iPhone App for only $2.99 from the Apple App Store.

Monthly Photo Assignment

Action is the May 2012 Photo Assignment. You can read more about how to submit on our Member Participation page. Deadline for entry is May 31, 2012.

More Ways to Participate

Want to share photos and talk with other members in our virtual camera club? Check out our Flickr Public Group. And from those images, I choose the TDS Member Photo of the Day.

Podcast Sponsors

Red River Paper -- The $7.99 Sample Kit is back! And with free shipping.

Make Your Photos Sizzle with Color! -- SizzlPix is like High Definition TV for your photography.

Need a New Photo Bag? Check out the Lowepro Specialty Store on The Digital Story and use discount code LP20 to saven 20% at check out.


Technorati Tags:
, , , , ,


I've experimented with many apps to display pictures on the iPad. It's a perfect device for showing off your work. But finding the right software can be a challenge. Portfolio Pro for iPad builds a strong case to be that app.

portfolio_pro_home.png Branded overview page on Portfolio Pro displaying my logo and available galleries.

One of its best features is the ability to create different galleries of my images. I've found this helpful because different clients are interested in different subjects. I've always had a hard time creating just one portfolio for everyone.

You can control which galleries are visible, and for that fact, which images in those galleries can be viewed, by going into edit mode (triple tap) and clicking on the "eye" icon. This allows you to quickly customize the experience for the viewer without having to delete and add photographs.

As you'd expect, you can move pictures around to display in the order you want. The viewer can swipe to go from image to image, or play a slideshow. Portfolio Pro also accommodates video allowing you to stay in the same app for both stills and movies.

portfolio_pro_gallery.png Thumbnail view inside a gallery.

You can populate your portfolio from the iPad's camera roll, Flickr, or Dropbox. If you have a lot of images on Flickr, you'll be able to build a variety of galleries quickly. The Dropbox connectivity is good too.

Despite claims for "ease of use," on the site, give yourself some time to learn how to work the application. The creators provide some helpful movies to get you started. I recommend watching them.

The current price for Portfolio for iPad is $9.99, expensive by iOS standards. But you'd pay more for a binder to house your prints, and this app is far more flexible. If you want to get serious about a digital portfolio, then I would consider this software.


The Digital Story on Facebook -- discussion, outstanding images from the TDS community, and inside information. Join our celebration of great photography!


My recent webinar, A Fresh Look at Familiar Subjects in B&W is now available online.

view_from_eiffel_tower.jpg

This recorded version of last week's webinar, sponsored by Nik Software and Lowepro, has two main parts. I begin by demonstrating how B&W can sometimes tell a story better than color images. I then move into Silver Efex Pro 2 itself and show my workflow.

If you missed the live event, but are interested in seeing the presentation, you can watch it now on Vimeo.


The Digital Story on Facebook -- discussion, outstanding images from the TDS community, and inside information. Join our celebration of great photography!


Updates to the Flickr interface seem to be gaining momentum with the latest being justified view for groups. To experience this, click on the "more photos" link on any public group home page.

Flickr Justified View

In addition to the improved presentation for the thumbnails, you can click on the magnifying glass icon in the lower right corner of each image to get a lightbox view. When you close the lightbox, you're returned to the justified view interface.

To get to a photographer's photostream, click on the thumbnail itself. The image will be opened on the photographer's page. Hit the browser back button to return to the justified view of the group thumbnails.

We have a Digital Story Public Group with over 2,000 members and some amazing imagery. The Digital Story Member Photo of the Day is selected from this pool. Plus the TDS Member Gallery on the site pulls from our public group.


twitter.jpg Follow me on Twitter


What goes on behind the scenes at Leo Laporte's TWiT studio in Petaluma, CA? I recently spent an afternoon there recording scenes with a 3rd generation iPad to create the time lapse movie, TWiG in 60 Seconds. The process was as interesting as the activity I recorded.

Set Up at TWiT Studio Screen grab from the time lapse movie "TWiG in 60 Seconds" (This Week in Google) recorded at the TWiT Brick House Studio with a 3rd generation iPad.

Why iPad?

The latest iPad features a 5-megapixel iSight camera that records 1080p video at 30fps. Its low light performance is much improved over the 2nd generation model. Combine that hardware with iStopMotion for iPad, and I have a complete solution in a very portable package.

TWiG in 60 Seconds, the movie

How Did You Record the Panning Scenes?

One of the impressive features of the TWiT Brick House Studio is how big the facility is. In order to convey that sense of space, I wanted to pan during the movie. To accomplish this, I used the StarLapse camera motion system made by Losmandy. The basic system sells for $575, and it includes camera mounting plates, battery-powered controller, interconnecting cable, and a 12-volt cigarette lighter power cord.

How Did You Mount the iPad to the Rig?

Makayama makes a clever accessory called the Movie Mount for iPad. Not only can you attach your iPad to a tripod or motion system, but the mount also accommodates accessory lenses and includes a shoe mount (for microphones, etc.). By using the Makayama, I was able to attach a wide angle lens to the iPad so I could capture more of the Brick House Studio environment.

The Workflow

Once I had all of the hardware in place, I launched iStopMotion and set it to record a frame every 3 seconds. I captured a variety of scenes, some with panning, and others without.

I then used the DropBox feature in iStopMotion to upload the raw footage to my online storage. By doing so, I could access the files from my MacBook Air, and assemble the movie using Final Cut X. I uploaded the finished file directly to YouTube from Final Cut.

In the past, I've also done the editing right there on the iPad using iMovie, such as in this title, The Overlook.

Final Thoughts

When Oliver from Boinx Software came to me with the idea for this movie, I wanted to do it right away. What a great opportunity! And thanks to the support from Leo and his crew, plus the great guys at Losmandy and Makayama, we were able to take you behind the scenes at the TWiT studio for a glimpse of how Leo Laporte informs and entertains us on a daily basis.


twitter.jpg Follow me on Twitter