This is The Digital Story Podcast #568, Jan. 24, 2017. Today's theme is "Why Churchill's Portrait was Burned." I'm Derrick Story.
Opening Monologue
When a subject allows us to photograph them, they are putting their hearts in our hands. And the decisions that we, the photographer, make in those moments together bear great weight on the final outcome. Is our goal to solely please the subject? Do we have a responsibility to integrate our own artistic vision into the work? Or should we ignore the desires of others and portray what we believe to be honest? I grapple with these questions in today's show.
Why Churchill's Portrait was Burned
For Winston Churchill's 80th birthday, House of Commons and House of Lords commissioned a formal portrait by modern painter Graham Sutherland. The painting showed Churchill seated in a chair with his hands resting on its arms with him slightly slumped and portrayed in dark wintery tones.
Churchill hated the painting. Sutherland argued that he had painted what he honestly saw. During its public unveiling, Churchill quipped that it was, "a remarkable example of modern art."
The painting was never hung in public. And as the story goes, it was hidden away in the cellar of their Chartwell estate... until in the middle of one unparticular night, it was smuggled out and burned.
Years later, when Sutherland learned of the destruction of his work, he is claimed to have said, "without question an act of vandalism."
So who was right? Winston Churchill, who had tried to guide the artist toward a more flattering portrayal, but upon failing to do so, chose to destroy the work? Or Graham Sutherland, who despite pressure from his subject, stuck to his beliefs that his responsibility was to show the famous statesman as he truly looked in his 80th year?
I think the question comes down to what is honesty, and does it only exist on the exterior? Or should we as artists consider the human being beneath the surface when making our choices on how to portray them?
In the News
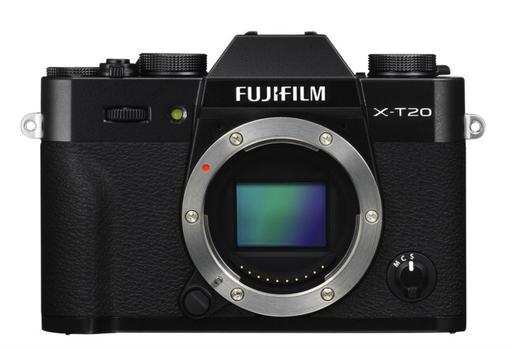
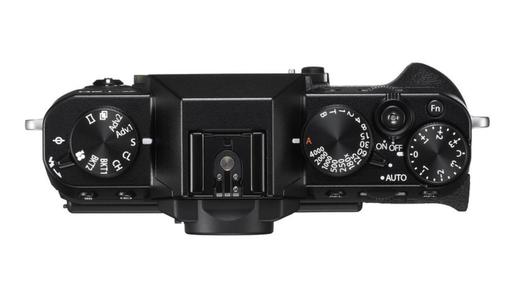
Fujifilm X100F steps up to 24.3MP, adds AF joystick. Fujifilm is taking the wraps off the X100F, the fourth generation of its popular enthusiast-focused compact series. It updates the house that the X100 built with a 24.3MP X-Trans III APS-C sensor and X-Processor Pro image processor borrowed from the X-T2.
Changes can also be seen on the top and rear panels of the camera - notably, an AF joystick makes its first appearance on the X100 series. Other controls have been shifted to the right of the LCD, and up top the shutter speed dial has been modified to include ISO controls. A front control dial has also been added. The hybrid viewfinder has also been updated, and now offers image magnification when using the electronic rangefinder mode.
The Fujifilm X100F will be available February 16th in black or silver for $1299/£1249. (As reported by DPReview.com).
87% of UK Freelance Photogs Asked to Work for Free in 2016; 16% Said Yes
The issue of businesses asking photographers to work for free has been a hot issue in recent years, and now we have some citable statistics that shed more light on it. According to a new study in the UK, 87% of photographers were asked to work for free in 2016, and 16% said yes.
The research was conducted by the UK startup Approve.io, which surveyed 1,009 part-time and full-time freelancers in the UK who have taken on freelance contracts over the past 5 years.
The study "reveals an alarming trend for corporate 'entitlement' when it comes to how freelance professionals are treated," Approve.io tells PetaPixel.
You can read the entire story on Petapixel.
Updates and Such
The registration forms for the The Chicago to New Orleans Rail Adventure - June 26-29, 2017 - have been sent out to members of our reserve list. This workshop begins the day after Out of Chicago concludes. So if you're going to OOC, just add Sunday night to your hotel reservation if you plan on joining us. You can still get on the reserve list for this event, and for our others, by visiting the TDS Workshops Page and using the Send Me Info form on that page.
Big thanks to all of our Patreon members! I was able to pay for the podcast server and the backup system from last month's pledges. Your contributions are making a positive impact.
B&H and Amazon tiles on www.thedigitalstory. If you click on them first, you're helping to support this podcast. And speaking of supporting this show, and big thanks to our Patreon Inner Circle members.
And finally, be sure to visit our friends at Red River Paper for all of your inkjet supply needs.
See you next week!
More Ways to Participate
Want to share photos and talk with other members in our virtual camera club? Check out our Flickr Public Group. And from those images, I choose the TDS Member Photo of the Day.
Podcast Sponsors
MindShift Gear - MindShift Gear is a group of committed professional photographers and product designers who support conservation and protection of our natural resources and planet.
Red River Paper - Keep up with the world of inkjet printing, and win free paper, by liking Red River Paper on Facebook.
The Nimbleosity Report
Do you want to keep up with the best content from The Digital Story and The Nimble Photographer? Sign up for The Nimbleosity Report, and receive highlights twice-a-month in a single page newsletter. Be a part of our community!
Want to Comment on this Post?
You can share your thoughts at the TDS Facebook page, where I'll post this story for discussion.