Recently in Photography

  Page 202 of 382 in Photography  

Fast Olympus 17mm Lens Debuts at $499

olympus_17mm_f1-8

The premium Olympus 17mm f/1.8 prime lens will debut in December for $499 US. This is great news for micro four thirds shooters who want a top quality prime for general low light photography.

The 17mm features the Snapshot Focus mechanism that lets you shift the focusing point to a specific distance. Sliding the focus ring back reveals range markings on the lens barrel, including distance and depth of field scales, which can be used as a guide as you set the focal distance by rotating the ring.

Speaking of the lens barrel, the 17mm is all metal and will have a similar feel as the 12mm f/2.0 prime that sells for $300 more. Add an optical system that features three aspherical lenses, including a Dual Super Aspherical element to correct aberrations, as well as a High Refractive index lens to correct high spherical aberrations, and you have a precise photographic tool.

I'll get my hands on the 17mm when it's released later this year, but I think this is going to be a "must have" lens for many micro four thirds photographers.


Take a look at the Olympus Micro Four Thirds Gear Guide for an overview of cameras, lenses, and accessories.

Very few cameras have WiFi built-in. But you can control your existing DSLR over a wireless network with Triggertrap 1.5.1 and a couple of iOS devices, such as an iPhone.

triggertrap_wifi.jpg WiFi setup for Canon DSLR using Triggertrap loaded on an iPhone and iPad mini. The iPhone 4S is the "slave," and the iPad mini is the "master."

Triggertrap has been around for a while as an iOS/Android cable release for many popular DSLRs. The app is available for $4.99, and the dongle and cable will cost you an additional $35-$40. You launch the app on your iPhone, connect the cable to your camera, and have a host of controls, such as time lapse, that you can use. I felt that Triggertrap was a good investment before for those who like to experiment with their photography. But now, with the WiFi enhancement, it's even a better value.

triggertrap_iphone4s

To go wireless, you need two iOS devices. I used my iPhone 4S as the "slave" connected to a Canon DSLR, and the iPad mini as the "master." Both devices have to be on the same wireless network. Once you have the components set up properly, you can control the DSLR wirelessly from any distance that is within network range.

But it gets even better. I used the iPad mini to wirelessly control the camera on the iPhone 4S using just the Triggertrap app without any cables. On the slave unit (iPhone 4S), just turn off the Shutter and Focus switches at the bottom of the interface, and turn on the Internal switch, as shown in the illustration.

internal_output.jpg


Top Screenshot: setting up Triggertrap slave on an iPhone to fire the camera in the iPhone via the "Internal" switch. Bottom Screenshot: Previewing the photo in the Outputs menu on the iPhone 4S.


Then, go to the Outputs screen by tapping on the button in the upper right corner, and choose "Internal" from the icons at the bottom of the screen. Not only does this provide you with a couple controls, you also have a preview window for composing the shot.

So, for just the price of a $4.99 app, you can wirelessly control an 8 MP iPhone from a relatively large distance. There's lots of room for play and discovery here. If you come up with something cool, please share it in the comments below.


The Gift Guide for Photographers features 12 tempting goodies for the photographer in your life. Each item includes a background article about it and a direct link for the best price.

Want to compare tons of sensor data for various cameras you're interested in? Check out the Digital Camera Database.

sensor_comparison.jpg

DCD allows you to visually compare detailed sensor info (sensor surface area, pixel pitch, pixel density, etc.) for more than 3,200 digital cameras. The breath of information it provides is fascinating. I highly recommend taking a look.


twitter.jpg Follow me on Twitter


Three stories this week, one in the air, one on the road, and the last tied to my computer.

"Wind Shear" Went flying over N. Cal this weekend. I came prepared for shooting through glass with my polarizer and rubber lens hood. But I also has the opportunity to take pictures with the window open. Sad what 130 MPH winds will do to a lens hood and polarizer.

"Memory Gain" People ask me often about backing up images on the road when I'm in nimble photographer mode. At the heart of that workflow is having enough memory cards so I don't have to overwrite them. Sometimes I'd get the response, "but I don't have enough memory for that." Have you seen the prices of memory cards lately?

"iOS Tethering" Aperture supports tethering of many Nikon and Canon DSLRs. But, did you know that tethering works with iOS devices to? And better yet, you can use the app ProCamera instead of the regular Camera app to capture the images. It's really kind of cool.

All of this and more on this week's episode of The Digital Story.

Listen to the Podcast

You can also download the podcast here (28 minutes). Or better yet, subscribe to the podcast in iTunes. You can support this podcast by purchasing the TDS iPhone App for only $2.99 from the Apple App Store.

Monthly Photo Assignment

Flash is the Nov. 2012 Photo Assignment. You can read more about how to submit on our Member Participation page. Deadline for entry is Nov. 30, 2012.

More Ways to Participate

Want to share photos and talk with other members in our virtual camera club? Check out our Flickr Public Group. And from those images, I choose the TDS Member Photo of the Day.

Podcast Sponsors

Red River Paper -- Keep up with the world of inkjet printing, and win free paper, by liking Red River Paper on Facebook.

Make Your Photos Sizzle with Color! -- SizzlPix is like High Definition TV for your photography. Special this month, order one SizzlPix and get the second one for 50%. Put "TDS" in the comments field of your order.

Need a New Photo Bag? Check out the Lowepro Specialty Store on The Digital Story and use discount code LP20 to saven 20% at check out.


Technorati Tags:
, , , , ,


Golden Gate Fly Over

Sunday was a perfect, crisp, Autumn day for flying. And I had the opportunity to photograph the Golden Gate Bridge from the air with my brother Pat and his friend Wade, who is a pilot. So we took off in a Cessna from Sonoma County Airport, flew down the coast, and circled back at the bridge so I could photograph it.

Golden Gate Bridge from Above

As with my flight over Oktoberfest in Munich, I used the Olympus OM-D body and the Panasonic Vario 12-35mm f/2.8 zoom to photograph the sites below. I kept a polarizer mounted over the lens to improve color and contrast. A rubber lens hood helped me minimize reflections while shooting through glass.

This image of the Golden Gate Bridge was recorded at 1/200th at f/5, ISO 400 (keeping in mind that I lose two stops of light with the polarizer.) The bridge is a beautiful site, from land... and sky.


The Gift Guide for Photographers features 12 tempting goodies for the photographer in your life. Each item includes a background article about it and a direct link for the best price.

Aperture Exporting Tips

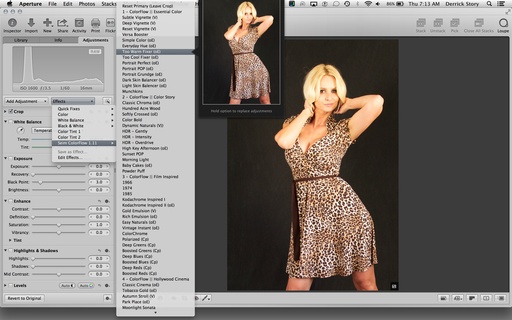
Think of Aperture as a vault that, among other things, stores and protects your images. And you can export versions of those masters in a variety of formats and configurations. In my Macworld Magazine article, How to get your pictures out of Aperture, I show you how to set up a custom export preset to the exact specifications you want.

aperture_export_zebras.jpg

Aperture then makes a digital copy of your photograph, including any image edits, author's data, and format changes you've specified, and places it in the location where you've instructed. It's a great feeling knowing that your original image is safe, yet you have all of these options for copying it.

This exporting article is the first in a series that will include image editing tips, organization, and more. If you have a specific request, let me know. I'll take a close look at it.

More Aperture Tips and Techniques

To learn even more about Aperture, check out my Aperture 3.3 Essential Training (2012) on lynda.com. Also, take a look at our Aperture 3 Learning Center. Tons of free content about how to get the most out of Aperture.


The Digital Story on Facebook -- discussion, outstanding images from the TDS community, and inside information. Join our celebration of great photography!


Aperture 3 supports tethered shooting with a host of Canon and Nikon DSLRs. But iOS devices work quite well too. Simply connect an iPhone or iPad via the USB cable to your Mac, then start a tether session in Aperture (File > Tether > Start Session).

tethered_capture_aperture_mini.jpg A tether session in Aperture using the iPad mini as the camera.

When you tap the shutter release button on the device to take a picture, Aperture grabs it and displays the image. This setup can be handy for all sorts of situations, such as product shoots and portraits where the large composing screen makes the job easier, or in the classroom with lots of kids. And since the built-in camera is actually quite good with the iPhone 4S and iPhone 5, plus the latest iPads, the main limitation is the software controlling the camera. The built-in Camera app is basic at best.

procamera_settings.png

But you're not limited to that software. An excellent app, ProCamera ($2.99, iPhone and iPad versions) provides much more sophisticated controls, and works in tethered mode with Aperture.

ProCamera adds helpful features such as: anti-shake, self timer, virtual horizon, grids, white balance lock, separate exposure and focus controls, JPEG compression setting, sound trigger, and more. Plus it's easy to use.

I'm not saying that your iPhone or iPad will always replace the DSLR for a tethered shoot. But the iOS setup is sure a lot easier. And there are many situations, especially in the classroom, where a tethered iPad or iPhone is a heck of a lot easier to manage.

Aperture Tips and Techniques

I have a training movie on tethering with an iPhone in my Aperture 3.3 Essential Training (2012) on lynda.com. It's just one of the tutorials in the 8+ hours of instruction. Also, take a look at our Aperture 3 Learning Center. Tons of free content about how to get the most out of Aperture.


The Digital Story on Facebook -- discussion, outstanding images from the TDS community, and inside information. Join our celebration of great photography!


For years I never trusted auto-focus for sporting events because I felt I missed too many shots. Then auto-focus got better. But lately I've been using some of my prime lenses from the past and rediscovering the joy of manual focus.

young_warriors_fanPB077468.jpg Young Warriors Fan - Olympus OM-D, ISO 3200, Carl Zeiss 85mm f/2.8 lens at f/2.8, manual focus - Photo by Derrick Story

I like watching how the image changes as I twist the focusing ring right and left, then discovering the look that I want for the scene.

Another advantage is prefocusing on an area where good shots typically happen, such as around the rim at a basketball game. Then I can lower the camera, watch the action, and if something unfolds, I can raise the camera and shoot instantly. I don't have to worry about missing the photo while the camera auto-focuses.

For this image of a boy sitting on his dad's shoulders during a break in the action, I used the Olympus OM-D body with a manual focusing Carl Zeiss 85mm f/2.8 lens. My effective focal length on the OM-D is 170mm. I always shoot wide open at f/2.8. ISO set to 3200.

I still pack a couple auto-focus lenses in my bag when I go to the game. But I rarely use them. I'm very much enjoying being in charge of the focusing myself.


Take a look at the Olympus Micro Four Thirds Gear Guide for an overview of cameras, lenses, and accessories.

iPad mini DIY Case (and more)

ipad_mini_folio_case.jpg

Before long, we'll have many cool and interesting cases to choose from for the iPad mini. In the meantime, you probably have an excellent leather case right under your nose.

The Leather Folio Pad

The iPad mini is about the size of note-taking pads that we use at conferences and workshops. I looked in my office supply cabinet and found three of these leather folios with paper. On the left side was a solar calculator attached to a sleeve. Don't need that any more! So I carefully removed the sleeve and calculator with an X-acto knife, and now I have a folio for the iPad mini. I leave the paper pad in. It's still handy to have. Then I place the iPad mini facedown on the paper and zip up the folio. Fits perfectly. I look stylish. iPad mini protected.

home_red_stump.jpg

Stump for mini

The $24 Stump Stand works great for the mini too. If you have one that you used for the full-sized iPad, dig it up. I think it's even better with the mini.

There are two vertical positions, lean and upright, that securely display the mini in portrait mode. If you want a lower angle for typing, then go to ramp mode. I keep a Stump Stand on my desk.

insanely-great-the-jack.jpg

The Jack by Insanely Great

The $10 Jack by Insanely Great was originally designed for the iPhone. The suction cup adheres to the back of the iPhone and the grip pad on the bottom of the stand keeps the device from sliding around on your desk. I've had one for a while and use it in certain situations for the iPhone.

Trying it with the mini, I discovered that the suction cup doesn't like the aluminum back for more than a few minutes. But if you turn the Jack around so the suction cup is on the desk and the friction pad against the back of the iPad, it works much better. I kind of like it actually, especially as a mod.

The point is, if you have things like this already in your odds and ends drawer, dig around in there and see what you can come up with. You probably have more iPad mini accessories than you realize.


twitter.jpg Follow me on Twitter


Canon EF 24-70mm f/4 L IS USM

Canon has just announced the Canon EF 24-70mm f/4 L IS USM for $1,500 US, and I have to say, I'm scratching my head.

I can get the Canon 24-105mm f/4L IS EF USM AF Lens for $1,149 that has the same constant aperture, excellent image stabilization, and better reach... for $350 less. With those savings, I can buy another lens for $350. Heck, I can buy an iPad mini.

For the new 24-70mm, it seems as though the built-in macro mode with hybrid IS is enough, in Canon's mind, to charge the extra money. Oh, and why is IS a good idea for this lens, but not the $2,300 Canon EF 24-70mm f/2.8L II USM Zoom Lens?

DP Review says that the new 24-70mm f/4 is designed to go with the Canon EOS 6D Digital Camera. Yeah, that makes sense.


twitter.jpg Follow me on Twitter