Recently in Photography

  Page 190 of 382 in Photography  

Rouge FlashBender Flag Bounce Card

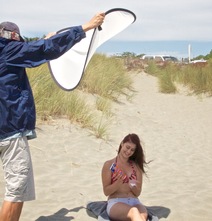
The solution to dealing with strong, directional light that's determined to cause flare in your photograph may already be sitting in your camera bag. If you have a RougeFlag Bounce Cardthat you typically use for bounce flash, you can adapt it to serve as a robust lens shade too.

This particular FlashBender includes a black cloth "flag" that attaches over the white reflective surface. I tend to leave my flag attached so I don't lose it. When I'm using the RougeFlag for bounce flash, I remove the black cloth and store it in my bag.

But, if I want serious flare protection for my lens, I leave the black cloth on and attach the FlashBender to my lens using the adjustable strap. In this photo I'm using it with a Canon 24-105mm f/4 L zoom on a 5D Mark II. Unlike a traditional lens hood, the FlashBender can be positioned exactly as needed to block the sun from striking the front of your lens.

I love multi-use. This $29 bounce flash accessoryhas already paid for itself many times over. The fact that it can help me fight flare too is just a sweet bonus.

Want to Comment on this Post?

You can share your thoughts at the TDS Facebook page, where I'll post this story for discussion.

Some pictures just look better in Black and White. And even though there are plug-ins and specialized programs to help you create B&W images, you can produce great stuff using the built-in tools in Aperture and iPhoto.

In this 3-minute movie that I created for my latest lynda.com title, Using iPhoto and Aperture Together, I compare the B&W conversion techniques in both iPhoto and Aperture, and add a few tips too.

Take a look, then make your B&W masterpiece tonight!

More Aperture/iPhoto Tips and Techniques

To learn more about using Aperture and iPhoto together, visit my Using iPhoto and Aperture Together on lynda.com. Also, take a look at our Aperture 3 Learning Center. Tons of free content about how to get the most out of Aperture.

Want to Comment on this Post?

You can share your thoughts at the TDS Facebook page, where I'll post this story for discussion.

This week on The Digital Story: Lightroom 5 public beta is now available for download, Fujifilm X20 deluxe compact camera begins shipping, and the imminent release of iPad for Digital Photographers. All of this... and more!

Story #1 - Lightroom 5 public beta - Just a little over a year since the final release of Lightroom 4, Adobe has reloaded its image editing guns and fired off the first public beta of Lightroom 5. You now need Windows 7 or Mac OS X 10.7 to run Lightroom 5. Key features for testing include Smart Previews, Advanced Healing Brush, a Radial Gradient tool, and more. I take a closer look at the top three features in the first story of this week's show.

Radial Gradient tool - You can draw a circle or oval around an area in the photo, then apply effects to the area out side the selection. Typical uses would be exposure or color adjustments, but there are other sliders too.

Advanced Healing Brush - Great for cloning or healing odd shaped objects that you want to eliminate from your composition. This capacity is probably what has sent many Lightroom users to Photoshop in the past.

Smart Previews - Allows you to set up your Lightroom catalog to edit images, even when the originals are offline on another hard drive that isn't plugged in to your computer. Adobe pulls this off by using the lossy DNG format. Catalogs set up with Smart Previews can save a great deal of space, around 1/6 the size of a catalog with original RAW files connected. The edits you make in Smart Preview mode will be synced up with the originals when you reconnect the hard drive.

Story #2 - The Fujifilm X20 compact camera is now available.

Features include the 12MP 2/3" X-Trans CMOS II Sensor (RAW files can be processed in Lightroom 4.4), Fujinon 28-112mm f/2-2.8 zoom lens, amazing optical viewfinder that zooms and has a data overlay, a variety of intelligent features such as film simulation and pro focus, and looks great with its die-cast magnesium body construction and machined metal knobs. Currently sells for $599. I cover some of its pros and cons in the second segment of the show.

Story #3 - iPad for Digital Photographers will be released in just two weeks. The pre-order price is only $13.45. Not only do you get the book, but you'll gain access to a brand new, secure area on TDS called the Book Owners Lounge. I provide more details in the third story. There's a link for the book at the bottom of every TDS page.

Listen to the Podcast

You can also download the podcast here (32 minutes). Or better yet, subscribe to the podcast in iTunes. You can support this podcast by purchasing the TDS iPhone App for only $2.99 from the Apple App Store.

Monthly Photo Assignment

The April 2013 photo assignment is Architecture.

More Ways to Participate

Want to share photos and talk with other members in our virtual camera club? Check out our Flickr Public Group. And from those images, I choose the TDS Member Photo of the Day.

Podcast Sponsors

Red River Paper -- Keep up with the world of inkjet printing, and win free paper, by liking Red River Paper on Facebook.

Make Your Photos Sizzle with Color! -- SizzlPix is like High Definition TV for your photography. SizzlPix Spring Sale - 25% Discount! Offer good on orders placed by April 30. Again, "TDS" or "The Digital Story" in the comments space. Of course, they will honor the discount for all TDS listeners and readers, including those who've received SizzlPix samples.

Need a New Photo Bag? Check out the Lowepro Specialty Store on The Digital Story and use discount code LP20 to save 20% at check out.

Want to Comment on this Post?

You can share your thoughts at the TDS Facebook page, where I'll post this story for discussion.

Even though it only has a 2/3" sensor (smaller than Micro Four Thirds and APS-C), the Fujifilm X20 compact camera has the ability to soften backgrounds for portraits. Take a look at this comparison.

Soft Background Portrait, Fujifilm X20, Female, Theresa Ann Story Soft background portrait with Fujifilm X20 compact camera in Pro Focus mode in the ADV settings menu. Photos by Derrick Story.

Female Portrait without Background Softening Normal portrait without Pro Focus mode enabled on Fujifilm X20.

Fujifilm engineers created a clever Pro Focus mode (in the ADV menu) that captures two frames to create a softened background without compromising the image quality of the subject. I've tested it a handful of times, each time rendering excellent results.

There are three softening options, from mild to strong. You do have to compose on the LCD in ADV mode instead of the optical viewfinder. And the final capture is a JPEG -- RAW isn't available in this mode. But the compromises are worth the final output, for sure.

For professional work, large image sensors provide the most flexibility and best quality. No doubt. But you don't necessarily want to take your 5D Mark III with 70-200mm f/2.8 zoom on a date. For those occasions, it's fun to have a compact that can deliver artistic results.

Want to Comment on this Post?

You can share your thoughts at the TDS Facebook page, where I'll post this story for discussion.


Join me on my Instagram site as I explore the world of mobile photography.

RAW files from Fujifilm's new X-Trans CMOS II sensor can be processed in Lightroom 4.4 with excellent results. Adobe and Fujifilm have been working together to enable Lightroom to get the most out of the X Series cameras.

Fujifilm X20 Camera Processed Lightroom 4 Halftime show photographed with a Fujifilm X20 and RAW file processed in Lightroom 4.4. Click on image for a closer look.

Last night, I packed a Fujifilm X20 for the Warriors game at Oracle Arena and recorded in RAW. This image was captured at ISO 800, 1/420th at f/2.8 in Aperture Priority mode.

I then processed the photo in Lightroom 4.4, adjusting both color and exposure (but not much!). The .RAF file responded well to all of the adjustment sliders in Lightroom 4.4.

If you're shooting with one of these new X-Trans CMOS sensors, Lightroom can definitely help you get the most out of these files. I did notice, however, the fans coming on for my MacBook Pro 15" Retina Display laptop while working on the X20 library. Must be some heavy lifting going on under the hood.

Want to Comment on this Post?

You can share your thoughts at the TDS Facebook page, where I'll post this story for discussion.


Join me on my Instagram site as I explore the world of mobile photography.

Close Up Photography at Twilight

We tend to think of sunsets and big landscapes at twilight, but it's also my favorite time to shoot close-ups. Subjects that are unremarkable in midday light take on a surreal glow at day's edge.

Lichen on Rock Pextax K-5 Derrick Story Lichen on Rock by Derrick Story. Click on image for larger version.

This image of lichen on rock was captured at 7:40 pm with a Pentax K-5 at ISO 800 using a Pentax 18-55mm zoom set to f/4.5.

The next time you're out photographing a sunset, maybe look down at your feet too. There might be another world there waiting to be captured.

Want to Comment on this Post?

You can share your thoughts at the TDS Facebook page, where I'll post this story for discussion.


Join me on my Instagram site as I explore the world of mobile photography.

Panoramas are a great way to document an area that you're visiting. But it's interesting how different the same place can look, depending on how you make the image. I have have two panoramas here, one captured with a Canon S90 and stitched together in Photoshop CS6. And the other recorded with an iPhone 4S in panorama mode.

Canon S90 Panorama

Marin County Panorama Canon S90 Photoshop CS6

With the S90, I was able to zoom in a bit to better show the body of water below. I captured 3 frames and used Photomerge in Photoshop to assemble the final image. Click on image for larger version.

iPhone 4S Panorama

Marin County Panorama iPhone

The iPhone version is much wider and has less magnification. They almost look like two different locations.

So a panorama is not just a panorama. Like all types of photography, the decisions you make at capture have a tremendous impact on the final outcome.

Want to Comment on this Post?

You can share your thoughts at the TDS Facebook page, where I'll post this story for discussion.

Leica 25mm on OM-D

The amazing Olympus OM-D can do just about anything. Figuring out how to program it is another matter all together.

Fortunately, seasoned Micro Four Thirds veteran, Rohith Thumati, has written an excellent "set-up" guide to help you get started. In his post, Setting Up an Olympus OM-D E-M5, he takes you inside the menu system and explains how to activate the Super Control Panel, take control of autofocus, program the buttons, configure the Electronic Viewfinder, and a whole lot more. OM-D owners are going to want to bookmark his post.

A Few Additional Tips

In the year that I've been loving the OM-D, I have a few additional thoughts to share with prospective owners.

Protect the LCD - The touch LCD on the back of the OM-D is beautiful. I recommend that when you first get the camera, buy a quality protector for the LCD. That way you won't have to worry about surface scratches during use. I've used a crystal clear overlay without any problems at all.

Invest in the Power Grip - It's hard to pony up the additional $299 for the Power Battery Holder HLD-6, but it makes such a big difference in performance (two batteries now instead of one) and comfort. When traveling light, you can leave the grip at home. But the rest of the time I leave the grip on and love it. Also, there's an option to tell the OM-D to use the battery in the grip first. That makes changing batteries much easier.

Explore Lens Adapters - It's easy and fun to manual focus via the EVF, and I've had a blast repurposing my Zeiss prime lenses from the old Contax SLR. There are a ton of adapters available. I'm sure there's one that will allow you to repurpose some quality glass that you have stashed in the closet.


Take a look at the Olympus Micro Four Thirds Gear Guide for an overview of cameras, lenses, and accessories.

Want to Comment on this Post?

You can share your thoughts at the TDS Facebook page, where I'll post this story for discussion.

This week on The Digital Story: Are off-brands worth the risk? Backpacking is different for photographers. DIY Home Portrait Studio, Part 2. All of this... and more!

Story #1 - Are off-brands worth the risk? As I'm getting ready for an important assignment, it dawned on me that I'm packing a Pentax K-5 instead of a Canon or Nikon DSLR. Next week I'll be testing a Fujifilm X20. I regularly use Olympus and Panasonic cameras and lenses.

When I say "off-brand," I'm not referring to knock-offs, which should definitely be avoided. I'm talking about investing in brands other than the traditional photography titans: Canon and Nikon.

Is it wise to invest your assets in a Sony system, Pentax, Samsung, Olympus, Panasonic? Will you regret your decision later?

Story #2 - Backpacking photographer - I'm testing a new outdoor pack from Lowepro that's designed for overnight trips. It's my belief that backpacking photographers need to carry even less camping gear than other hikers because we have photography equipment too. In this segment, I share 5 tips for lightening your load on overnight excursions into the backcountry.

Story #3 - DIY Home Portrait Studio, Part 2.This week I'm focusing on lighting. For continuous lights, I recommend the Lowel Ego Digital Imaging Fluorescent 2 Light Kit (108 watts) for $215. Then add 3 light stands, such as the Manfrotto 1004BAC-3 QSS Air Cushioned Light Stand 3-Pack for $260. You'll need 3 Manfrotto 026 Swivel Umbrella Adapters ($28 each) to go with those light stands. With these basic tools that don't take up much room, you can use your electronic flashes with umbrellas, or the Lowel Ego lights, for your portrait and product work.

Listen to the Podcast

You can also download the podcast here (32 minutes). Or better yet, subscribe to the podcast in iTunes. You can support this podcast by purchasing the TDS iPhone App for only $2.99 from the Apple App Store.

Monthly Photo Assignment

The April 2013 photo assignment is Architecture.

More Ways to Participate

Want to share photos and talk with other members in our virtual camera club? Check out our Flickr Public Group. And from those images, I choose the TDS Member Photo of the Day.

Podcast Sponsors

Red River Paper -- Keep up with the world of inkjet printing, and win free paper, by liking Red River Paper on Facebook.

Make Your Photos Sizzle with Color! -- SizzlPix is like High Definition TV for your photography. SizzlPix Spring Sale - 25% Discount! Offer good on orders placed by April 30. Again, "TDS" or "The Digital Story" in the comments space. Of course, they will honor the discount for all TDS listeners and readers, including those who've received SizzlPix samples.

Need a New Photo Bag? Check out the Lowepro Specialty Store on The Digital Story and use discount code LP20 to save 20% at check out.

Want to Comment on this Post?

You can share your thoughts at the TDS Facebook page, where I'll post this story for discussion.

Our eyes have this wonderful ability to render sky and foreground at the same time. Our cameras need a little help. If you like sunrise and sunset photos, and are tired of having the foreground go to black, here are three options that should improve your composition.

Bridgeport at Twilight Bridgeport at Twilight by Derrick Story

The Graduated Filter

The Bridgeport at Twilight image was captured using a Cokin Grad Density filter. Yes, it's the old fashioned way to balance sky and foreground. But it has the advantage of getting the image right in-camera, saving you computer time once you return home.

You can get set up fairly affordably with kits such as the Cokin H250 P-Series ND Grad Kitfor $82 that includes the holder that mounts on the front of your lens and the filters that go in it. Just slide the graduated filter up and down until you get the effect you want, then take the picture.

Pentax K-5 Pentax K-5 with Cokin Graduated Filter. Photo by Derrick Story. Click on image for larger size.

Merge Two Exposures in Photoshop

Another approach is to mount your camera on a tripod and take two pictures: one exposed for the sky, and the second exposed for the foreground. Then you can merge the best areas of the two exposures in Photoshop.

Photographer Steve Berardi has posted a helpful tutorial explaining this technique on his site. Take a look at How To Merge Two Exposures. You'll need to have some familiarity with Photoshop to apply these steps. But if you do, the process is straightforward.

I think it's a good idea to shoot a bracketed series of important landscape shots anyway, regardless of the technique you're planning on using. Those bracketed exposures can come in handy once your return home. Who knows, you might want to try an HDR composite...

High Dynamic Range (HDR)

While your camera is still on the tripod, take 3 or 5 bracketed exposures. You can set this up in the menu of your camera. I usually make the exposures 1 f/stop apart. Something like -1, 0, +1 or -2, -1, 0, +1, +2. But you may find that 2/3 of a stop works better. It depends on your gear and aesthetics, and it's worth playing with.

Once you have your sequence, then you can create an HDR merge in Photoshop or a specialized HDR application. Photographer Colin Smith has published a helpful tutorial titled What is HDR and why do we need it?. It will help you get started with this technique.

Bottom Line

Sunrise and sunset pictures are favorites, for sure. And you can take your twilight shots to the next level by trying one of these techniques. A little bit of foreground can make the sky all that much better.

Want to Comment on this Post?

You can share your thoughts at the TDS Facebook page, where I'll post this story for discussion.


Join me on my Instagram site as I explore the world of mobile photography.