This is The Digital Story Podcast #786, April 13, 2021. Today's theme is "Should I Stay with Micro Four Thirds?" I'm Derrick Story.
Opening Monologue
It's been over a year since the release of the OM-D E-M1 Mark III. And it doesn't seem like we're going to see anything significant until the end of 2021 from OM Digital Solutions. Panasonic has been quiet on the MFT front as well. Meanwhile, Fujifilm and others have been quite active. Is it time for me to read the writing on the wall, or to stay the course? I discuss on today's TDS Photography Podcast. I hope you enjoy the show.
Tune-In Via Your Favorite Podcast App!

Apple Podcasts -- Spotify Podcasts -- Stitcher
Podbean Podcasts -- Podbay FM -- Tune In
Should I Stay with Micro Four Thirds?
Here's why I've preferred Micro Four Thirds to this point.
- Fantastic Lens Catalog - If I want a super telephoto and ultra compact prime lens, I can find just the right one in the MFT mount.
- Image Stabilization Is Not a Premium Option Every Olympus MFT camera I have include fantastic IS.
- Still the Most Compact
- Excellent Image Quality
- Reasonable Pricing
But, I'm enjoying shooting with Fujifilm cameras as well. I like their better resolution, film simulations, and styling.
For a look at what the future may look like for OM Digital Solutions, you may want to check out this Interview: Aki Murata of OMDS (Olympus) - 'we're more flexible now'. Lots of good insights there.
In terms of Panasonic -- Panasonic launched the LUMIX G100 on June 24, 2020, a new Digital Single Lens Mirrorless camera designed and developed for creating high-quality, versatile content.
Bottom Line
For my "system" camera, I'm going to wait and see what Olympus does over the next year. I have great lenses for the MFT mount, and I truly enjoy shooting with their cameras.
If I don't see a solid successor to the E-M1 Mark III by 2022, then we'll revisit this topic then. In the meantime, I can work just fine with the gear that I have.
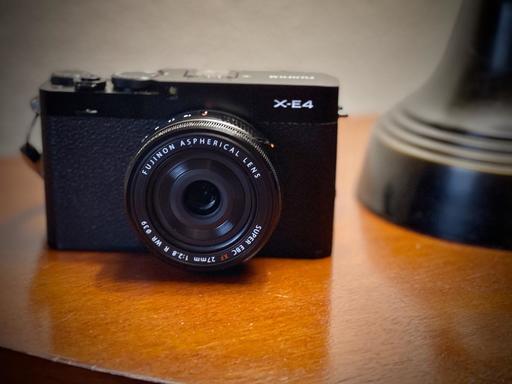
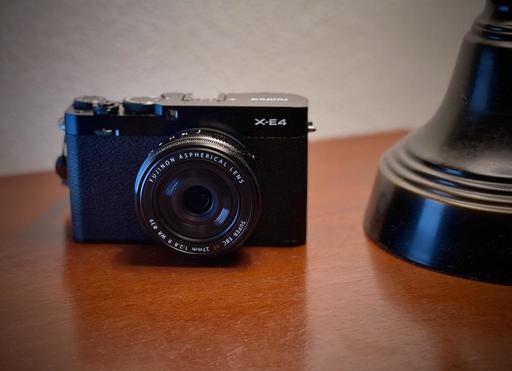
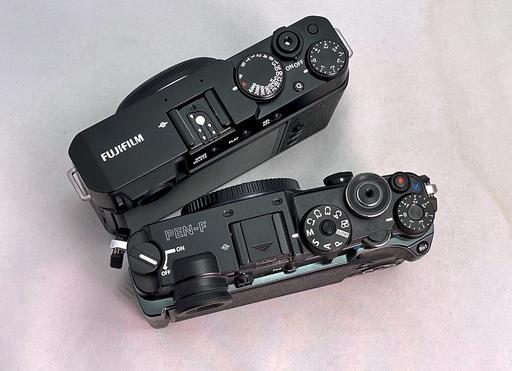
A Beautiful Couple - Fujifilm X-S10 with 27mm Lens
I've been testing recent releases from Fujifilm searching for that perfect combination of functionality and nimbleosity. You've probably read about my disappointment with the X-E4. Nice camera, but missing too many features for my taste. I did like, however, the XF 27mm f/2.8 pancake lens that you can bundle with it.
When I paired the XF 27mm f/2.8 R WR lens ($399) with the Fujifilm X-S10 ($999), I found a wonderful pairing for on-the-go photography. There are a few key reasons why I preferred the X-S10 to the X-E4.
- 5-axis image stabilization built into the camera.
- Built-in popup flash that can also serve as an off-camera flash controller.
- Excellent handgrip that doesn't really add bulk to the camera. It's about the same depth as the 27mm pancake lens when mounted on the body.
- Battery charger included in the box.
- You get all of this in a still very compact package.
All of this comes at a price, however. Combining the separately purchased XF 27mm lens with the X-S10 body tallies to $1,398 compared to the $1,049 for the X-E4 bundle. The problem is that Fujifilm isn't provided a bundle for the X-S10 and 27mm, so you have to buy them separately at regular price. When the same lens is purchased with the X-E4, you save $200 off the price of the lens.
I would love it if Fujifilm would offer us the same deal with the X-S10. That would be bring the price down to $1,198. Fujifilm: I would buy that bundle in a heartbeat.
Bottom line here is that if you're debating between the X-E4 and X-S10, I recommend the latter. The X-S10 doesn't realistically take more room in your jacket pocket, but packs many more features. It's a great camera.
The New Donation Kit for Carefree Shipping of Found Film Cameras
We have more time around the house than ever. And you finally dove into that bedroom closet that's been begging for some organization.
If you found a film camera that you're no longer using, our new Donation Kit makes it easy to pack and ship. Just visit the Contact Form on thenimblephotographer.com, click the box next to Donating a Film Camera, and let me know what you have. In your note, be sure to include your shipping address.
If it's a camera we can use for the shop, I'll send you a Donation Kit that includes a USPS Priority Mail shipping box and prepaid label. All you have to do is tape it up, insert the camera, and add the label. USPS will pick up your shipment from the front door of your house during their regular mail delivery. It's that simple!
Your donation help get analog gear in the hands of aspiring fine art photographers, and the proceeds help support this podcast.
Samyang's new AF 24mm F1.8 lens features a dedicated 'Astrophotography Mode'
You can read the entire article on DP Review.
Samyang has announced the release of one of those lenses, an AF 24mm F1.8 lens for Sony E mount cameras. (We may get a MFT version soon...)
The lens is constructed of 11 elements in 8 groups, including two aspherical elements, three high-refractive index lenses and two extra-low dispersion elements. The lens features a minimum focusing distance of 19cm (7.48"), uses a nine-blade aperture diaphragm, has an aperture range of F1.8 to F22 and is weathersealed.
In addition to a customizable focus-hold button, which will keep the lens locked at a specific point while in autofocus mode, the AF 24mm F1.8 also features an 'Astrophotography Mode.' Samyang says this mode will 'automatically set the lens focusing mode to MF, move and lock the lens to infinity focus and the Inifinity Focus Confirmation LED will light up green.' If the lens is moved from infinity focus, the LED will turn red to let you know you're no longer focused on infinity for your night sky images.
The lens also features a custom switch, which allows the focus ring to be used as an aperture ring (Mode 1 for AF, Mode 2 for aperture).
The Samyang/Rokinon/Bower AF 24mm F1.8 will be available in June 2021 for an MSRP of $549.
Virtual Camera Club News
Inner Circle Members: A big thanks to those who support our podcast and our efforts! (And welcome to our new members.)
Second Session of Integrating iPhone into a Pro Photography Workflow Online Workshop - April 21 to May 15, 2021: The first session of "Integrating iPhone into a Pro Photography Workflow" Online Workshop has sold out. But now I've posted a second session that begins April 21, 2021. If you're interested in attending, just go to catalog page.
My Writing on Medium.com: I now have more than 25 published articles on Medium.com. And if you haven't visited the site, and enjoy good writing on a variety of topics, I suggest that you may want to take a look. You can just go to the home page and enter "Derrick Story" in the search field. And if you like what you read, then follow me!
EV Explorers for Those Who Are Interested in Electric Cars: I've created a new group on DerrickStoryOnline titled EV Explorers. The tagline for this group is: "Bringing Curiosity and Nimbleosity to the World of Electric Vehicle Transportation." Here we can share information, tips, discoveries and more about using electric vehicles for our photography adventures. If you want to join this group, click on this link for an invite. We're going to keep this as a private group for now, but you are invited to join us.
Affiliate Links - The links to some products in this podcast contain an affiliate code that credits The Digital Story for any purchases made from B&H Photo and Amazon via that click-through. Depending on the purchase, we may receive some financial compensation.
And finally, be sure to visit our friends at Red River Paper for all of your inkjet supply needs.
See you next week!
Product Links and Comments
There are product links in this article that contain affiliate tags. In some cases, depending on the product, The Digital Story may receive compensation if you purchase a product via one of those links. There is no additional cost to you.
You can share your thoughts at the TDS Facebook page, where I'll post this story for discussion.
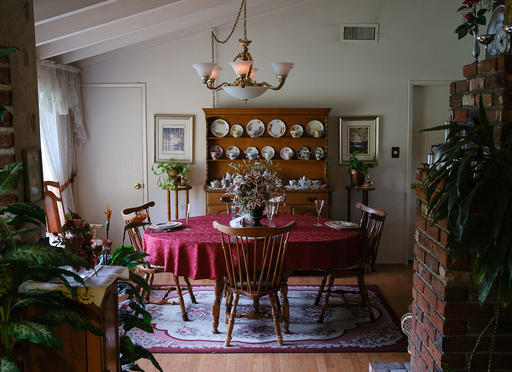 The Dining Room - Fujifilm X100V, ISO 1600, 1/15th, f/4. Handheld. Photo by Derrick Story.
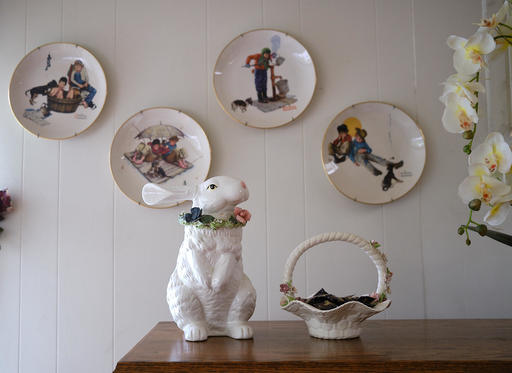 Ceramic Bunny with Norman Rockwell Plates - Fujifilm X100V, ISO 640, 1/15th, f/2.8. Handheld. Photo by Derrick Story.
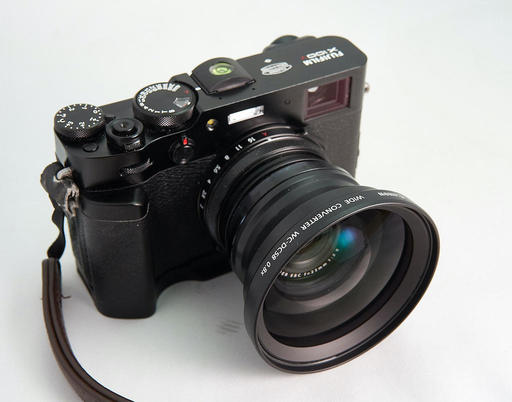
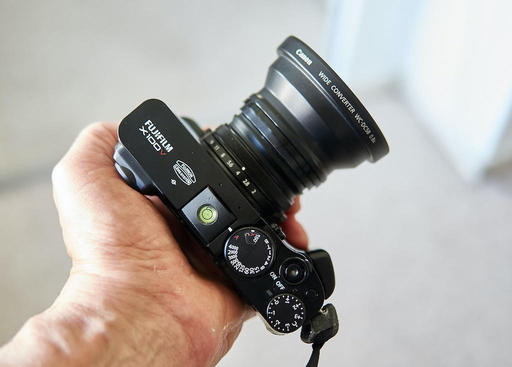
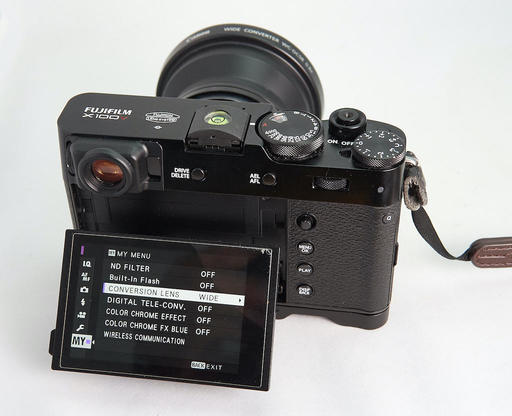
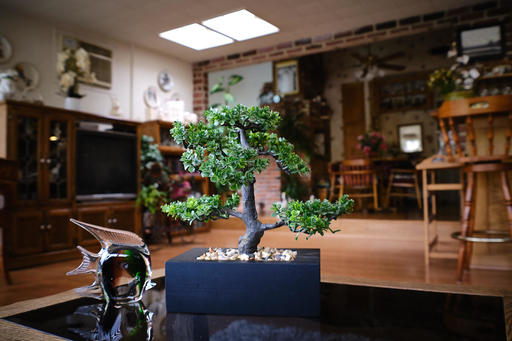 Plastic Bonsai with Glass Fish - Fujifilm X100V, ISO 1250, 1/15th, f/4, Canon 0.8 Wide Angle Adapter for 28mm equivalent. Handheld. Photo by Derrick Story.