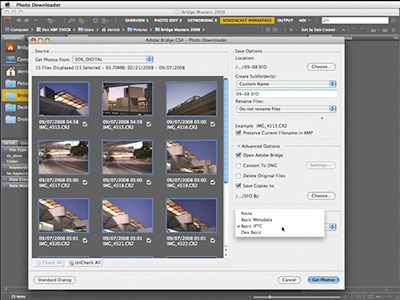
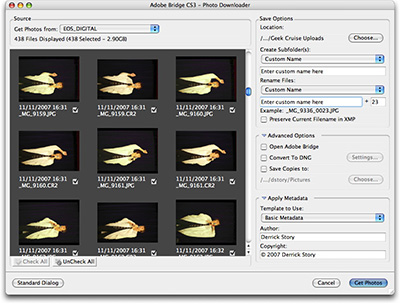
Recently in Photography

  Page 355 of 382 in Photography  

If not your worst nightmare, it's close: you've accidently erased your memory card losing precious photographs before they've been safely uploaded to the computer. You fear you may have lost everything.

But chances are good that you can recover those photos. First, remove the memory card from the camera. Then download the latest version of PhotoRescue. You can grab a demo version initially, then buy the application once you've saved the data from your card. Launch the program and click on the "Backup card" button. PhotoRescue will copy the entire contents of your card to the destination your designate, and label the file, "card_image.cib". Your "erased" data has now been transferred to your computer.

backup_card.jpg

At this point, you can buy PhotoRescue for $29 US and recover your pictures using "Quick Recovery." This function will read your card directly if it's still connected to the computer, or it can read the backup file you created earlier. Either way, you can't actually restore the images without paying the registration fee.

register.jpg

My advice is this: even if you're not ready to pay for PhotoRescue now, download the demo today and have it on your hard drive. That way, if you need it, and don't have Internet handy, you can backup the contents of your memory card immediately, then restore the pictures once you have a chance to go online and pay the $29 registration.

PhotoRescue works for both Mac and Windows. The Mac version is Universal Binary, and is quite speedy on an Intel Mac. In just minutes, I successfully recovered nearly 2GBs of photos from a formatted SD card that was full of images from my Canon SD700. There are also other recovery applications available that you might want to look in to. The bottom line, however, is to be prepared for an accidental erasure, so you don't lose valuable pictures.

Technorati Tags:

The nooks and crannies of The Digital Story mailbox has yielded more outstanding photos from last month's Photo Assignment: "Texture". These images are too good to languish in a stuffy old inbox, so I'm running a follow up here so you too can enjoy them.

And don't forget that this month's assignment is "Self Portrait." That's right, we're asking you to get in front of the camera and share your personalty with other members in the Digital Story virtual camera club. I guess you could call this a virtual ice breaker! If you've never entered a photo assignment before, just check the Submissions page. The deadline for "Self Portrait" is March 31.

But now, let's enjoy a few more "Texture" submissions from our members. Thanks all for contributing, and for your patience :)

More Texture

jason_francis.jpg
Jason Francis


paul_leasure.jpg
Paul Leasure


stuart_glenn.jpg
Stuart Glenn


bryan_pearson.jpg
Bryan Pearson

Technorati Tags: ,

color_grid.jpg

I've been a big fan of the Canon Rebel XT (350D) and carry it in my backpack as my point and shoot. Recently I got my hands on the Rebel XTi (400D) and have been enjoying the larger 2.5" LCD, improved user interface, automatic dust sensor cleaning, the cute little green power-on light, and of course the 10.2 megapixel sensor. This camera handles all of my Canon lenses, shoots RAW, and is quite responsive.

But I started hearing little comments such as, "Well, you know that the XTi is a lot noisier than the XT, right?" Actually, no I didn't. I ignored the first few remarks, but then had to do a little research to get to the bottom of this. Why? Well the images I was shooting looked pretty good, and I would have been hard-pressed to tell the difference between RAW files shot with the XT and the XTi. (Now compared to the 5D is another matter...)

My research led to me an interesting report published on Camera Labs. If you're interested in this sort of thing, you should read it. They did a great job of comparing noise levels between the Canon Rebel XT, XTi, Nikon D200, and Sony Alpha. Their remarks?

"In terms of its 10 Megapixel rivals, the EOS 400D / Rebel XTi delivers essentially the same results as the more expensive Nikon D200 at 200 ISO and above, while arguably enjoying a smoother image at 100 ISO. Interestingly, the Sony Alpha A100 exhibits noticeably higher noise than any of the other models here, especially at 800 ISO and above. The bottom line is Canon may have increased the resolution of the 400D / XTi, but its noise levels remain very low and usable even up to 1600 ISO."

As you continue through the report, they could find some small differences at ISO 1600 between the XT and XTi. But they don't seem like an issue in real life shooting, and they certainly don't offset the other advantages provided by the XTi.

My bottom line... the Canon Rebel XTi is my new point and shoot camera. And I really like the shots it produces.

Technorati Tags: ,

tiger_town.jpg

Looking for a sports lens but don't want to spend the $500+ from the name brands? Virtual camera club member Tom Bridge dropped me a note about the $150 Quantaray - 70-300 mm DI f/4-5.6 D for his Canon 10D. Tom took the lens out to the ballpark and captured some great shots from about 20 rows into the bleachers.

Tom said this isn't an image stabilized lens, but it is quite sharp based on his testing. The focusing isn't as fast as a Canon USM zoom, but he was impressed with how quiet the Quantaray was during operation.

With Spring in the air and baseball beckoning to aspiring sports photographers, I thought I'd pass along this tip from a reader.

Technorati Tags: ,

prince_charles.jpg

Aspiring photographer Brian Larrabee learned that Prince Charles and Camilla were to visit Philadelphia last January. Using his mom's Canon point and shoot, he was able to record a series of great images of the royal couple, including the shot I've featured here. Brian and his mom were so pleased with the images, they thought that someone might be interested in publishing them.

They shared a sample gallery with a prospect and were asked to send a high resolution version. The only problem was, there were no high rez photos. The camera had been set to its lowest resolution in order to save memory on its card. Brian's priceless images were only 480 x 360.

I asked if I could share this story because it's a good reminder to always shoot at your camera's highest resolution, and help others do the same. You never know when you're going to take that next great shot, and if you capture it, you want it as big as possible. Flash cards have become quite affordable, and if you find yourself running out of space, don't reduce the resolution, buy more memory.

And congratulations to Brian for getting such great shots -- no matter the size, they are memorable photos.

I'm working on my next Things I Learned the Hard Way podcast, if you have a good story to share, please send it along. Contact information is on our Submissions page.

Photo by Brian Larrabee.

Technorati Tags: ,

photoflex_reflector.jpg

My friend Ben Long and I decided to take on an impossible self-assignment the other day: Could we take a decent portrait out in the bright Spring sunshine? I grabbed my camera and the Photoflex 5-in-1 MultiDisc 32"Reflector, then picked up a friend along the way who agreed to be our subject.

The Photoflex kit, which sells for about $100, includes a translucent main disc that we call "the portable cloud," and a slip-on, reversible cover that has four different reflective surfaces. I also carry a second 22-inch disc to use as fill light when I'm using the larger disc as the portable cloud. I also highly recommend the LiteDisc Holder that makes it easier to position the disc or mount it to a light stand.

joanna_reflector.jpg

We had lots of fun using the different combinations out in the bright sun. The Photoflex reflectors and Mother Nature's illumination allows me to create a photo studio just about anywhere -- I just have to make sure I have a second set of hands to hold the disc.

With this image, we used the translucent disc above to soften the harsh midday sun, then added a fill reflector to illuminate the face. I recorded the image with a Canon 5D at 300mm wide open at f-5.6.

One other benefit of the Photodisc is that it helps offset the green cast from the intensely vibrant grass lawn. And if you don't feel like springing the 100 bucks for the kit, you can use the windshield reflector for your car in a pinch.

Technorati Tags: ,

sigma_dp1.jpg

The Sigma DP1 looks like a stylish compact, but inside it uses the same 14 megapixel FOVEON X3 direct image sensor (2652×1768×3 layers) contained in the Sigma SD14 digital SLR. Coupled with a 16.6mm F4 lens for a wide angle field of view equivalent to 28mm on a 35mm film camera, and RAW mode, the DP1 packs a lot of capture quality in a small package.

It's been interesting to watch this camera evolve, even though it still hasn't been released (we're guessing May of this year). The above picture is the prototype that Sigma displayed last September. The look of the camera has changed quite a bit since then with the addition of a hot shoe, mode dial on top, and more classic rangefinder styling. Here's what Sigma was showing off at PMA.

sigma_dp1_rev.jpg

I think the DP1 will be of particular interest to serious photographers committed to another DSLR system such as Canon or Nikon, but who want to work with the FOVEON three layer sensor. The DP1 should be perfect for landscape, street shooting, and working in crowded interiors. I suspect noise levels will be low at high ISOs, plus you have RAW for even more control in post production.

You can learn more about the camera by watching Dave Etchells of Imaging Resource talk to Tom Sobey of Sigma about the DP1 Rangefinder. The YouTube video packs lots of information into just a couple minutes. (BTW: I met Dave on the Panasonic Sunrise Shoot; he's a terrific guy.)

No price has been set yet for the Sigma DP1, but I'm guessing that it will run around $799 US. We'll know for sure when it's released later this spring.

Top photo represents the first prototype that Sigma released in Sept. 2006. The middle photo is what Sigma was showing at PMA. The DP1 has changed considerably since its initial press release.

Technorati Tags: ,

las_vegas_baloon.jpg

The Panasonic DMC-FZ8 is a compact digital camera that features a 7.2 MP sensor, 12X Leica DC lens, image stabilization, 16:9 option, movie mode, and yes, Raw. The camera, due to ship anytime now, also includes a nice lens hood and filter adapter.

I spent Friday morning shooting with DMC-FZ8 in the Red Rock wilderness area playing with the 36-432mm lens in Jpeg, Raw, and Movie mode. This shot of the balloon rising over the Las Vegas strip was captured in Jpeg mode, ISO 100, 1/500 @ f-7.1, 16:9, focal length at 55mm (330mm equivalent), image stabilization on, pattern meter mode resulting in a 3072x1728 image. Picture quality -- thanks to the lens and processor -- was excellent at ISO 100 and 200, good at 400, and acceptable at ISO 800.

The movie mode was also excellent, capturing directly in QuickTime format with stereo sound. I really like shooting in 16:9 format for the movies, giving me a cinematic 848x480 viewing frame.

Raw mode also worked well and is a welcome addition to this feature-rich camera. I had to use the latest version of Photoshop CS3 or the software included with the FZ8 to decode the files. But I imagine we'll see this capability added to Adobe Lightroom and other decoders before long.

panasonic_fz8_sm.jpg

Overall, this is a very impressive camera that will sell for $349 or less. You have lots of pro features, such as manual exposure, aperture priority, manual focus mode, spot metering, 12X optics, Raw capture, filter adapter, and more. Performance was snappy and responsive. The right handle grip makes it easy to steady the camera while shooting, yet is is compact enough to slip into your jacket pocket or day pack.

If you're looking for a high quality compact camera with Raw and a long zoom, the Panasonic FZ8 should be on your list.

Technorati Tags: , ,

paper_flash_diffuser.jpg

I saw tons of cool equipment at Wednesday's PMA Sneak Peek event, but my favorite was a sheet of letter-size paper folded and attached to a flash with a rubber band to create a very effective diffuser.

I noticed that Steve Makris, a technology writer for the Edmonton Journal, using the device pictured above. I thought is was so simple, yet elegant and quite useful. If you look closely, he's actually using a PMA memo.

And the best thing about it... "I get a fresh one every day," says Steve.

All the more reason to make sure you have a handful of rubber bands in your camera bag.

Technorati Tags: ,

Las Vegas Here I Come - PMA 07

pma_07.jpg

I'm off to Las Vegas to cover this year's PMA show. If you've been following the industry news, you know that already lots of pre-show announcements have been released, such as the Nikon D40x. But there will be more, and I will be there in person to figure it out and relay the information to you.

I have meetings set up with Adobe, Nikon, HP, Pentax, Panasonic, and more. I'll do my best to get you the inside scoop, and hopefully an interview for our weekly podcasts. And if there's anything interesting on the show floor, I'll send along a snapshot or two.

Next stop... Vegas!

Technorati Tags: ,


Sponsor Note...

Add Magic to Your Slideshows -- FotoMagico presentations are so amazing that your audience will be asking how you did it.