Apple's iOS 4 adds a handful of interesting photography-related features to my iPhone 3GS. One of the most basic, but an improvement that I like a lot, is being able to change the background of the Home Screen with one of my photos. I'm using a blue sky shot with just a wispy cloud, and it looks great. Nice use of those artsy images I'm prone to collecting.
Digital Zoom
On compact cameras, digital zoom is something that I always disable because those devices have optical zooms that are higher quality. But on my prime lens only iPhone, I'm happy to have the 5X zoom. To enable it, just tap the screen and a slider appears that allows you to get a little closer to your subject. It actually works fairly well. Keep the camera steady during exposure by holding your finger on the shutter button, then lightly lift it off to take the photo.
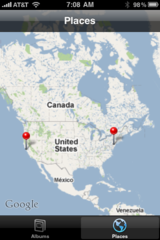
Places
I haven't had time to test the new Faces feature, but Places is automatically enabled since the iPhone geotags images. When in the Photos app, just tap the Places tab at the bottom, and you'll see a map with red drop pins. Tap on a drop pin and a label appears telling you how many photos are at that location. Tap the blue arrow, and you're taken to an album that has both photos and videos from that general area. You can fine tune the area by pinch-zooming in on the map. One pin can become several as you get closer. Very handy. Works great.
Tap to Focus Video
Another handy feature is the ability to focus the camera during video recording. So if you're shooting a distant shot, then move in close, you can tell the iPhone exactly want you want in focus by tapping the screen. What isn't discussed as much, but just as important, is that exposure is also adjusted by tapping. This really helps when dealing with a backlit subject that would otherwise be dramatically underexposed.
Final Thoughts
I just love free software, and the new iOS 4 includes features that I find useful. You don't have to buy a new iPhone to take advantage of many of these. Just connect your iPhone 3G or 3GS to iTunes, and grab your update now.
 Follow me on Twitter
-