This is The Digital Story Podcast #746, July 7, 2020. Today's theme is "The Resurgence of Car Camping for Photographers." I'm Derrick Story.
Opening Monologue
Once again, the car has become our sanctuary. As we learn more about airborne transmission of coronavirus, public places become even less appealing than before. The one place, outside of our home, that we can relax and breath deeply is our vehicles. And by extension, car camping may become our most viable alternative for photography adventure. Here are some tips for a comfortable experience.
The Resurgence of Car Camping for Photographers
The vehicle I've been waiting for, and still have a few years to go before it's available in North America, is the Volkswagen Buzz electric bus. It is a nimble alternative to RVs and trailers, letting me take advantage of highway rest stops and public campgrounds while still easily parking at the grocery store.
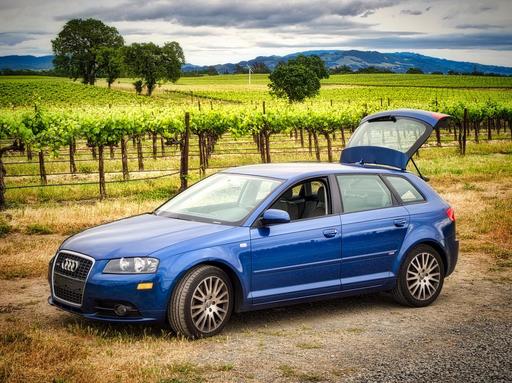
But in the meantime, I've outfitted my Audi A3 to serve the same purpose. You may wonder, how does a tall guy road trip comfortably in a compact wagon? Actually, with the right gear, it is very nice. And I thought that you might enjoy hearing about some of the tricks I've learned over the years for overnight stays on the road. Here are five favorites.
Where You Can Stay and for How Long
For maximum flexibility, it pays to be familiar with the locations and rules for the Interstate Rest Areas that are along the way. In California, for example, there is an 8-hour stay limit. No overnight parking or camping. That means, if you're will to sleep inside your vehicle, you can get a full night's rest. (Some states don't allow this at all; others give you even more time.)
Customizing Your Reclining Seat
If you're like me and don't have your cool electric bus yet, then you can outfit your car seat for a comfortable night's rest. Do this at home before you leave.
In my Audi A3, the passenger seat goes all the way back to touching the back seat. I have a few flat throw pillows, like the kind you would accessorize a couch with, stashed in the Audi. If I raise up the base of the seat, the back goes more flat. I then add a throw pillow to the base where I normally sit, and that evens out the configuration.
Add a stuff-able camping blanket and a travel pillow for your head, and you are set for the night. Generally speaking, I'm pretty tired by the time I set this all up, so that helps too.
Hot Coffee in the Morning
My go-to kit starts with a Jetboil Zip Camping Stove ($68). If you've never used one of these. you will go crazy over it. They are so hot!
Next, I break out my water jug and a packet of Starbucks VIA Instant Italian Roast Dark Roast Coffee. Most rest areas have picnic tables that you can use to brew the coffee. It's delicious and quite civilized.
Charging Up
One of the things that I like about the Audi is that it has an abundance of 12-volt outlets that remain hot even when the engine is turned off. I keep a handful of USB adapters in the glovebox to charge my phone, watch, and iPad mini.
I can also charge my MacBook Pro using a POTEK 500W Power Inverter DC 12 V to 110V AC Car Converter with Digital Display ($39) or one like it. I don't use the laptop as much as I do the iPad mini when working in the car. But the converter is good to have just in case.
Keeping it Cool
It wouldn't be a road trip without a few cold refreshments stashed, plus maybe a string cheese or two. Hands down my favorite storage container for this is the eBags Crew Cooler II ($55).
First of all, the cooler area is just right for most overnight trips. This eBag holds about twice as much as a standard lunch cooler. And its insulation is quite good.
Beyond that, however, I really like the dry pockets on top, front, and both sides. The top area is particularly good for storing protein bars, nuts, condiments, paper towels, and plasticware.
The bag seems to fit anywhere in the car that I need it to, from a tight spot in the trunk, to on the floor in the back behind a front seat.
Handsome, durable, and will last you years - this eBag is a great travel companion.
So, gear up, don't forget your mask and hand sanitizer, and treat yourself to a short getaway. The change of scenery will do you wonders.
Olympus has NOT fallen: exclusive Olympus UK interview
You can read the entire post here on Amateur Photographer.
"Don't panic... business is pretty strong." Olympus UK's Mark Thackara gives a wide-ranging interview and as you can imagine, there is a lot to talk about.
Mark Thackara, Marketing Brand Manager for Olympus UK and a 35 year veteran of the company, met AP's Nigel Atherton and Geoff Harris to cast more light on what's been going on, answer questions about past strategy and future developments, and explain why going full frame still doesn't make sense for them.
How do you respond to negative speculation online about Olympus's future?
I also see a lot of positive comments online. If you want to be able to take your camera in a bag on a plane, with a good range of lenses, the benefits of our system are very clear. The argument about full frame will carry on for ever. It's no different from cars. If you want a Land Rover Defender you will buy one but if you want something more compact you can easily park in town, you will buy a Mini.
Nobody can promise that Olympus will be here in 100 years time, as you can't say that about any brand. What I can say is, we have seen the product road map, including the new lens one, and it's very exciting. The company wouldn't be bringing out news lenses if they didn't believe in the system. We are quietly positive.
So what is your final messages to current Olympus owners, or prospective customers, who might be worried about expanding their system or buying into it?
Don't panic. As far as we are concerned it is business as usual. Businesses change hands and flourish, so there no reason this won't be the case here. I have been through all sorts of ups and downs in my 35 years with Olympus. Our basic technology and core proposition are still very good.
The New Donation Kit for Carefree Shipping of Found Film Cameras
We have more time around the house than ever. And you finally dove into that bedroom closet that's been begging for some organization.
If you found a film camera that you're no longer using, our new Donation Kit makes it easy to pack and ship. Just visit the Contact Form on thenimblephotographer.com, click the box next to Donating a Film Camera, and let me know what you have. In your note, be sure to include your shipping address.
If it's a camera we can use for the shop, I'll send you a Donation Kit that includes a USPS Priority Mail shipping box and prepaid label. All you have to do is tape it up, insert the camera, and add the label. USPS will pick up your shipment from the front door of your house during their regular mail delivery. It's that simple!
Your donation help get analog gear in the hands of aspiring fine art photographers, and the proceeds help support this podcast.
Just Released! Organizing and Archiving Digital Photos
It's a concern that lingers in the mind of just about every digital photographer: "How do I preserve my digital images and make them accessible while doing so?"
If you've had those thoughts, then help is available now. My latest LinkedIn Learning/lynda.com title, Organizing and Archiving Digital Photos is a complete course that shows you a variety of options and techniques to take control of protecting your image collection.
As your photo library grows, it becomes more important to back up your work. In this course, I teach the concepts and techniques behind efficient photo management for the long haul. First, I compare a few selected photo storage philosophies and techniques. I then show you how to create an ultralight backup system for travel, also back up photos stored on a laptop (or desktop), and finally, review archiving strategies for storing photos for decades.
Here are just a few of the talking points that I cover in the training.
- Creating an ultralight backup system for travel.
- Sending images from cameras to mobile devices.
- Internal vs. external hard drives (both have their roles).
- Organizing photos in managed vs. referenced catalogs vs. Finder-based.
- Re-archiving images from older hard drives (do this before they fail!).
- Integrating cloud services into your overall strategy.
- Including a few tips you might not have considered, such as making archival prints of your best images.
You can start fine-tuning your workflow today by watching Organizing and Archiving Digital Photos on LinkedIn Learning and on lynda.com. It's a great way to begin the process of protecting your digital media for years to come.
The Essential Steps to Impressive Video Conferencing
If you want to learn more about looking and sounding great for your next online interaction, then I think you'll very much enjoy my latest online workshop, The Essential Steps to Impressive Video Conferencing.
This 1-hour deep dive focuses on the 3 major areas of successful online interaction: Audio, Video, and Environment. During the course, I walk you through a variety of techniques that range from simple using gear that you already have, to improving your chops through a few inexpensive purchases.
The course is currently available for free to our Inner Circle Members on Patreon. Members, just go to our Patreon site, and all the information will be there. If you're not already an Inner Circle Member, you can join us for $5 a month.
The course is also available on our Nimble Photographer Workshop Page for $14.95.
I have tons of great tips and techniques waiting for you there. If you want to get serious about how you come across during online meetings, classes, interviews, and family interactions, then you definitely will want to watch this course.
Digitizing Family Memories Course Now Available Online
Each of the four classes will outline a specific set of steps for you to accomplish. By the end of the course, you will have an organized digital archive of your most valuable family images.
You can sign up for the course by visiting the Workshops page on The Nimble Photographer. The course fee is a reasonable $39 (on sale right now). It includes the 4 class videos, class notes, and access to the class forums that are a part of each movie.
Updates and Such
Inner Circle Members: A big thanks to those who support our podcast and our efforts!
Due to the coronavirus pandemic, we've had to postpone our July photography workshop at Lassen Volcanic Park. We so still have on the schedule, however, our Eastern Sierra event in October.
How to Watch Photos for macOS Catalina and iPadOS - Learn everything you need to know about Photos for the Mac and iPad by checking out my latest course on LinkedIn Learning and on lynda.com. This course is perfect for Mac and iPad based photographers who shoot with iPhone, Mirrorless, and DSLR cameras. It covers both photography and movies. And if I say so myself, it's a lot of fun.
B&H and Amazon tiles on www.thedigitalstory. If you click on them first, you're helping to support this podcast. (The Digital Story is supported by its audience. When you purchase through links on our site, we may earn an affiliate commission.) And speaking of supporting this show, and big thanks to our Patreon Inner Circle members:
Affiliate Links - The links to some products in this podcast contain an affiliate code that credits The Digital Story for any purchases made from B&H Photo and Amazon via that click-through. Depending on the purchase, we may receive some financial compensation.
And finally, be sure to visit our friends at Red River Paper for all of your inkjet supply needs.
See you next week!
More Ways to Participate
Want to share photos and talk with other members in our virtual camera club? Check out our Flickr Public Group. And from those images, I choose the TDS Member Photo of the Day.
Podcast Sponsors
Red River Paper - Keep up with the world of inkjet printing, and win free paper, by liking Red River Paper on Facebook.
The Nimbleosity Report
Do you want to keep up with the best content from The Digital Story and The Nimble Photographer? Sign up for The Nimbleosity Report, and receive highlights twice-a-month in a single page newsletter. Be a part of our community!
Want to Comment on this Post?
You can share your thoughts at the TDS Facebook page, where I'll post this story for discussion.
 Richard Clompus - Comet Neowise.
 Gary Eyring - Blue Hour Milky Way.
 Karen Martin - Comet Neowise with Ion Trail.


 Karen Martin - Waxing Crescent Moon.
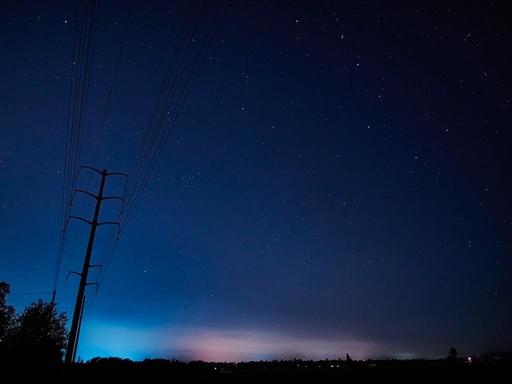 City Lights with Big Dipper - Derrick Story