This is The Digital Story Podcast #553, October 11, 2016. Today's theme is "If Only One Tradeshow." I'm Derrick Story.
Opening Monologue
Photo Plus Expo is right around the corner, Oct. 19-22 at Javits Convention Center in New York City. It combines the best U.S. expo hall for photographers, and excellent conference program, and the opportunity to photograph once of the best street shooting cities in America. And if I could go to only one trade show a year, Photo Plus would be it. I explain why in today's show.
If Only One Tradeshow
I've attended a half dozen Photo Plus shows over the years and have loved everyone of them. Sometimes I was working, other times teaching, but always exploring and interacting. Here are five reasons why I highly recommend this event.
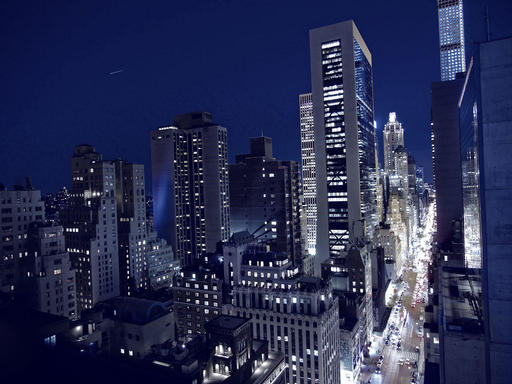
It's in New York! - This alone makes it worth attending. PPE is the perfect excuse to escape to Manhattan for street shooting, deli sandwiches, night life, and the electricity that is always switched on there. Plus you can finally make that pilgrimage to B&H Photo.
Terrific Expo Hall - More than 225 top quality exhibitors all under one roof. It's more intimate than Photokina, but much larger and diverse than Photoshop World and other mid-sized events. Over the course of my stay, I usually take at least three tours of the exhibits.
Meet Other Photographers - There are more than 21,000 of you there, and most of them are just as happy to be attending as you are. The years that I've been an exhibitor there, I thought the NY crowd was the most interesting to interact with. In this online world we live in, it's so nice to be in the same space as other enthusiasts.
Solid Conference Program - The PhotoPlus Conference features over 100 seminars, including Photo Walks, Master Classes, new One Day Intensive Classes, and Keynotes. If there's a photographer whom you've wanted to meet, chances are good he'll be there teaching.
Great Floor Demos - If you can't afford a conference pass, you can get into the Expo Hall for $20 (if you buy now) and enjoy great presentations in many of the large booths including Canon and Nikon. I think the demos are PhotoPlus are top drawer.
If you're in the New York area, I recommend attending the Expo on Friday Oct. 21 instead of Saturday the 22nd. The floor is less crowded and the exhibitors are still fresh.
In the News
The Cameras You All Really Want Are Only Going to Get More Expensive (via ThePhoblographer)
If you've noticed something about the price points of cameras, you'll realize that they're only becoming more and more expensive. That's because of a number of factors including the slow crush of most point and shoots from phones and exactly what they're capable of doing. Add onto that the fact that the prosumer market is growing and willing to spend a lot more money to get the image quality they want, and you'll now get what we wanted in some ways or another: the camera and high end photography industry is now something only available to the rich and those that truly want to spend the money to create something inspired by their creative passion.
At the same time, many of you know exactly what lots of us have known for a while now: cameras are so good that you can pretty much use anything out there and get the image that you want. It makes sense when like four companies make all the sensors! What you eventually end up paying for then are more features, horsepower under the hood, and far better image quality potential that will force you to make a more careful decision. For example, how many of you really need 42MP sensors in your camera? What about 24MP? Or what about 16MP? Do you really need a more revamped autofocus or will you be alight with focusing and recomposing? We all love talking about gear, but sometimes it truly isn't necessary.
52 Projects for 2017
52 photography projects: A photo idea to try every week of the year
Here are five of my favorite from this excellent list.
- Water drop art - The basic idea with this project is to suspend a container of liquid and let drops fall through a small hole, then capture the resulting splash.
- Minimalist mono landscapes - Instead of cramming an entire view into a single frame, shoot a series of minimalist long exposure landscapes instead.
- Time-lapse photo - How many of us have the time to fit time-lapse photography into the daily routine? Force yourself to try this addictive technique by making it one of your photo projects for 2017.
- The 50 x 50 x 50 project - Take 50 pictures in 50 days using nothing more than a 50mm lens. A simple project idea that really helps to develop your photographic eye.
- Self-publish a photo book
Follow Us on Apple News for iOS Devices
I'm happy to announce that The Digital Story, The Nimble Photographer, and theAnalogstory are all available on the Apple News App for iOS devices. Just click on the following links on your iPhone or iPad, then save us to your Favorites.
Updates and Such
Big thanks to all of our Patreon members! I was able to pay for the podcast server and the backup system from last month's pledges. Your contributions are making a positive impact.
I'll be announcing the 2017 TDS Workshop season by the end of October. And I have to tell you, this is our most exciting lineup to date. Keep eye peeled!
B&H and Amazon tiles on www.thedigitalstory. If you click on them first, you're helping to support this podcast. And speaking of supporting this show, and big thanks to our Patreon Inner Circle members.
And finally, be sure to visit our friends at Red River Paper for all of your inkjet supply needs.
See you next week!
More Ways to Participate
Want to share photos and talk with other members in our virtual camera club? Check out our Flickr Public Group. And from those images, I choose the TDS Member Photo of the Day.
Podcast Sponsors
Red River Paper - Keep up with the world of inkjet printing, and win free paper, by liking Red River Paper on Facebook.
MacPaw Creators of CleanMyMac 3 and other great software for Apple computers. Visit www.macpaw.com today.
Hedge for Mac - The fast solution for moving photos and videos from memory cards to drives, or drives to drives for that matter. Learn more at Hedge for Mac.
The Nimbleosity Report
Do you want to keep up with the best content from The Digital Story and The Nimble Photographer? Sign up for The Nimbleosity Report, and receive highlights twice-a-month in a single page newsletter. Be a part of our community!
Want to Comment on this Post?
You can share your thoughts at the TDS Facebook page, where I'll post this story for discussion.
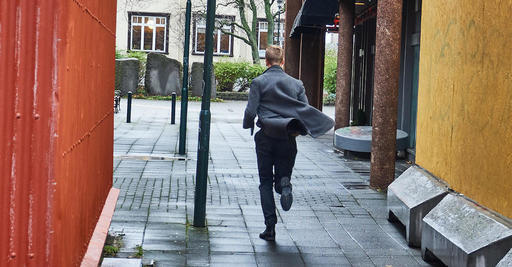 "Running Late" - Olympus OM-D E-M5 Mark II with 12-50mm lens, ISO 400, f/5.6 at 1/60th. Photo by Derrick Story..
 "Natural Heat" - You can warm yourself via the steam pipes tapping the water beneath the ground. Photo by Derrick Story.