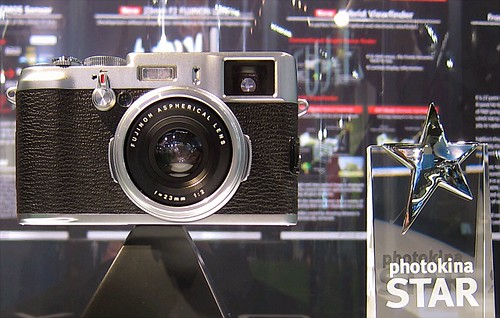
Awarded a photokina STAR award, the FinePix X100 reminds me of the finely machined cameras of the 1970s. The top level dials are all metal, the body is constructed of magnesium alloy, and the trim is leather. The camera features an APS-C CMOS sensor, 23mm (35mm equiv) f/2 Fujinon lens, and the hybrid viewfinder can switch from optical to EVF mode. Very innovative.
Fuji reps said we should see the camera in the Spring of 2011, probably for a hair less than 1000 Euros. It's a beauty.
Recently in Photography
Overall quality of product and displays has been top notch at photokina 2010. But these five items were my standouts for today. You'll notice that no prices are listed here. For some of the items, not all, if you have to ask, you probably can't afford... unfortunately that includes me too.
You can click on any of the images to view a larger version. All shots were captured with my Canon S90.
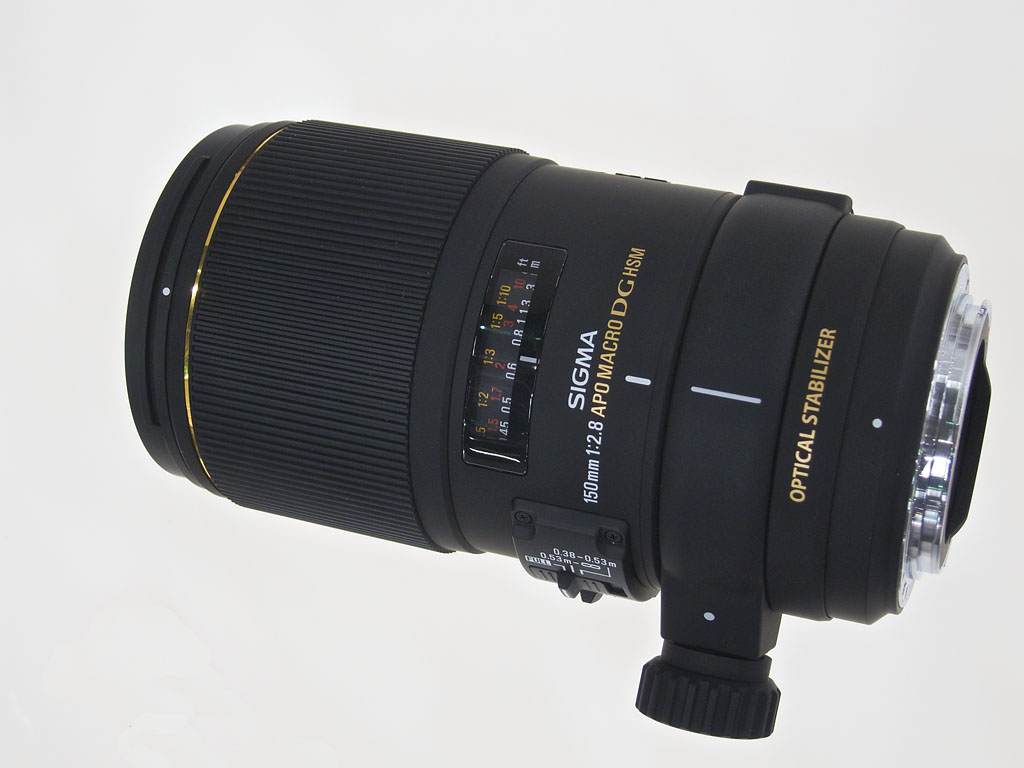 Sigma 150mm f/2.8 APO Macro DG HSM prime lens. This is a beautiful lens for portraits and close up work. It focused smoothly, felt great, and has image stabilization.
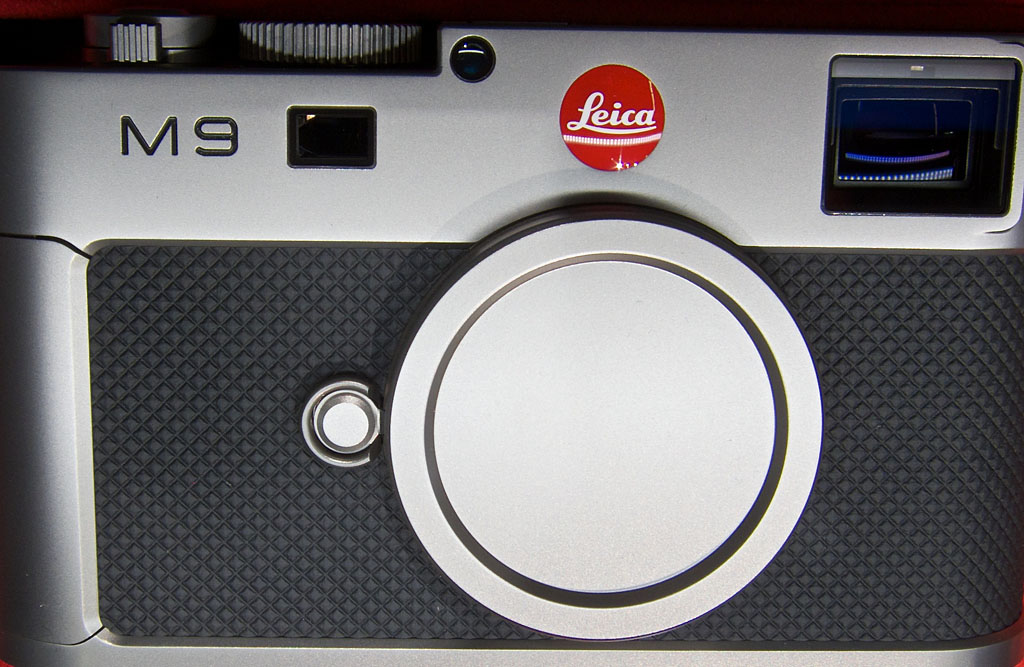 Normally I like black camera bodies. But this Leica M9 Titanium looks amazing. I think this is equipment artwork.
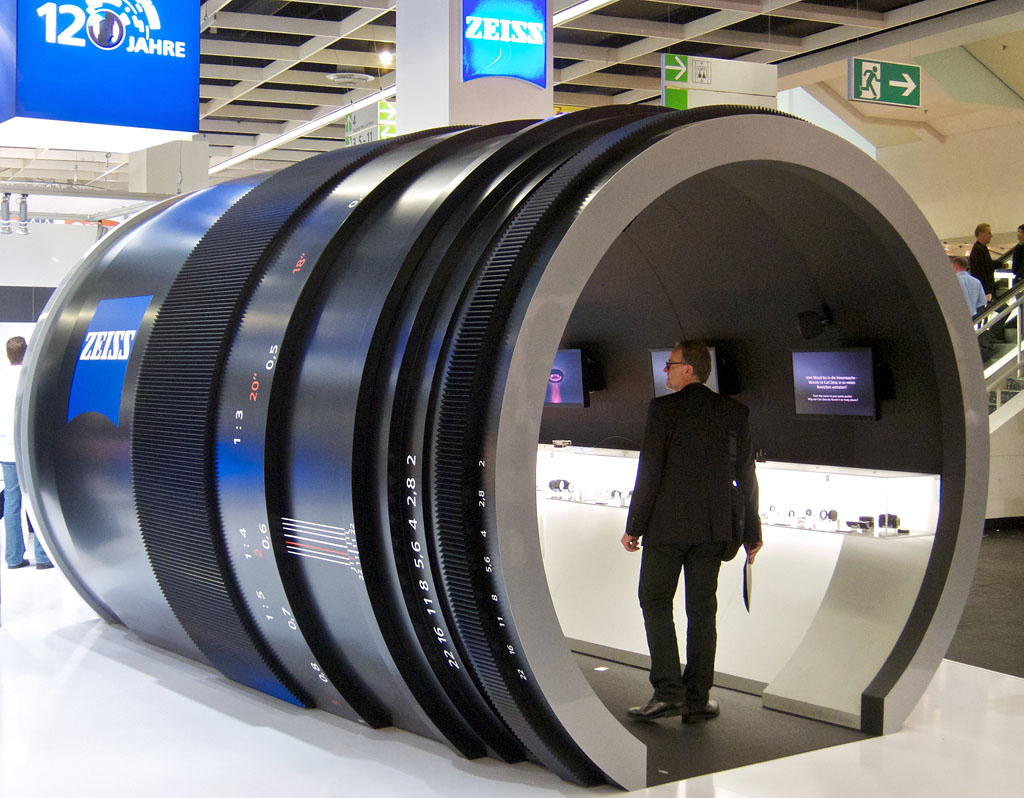 This giant Zeiss Lens barrel was one of the most clever displays I saw today. Inside was a mini museum. I thought it added fun touch to Hall 2.1, which was already one of my favorite locations.
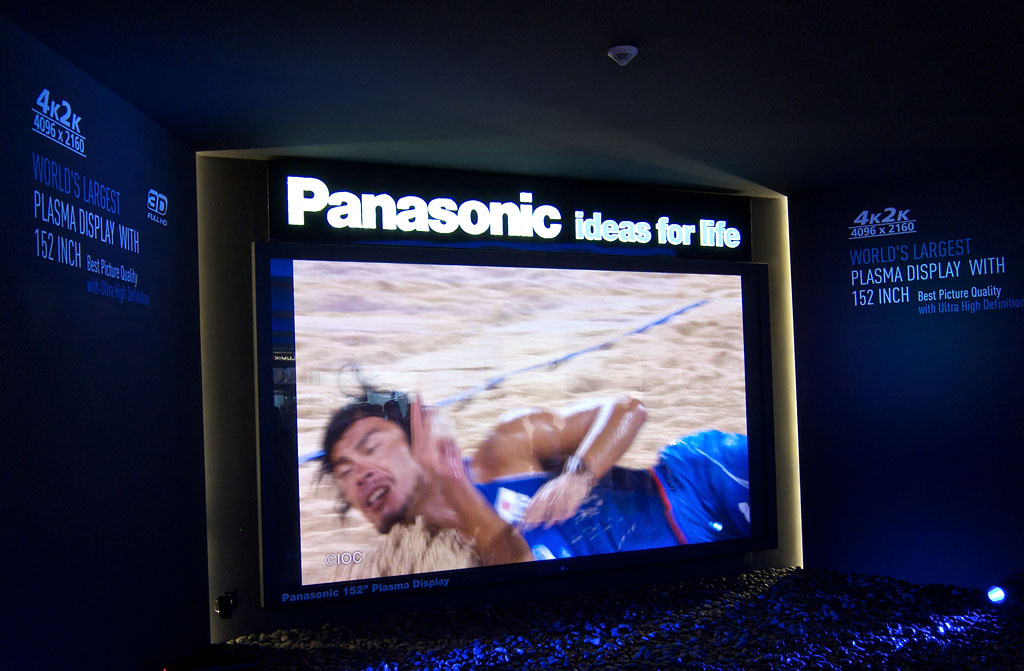 Panasonic 152 inch Plasma Display with HDTV and 3D. It was gigantic and crystal clear. If you watched 3D programming with the special glasses, it was better than your average movie theater.
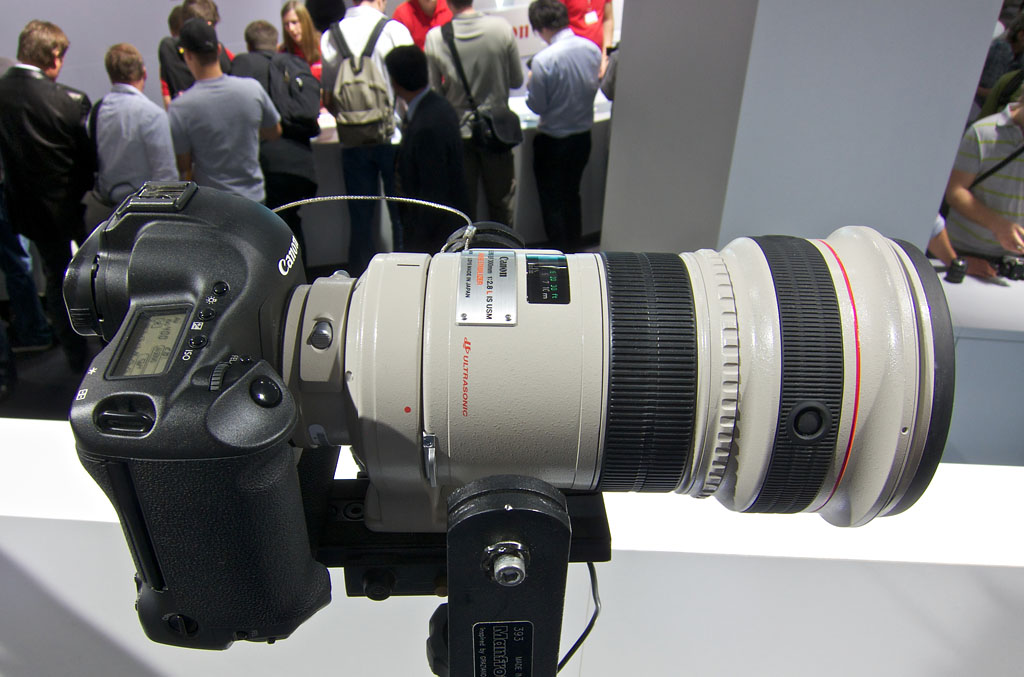 The Canon EF 300mm f/2.8L IS
 zoom is the telephoto I want. It's fast, hefty but not too big, and very sharp.

It's easy to get caught up with the "big shots": grand architecture and beautiful landscapes. But don't forget to mix in the little things too -- items such as the dinner presentation, interesting signs, and in this case, a style of beer service that I had never seen before.
I really like the straight cylinder glasses that beer is often served in here in Cologne, Germany. So when I spotted this waitperson navigating a crowd with 11 full glasses, I just had to ask for a shot (and then a beer, of course!). Maybe it was the intoxicating goodness of the delicious brew, but this turned out to be one of my favorite images of the night.
There's a lot of emphasis on equipment leading up to photokina in Cologne. And for good reason; many new announcements are made here. But what really impressed me after day one was the passion for photography that I witnessed.
 Photo by Derrick Story. Click on image for larger version.
People here just love this medium. It's both the picture and the camera. The tools and the art. Many of my discussions were framed by the desire to create better imagery. That doesn't mean we don't appreciate a finely designed camera. It's just that the conversation doesn't stop there.
I will certainly be talking about some of the new equipment that catches my eye. But first, I want to acknowledge the aesthetic eye, and that the goal is still to create photos that stir the emotions.
Munich, Germany -- They call them "beer tents." But they are actually huge structures that hold thousands of beer drinking customers. In the center is an elevated bandstand that fuels the party, sometimes to a fevered pitch.
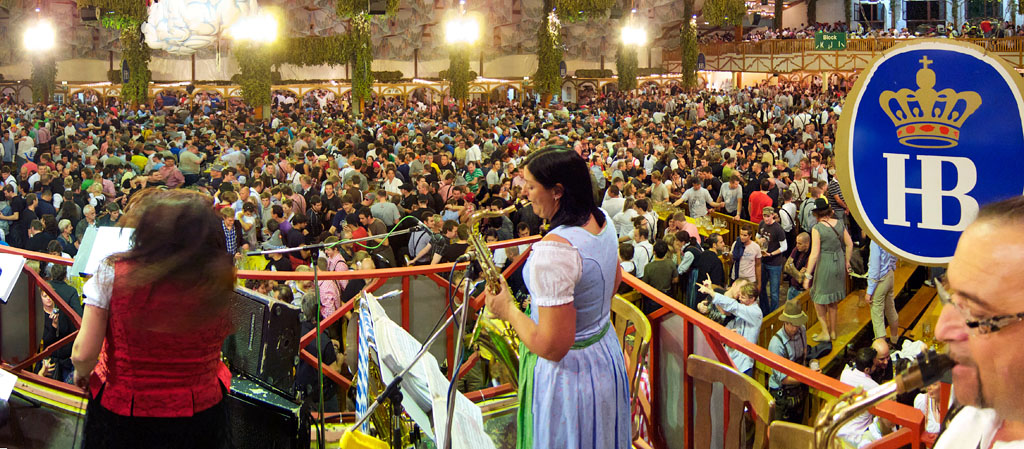 View in the HB tent from the elevated bandstand during Oktoberfest. Click on image for larger version.
I was already in a daze when I arrived on Sunday evening. Having left San Francisco early Saturday morning and flown to Munich by way of Philadelphia, I hadn't slept for over 24 hours as I wandered into the HB beer tent. I had never seen so many people drinking at once. Ever.
My friend, Oliver, who lives and works in Munich, knew the manager. When we said hello, he asked if I wanted a better view. "Of course!" I said. He then led us though locked doors to stairs that took us up to the bandstand. There we were. On top of the world looking down at thousands or party-goers, immersed in the band and Oktoberfest itself.
I knew my time there would be short. I began shooting with the Canon PowerShot S90 I had in my pocket. I remembered to record a string of frames that I hoped I could stitch together for a panorama. Here's the result. A view of Oktoberfest that very few ever see. Minutes later I was waved off the bandstand by the conductor. He had had enough of me. But I had my shots, and one heck of a view that I will never forget.

When you move the flash off the camera, it's easy to create natural-looking outdoor portraits. I like this technique because it lets me use the sun for rim lighting while I get to control the illumination of the face with my strobe.
In this example, I used a Canon Speedlite 580EX on a light stand triggered by a Canon STE2 Speedlite Transmitter
that was mounted in the hotshoe of a Canon EOS 5D Mark II
with a 70-200mm f/2.8 L zoom. I dialed the flash exposure back to -1.5 and the ambient exposure to -1.
Senior portrait shot on location using only the sun and a single off-camera flash for lighting. Click on image for larger version. Photo by Derrick Story.
I didn't use any diffusers on the flash itself, although I do angle it slightly upward and pull up the bounce flash card to slightly modify the light. I kept the 5D Mark II on a tripod so I could interact easily with my subject. The great thing about this set up is that I can work the shoot by myself without requiring assistants to hold reflectors, etc.
If you want to learn more about getting pro results from a single flash, be sure to check out my Off Camera Flash title on Lynda.com. I show you all sorts of helpful lighting techniques that are especially good for portraits.
More Off Camera Flash Tutorials
Off Camera Flash - Basic Techniques for Pro Results
Light Modifiers for Off Camera Flash
Off Camera Flash - The Single Light Portrait
"More Off Camera Flash" - Digital Photography Podcast 233
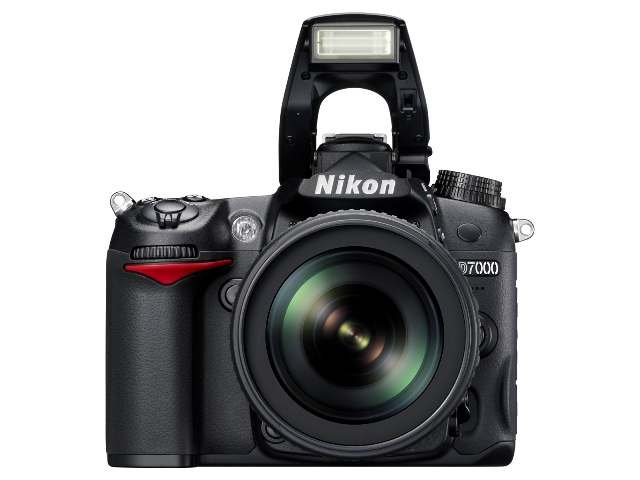
The Nikon D7000 is a camera that should have appeal to freelancers, photo journalists, and budding professionals. It combines durability ("protected by magnesium alloy top and rear covers and has durable sealing against dust and moisture") with 16.2 MPs and full HD video. Other goodies that I like include dual SD card slots, 6 fps burst mode, and an external microphone jack. And the best part is, all of these features are reasonably priced at $1,499 US.
If you're a Nikon shooter and ready to move up to a more robust DSLR body, take a look at the dpreview preview and the Chase Jarvis road test. I think Nikon found a sweet spot with the D7000.
Score one for Nikon. In a week where the two heavy hitters announced their premium compact cameras -- Nikon Coolpix P7000and the Canon PowerShot G12 -- Nikon upped Canon in one critical area: audio recording.
How ironic, right? These are cameras. They capture pictures. Yes, but they also record HD video (720p at 24 fps). And for many of us, having a device that doubles as a video recorder is a big deal. And everyone knows, except for Canon, maybe, that audio is half of video. So what am I talking about? Nikon included an external audio jack on the P7000 and Canon did not on the G12. If you want to use these devices to record video for publishing, one of them is going to give you a more professional product (Nikon P7000).
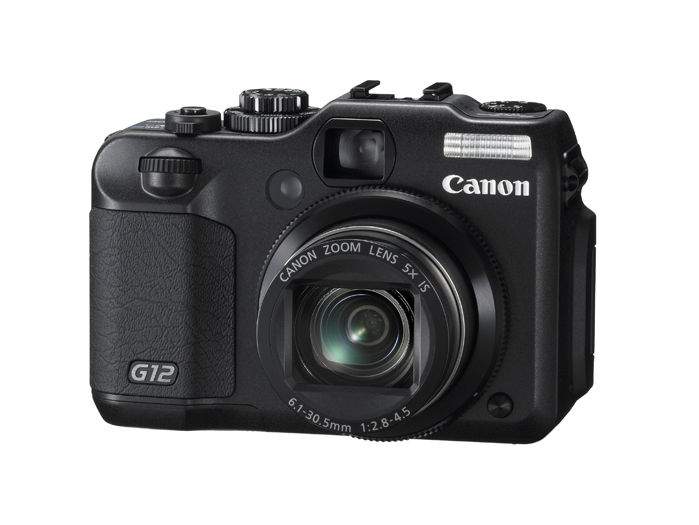
That doesn't mean that Canon slacked on the G12. The specs look great. But without external audio, I might as well stick with the Canon PowerShot S95 and save myself a few bucks, not to mention size and weight. I'll keep recording video with the 5D Mark II... for now, anyway.
In terms of photo assignment preparation, Germany is not a sunny beach on the Hawaiian Islands. At photokina, I have copious amounts of photos to shoot, gigabytes of video to record, hours or audio to capture, and lots of publishing. As much as I love my Canon S90 and iPad, I need the big guns for this trip. And I need to pack all that equipment wisely so I can move it from California, to Munich, to Cologne. This week I talk about DSLRs, fast lenses, and the Lowepro Pro Trekker 300 AWbackpack. I'm going to pack tight and fly right. Tune-in to find out how.
I've also published an article about bringing your gear on a plane, Make Sure Your Carry-On Gear Gets Onboard, if you want more information.
Listen to the Podcast
You can also download the podcast here (29 minutes). Or better yet, subscribe to the podcast in iTunes. You can support this podcast by purchasing the TDS iPhone App for only $2.99 from the Apple App Store.
Monthly Photo Assignment
Saturation is the September 2010 Photo Assignment. You can read more about how to submit on our Member Participation page. Deadline for entry is Sept. 30, 2010.
TDS Autumn 2010 Photography Workshop
The next TDS Photography Workshop will be Oct. 16-18, 2010. The event is sold out. But, you can place your name on the reserve list for the next workshop. Just drop me a line.
More Ways to Participate
Want to share photos and talk with other members in our virtual camera club? Check out our Flickr Public Group. It's a blast!
Podcast Sponsors
Red River Paper -- Try the $7.99 Sample Kit.
Make Your Photos Sizzle with Color! --
Technorati Tags:
digital photography, podcast, technique, Technology, The Digital Story, tips
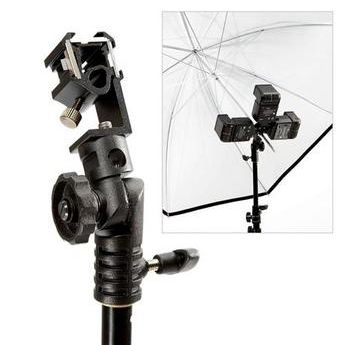
Wireless off-camera flash is terrific for location portraits and shooting on the go. But sometimes a single flash just doesn't have enough output. A simple solution is the Lastolite Triflash Bracket for $65. The bracket works with your existing light stands and umbrellas. But it allows you to mount up to three flashes on a single stand. There's the pop you're looking for.
I also read about a new version of this device called the Lastolite TriFlash Sync. It "features a built in sync system allowing the photographer to fire up to three flash guns from one triggering device. Featuring a built-in slave cell, the Lastolite TriFlash Sync can be adjusted to allow for none, 1, 2 or 3 pre flashes if required." But I haven't been able to find a dealer for this device yet. Will keep you posted if I do.
If you like this kind of stuff, be sure to check out my Off Camera Flash title on Lynda.com. I show you all sorts of helpful lighting techniques that are especially good for portraits.
More Off Camera Flash Tutorials
Off Camera Flash - Basic Techniques for Pro Results
Light Modifiers for Off Camera Flash
Off Camera Flash - The Single Light Portrait
"More Off Camera Flash" - Digital Photography Podcast 233
<< 1 2 3 4 5 6 7 8 9 10 11 12 13 14 15 16 17 18 19 20 21 22 23 24 25 26 27 28 29 30 31 32 33 34 35 36 37 38 39 40 41 42 43 44 45 46 47 48 49 50 51 52 53 54 55 56 57 58 59 60 61 62 63 64 65 66 67 68 69 70 71 72 73 74 75 76 77 78 79 80 81 82 83 84 85 86 87 88 89 90 91 92 93 94 95 96 97 98 99 100 101 102 103 104 105 106 107 108 109 110 111 112 113 114 115 116 117 118 119 120 121 122 123 124 125 126 127 128 129 130 131 132 133 134 135 136 137 138 139 140 141 142 143 144 145 146 147 148 149 150 151 152 153 154 155 156 157 158 159 160 161 162 163 164 165 166 167 168 169 170 171 172 173 174 175 176 177 178 179 180 181 182 183 184 185 186 187 188 189 190 191 192 193 194 195 196 197 198 199 200 201 202 203 204 205 206 207 208 209 210 211 212 213 214 215 216 217 218 219 220 221 222 223 224 225 226 227 228 229 230 231 232 233 234 235 236 237 238 239 240 241 242 243 244 245 246 247 248 249 250 251 252 253 254 255 256 257 258 259 260 261 262 263 264 265 266 267 268 269 270 271 272 273 274 275 276 277 278 279 280 281 282 283 284 285 286 287 288 289 290 291 292 293 294 295 296 297 298 299 300 301 302 303 304 305 306 307 308 309 310 311 312 313 314 315 316 317 318 319 320 321 322 323 324 325 326 327 328 329 330 331 332 333 334 335 336 337 338 339 340 341 342 343 344 345 346 347 348 349 350 351 352 353 354 355 356 357 358 359 360 361 362 363 364 365 366 367 368 369 370 371 372 373 374 375 376 377 378 379 380 381 382 383 384 385 386 387 388 389 390 391 392 393 394 >>
Main Index |
Monthly Archives |
Category Archives
Promotions


![]()


Subscribe


